Overview
The Common Reports article identifies the most commonly requested searches and includes this report type in iCIMS' Applicant Tracking (formerly Recruit). To learn how to run searches and reports in the system, see Creating a Person Search. To learn how to save a report for future use, see Saving Search & Output Templates.
Candidate Source Reports
Helpful Hint: When creating a search, it is helpful to first come up with a clear idea for your report. Think about which candidates you want to report on (the "Who"), what details you want to know about them (the "What"), and how you want to organize the information (the "How"). The more specific you are with your idea, the easier it will be to break it down into these sections, which will help you choose the right Keywords and Filters (for "Who"), Columns (for "What") and/or Group-Bys and Sort-Bys (for "How") for your report. This three-section concept is used below to create a candidate source report.
Scenario: The head of Talent Acquisition at your company wants to know which sources are bringing in the most candidates to help focus recruiting efforts.
1. Break your report idea down into the three sections to help determine the best way to create your search:
- Who are you reporting about: Using filters, you can narrow down your results to candidates who have created (or updated) their profile within the current year.
- What do you want to know about them: Using columns, you can view these candidates' source information.
- How would you like this information organized: Using group-bys and sort-bys, you can group and sort your search results by the candidates' source information.
2. To create your search in iCIMS' Applicant Tracking, from the top menu bar, select Search > Person > Candidate. The "Who," "What," and "How" directly correlate with the three sections (A, B, and C, respectively) outlined in the below image.
- Tip: This report will provide information on candidates who have applied to specific jobs, as well as those who have submitted themselves for general consideration. To view source information for only candidates that have applied to specific jobs, run this search as a Recruiting Workflow search instead; see Hired Candidate Source Reports for an example.
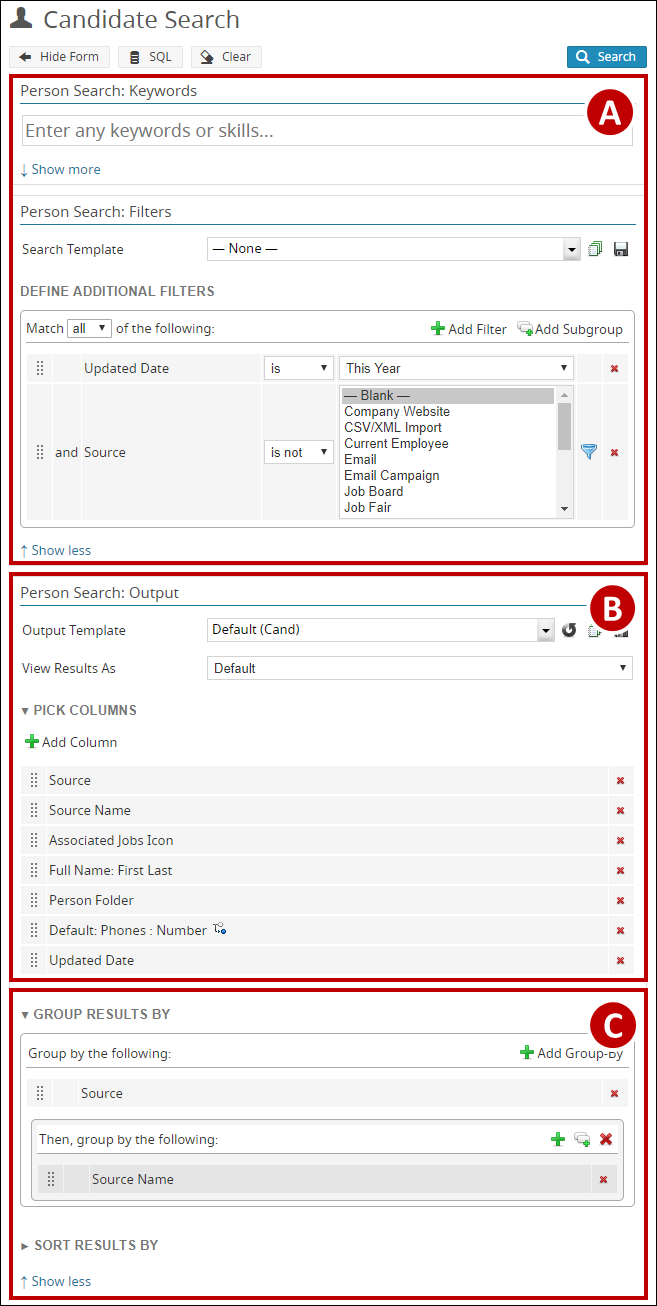
A.
Keywords and Filters: Who are you reporting about?
To focus your search on candidates who created or updated their profile within the current year, add a filter for Updated Date. To remove any candidates who did not supply source information, add a filter for Source.
- Keywords: N/A for this report.
- Filters:
1. Click Add Filter and add Updated Date. The selection path is General > Updated Date.
2. Select This Year from the list to the right of the added filter.
3. Click Add Filter and add Source. The selection path is Cand. Details Tab > Source.
4. From the first dropdown, select is not. From the source list, select – Blank –.
B.
Columns: What do you want to know about these candidates?
To capture the most detailed source information, use both the Source and Source Name columns. Source is the general source and Source Name is information that specifies the general source, if applicable (e.g.,
Job Board is a Source, whereas
CareerBuilder is a Source Name). Not all candidates will have a Source Name.
- Click Add Column and add Source. The selection path is Cand. Details Tab > Source.
- Click Add Column and add Source Name. The selection path is Cand. Details Tab > Source Name.
C.
Group Results By and Sort Results By: How would you like this information organized?
To quickly view the number of candidates that came from each source, group your search results by Source. Then, add another level of grouping by Source Name, to easily see the number of candidates that came from each more specific source. Lastly, sort the results in ascending (A to Z) order, if desired.
- Click Add Group-By and add Source. The selection path is Cand. Details Tab > Source.
- Click Add Level to add a secondary grouping. A Then, group by the following box will display.
- Within this new box, click the Add Group-By (green plus sign) icon and add Source Name. The selection path is Cand. Details Tab > Source Name.
- Sort Results By (optional):
- Click Add Sort-by and add Source, using the same selection as above. Choose Ascending (A to Z) to alphabetize your search results by Source.

