Overview
iCIMS Candidate Relationship Management (CRM) is a powerful tool that organizations can use to recruit, attract, and engage qualified candidates. Working seamlessly with iCIMS Applicant Tracking (ATS), CRM provides search, email, and event management capabilities that enable recruiters to find and communicate with the best-matching candidates for their jobs.
iCIMS Candidate Experience Management (CXM) combines the functionality of traditional candidate relationship management technology with AI-enhanced marketing automation capabilities to assess candidate engagement and automate campaigns.
For more on CXM and CRM, review the Getting Started with iCIMS Candidate Experience Management (CXM) and iCIMS Candidate Relationship Management (CRM) article.
This article includes the following sections to assist you in using Event Management in CXM and CRM:
About Event Management in CXM and CRM
CXM and CRM provide an efficient way for your organization to set up and manage the logistics associated with hosting in-person and virtual events. The system works in conjunction with the Event Management mobile app, which allows you to capture attendee information at events (either online or offline) and easily transfer that data to CXM or CRM. Attendees become part of your database, enabling you to take action on them and make them part of your talent pipeline.
Using the Event Management Page
Events are created and managed through the Event Management page, accessible by selecting the Event Management (calendar) icon in the vertical navigation menu on the left.
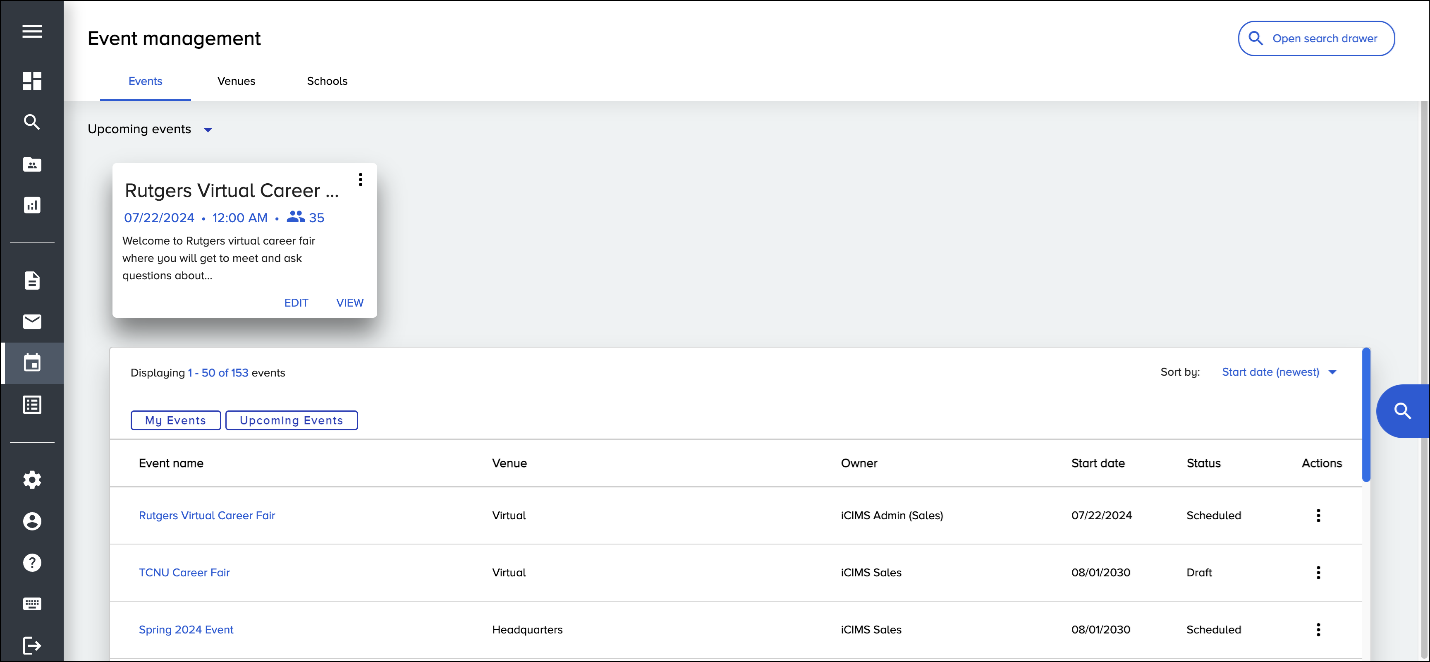
This page includes four tabs at the top:
- Events: A listing of your organization's events. Here, you can access Event profiles to view basic information about the event, set up the event registration page, and add team members associated with the event.
- Venues: A listing of your organization's venues (i.e., locations), which can be assigned to individual events.
- Schools: A listing of schools that your organization partners with. These can also be assigned to individual events.
- Question Library: A pre-populated listing of questions/fields that can be added to the registration page and mobile app for individual events. This listing is read-only and cannot be configured.
- Note: The Question Library tab will be unavailable if you have Form Management enabled in your system. Through Form Management, your organization can create different sign-up forms, each configured with specific sections and questions.
These tabs are discussed in more detail in the sections below.
Accessing the Events Tab
The Events tab, which opens by default upon selecting the Event Management icon, lists Upcoming Events at the top of the page followed by all of your organization's events in table format.
Upcoming Events highlights events in individual cards. You can update this section to display Recently Completed events, if desired, by selecting the down arrow to the right of the Upcoming Events heading and then selecting Recently Completed.
The main table of events includes buttons for two optional filters to the upper left: My Events and Upcoming Events.
The following columns are included in the table:
- Event Name: The name of the event. Selecting an event name in the table opens the profile for that event. For more information, review Reviewing Event Profiles below.
- Venue: The venue, or location, of the event. For more information, review Accessing the Venues Tab below.
- Owner: The email address of the person who created the event.
- Start Date: The exact date the event started or is scheduled to start.
- Status: The current status of the event. Events have one of the following statuses:
- Draft: The event has not yet been scheduled; event setup is currently in development.
- Scheduled: The event is scheduled for a specific date; event setup is complete.
- Active: The event is currently running. (A Scheduled event moves to Active 24 hours before the event start date/time.)
- Completed: The event has ended. (An Active event moves to Completed once the end date/time has passed.)
Tip: Select the Sort By dropdown at the top right to sort results in the table as desired. By default, the table sorts by Start Date (Ascending). To set a different default, contact iCIMS Technical Support.
Searching for Events
Search for events in the table by selecting the magnifying glass at the top (next to the Event Management header) or on the right border. This opens the Search Events panel, where you conduct your search.

This panel includes the following search options:
- Search Event Name: As you type a name in this field, the system automatically filters results in the table with events matching that name.
- Primary Filters: Four filters are available to narrow your results:
- Select Venue: A search field to select a particular venue; only events with that venue display.
- Select School: A search field to select a particular school; only events with that school display.
- Select Owner: A search field to select a particular email address; only events with that address as its owner display.
- Select Status: A dropdown to select a particular status; only events with that status display (None, Draft, Scheduled, Active, Completed, or Archived).
- Event Type: A dropdown to select a particular event type; only events with that type display (None, In-Person, or Virtual).
Creating New Events
To create a new event, select the circular + button at the bottom right of the Events tab. This opens the Create Event process, which includes four steps, as outlined below.

Step 1: Event Details
Enter all basic information about the event, including:
- Event Name (required): Type in the name of your event.
- School: Attach a school to your event. Type in the School field to find an existing school, or select the Create School (plus sign) icon to create a new school.
- Note: Selecting this icon opens the Create School window, where you enter the name of the school, along with the name, email, and phone number of your primary point of contact there. After selecting Save, the school is added to the list of schools on the Schools tab for future selection. For more on creating schools, review Creating New Schools below.
- Event Type: Select In-Person or Virtual.
- Venue: Attach a venue to your event. Type in the Venue field to find an existing venue, or select the Create Venue (plus sign) icon to create a new venue.
- Note: Selecting this icon opens the Create Venue window, where you enter the name, address, and city of the new venue. After selecting Save, the venue is added to the list of venues on the Venues tab for future selection. For more on creating venues, review Creating New Venues below.
- Tip: When you select Virtual as the Event Type above, the Venue field becomes a text field to enter the URL for attendees to join the virtual event.
- Start Date
- End Date
- Start Time
- End Time
- Event Time Zone
- Event Category: Select from Campus, Career Fair, Networking, or Interview.
- Event Cost
- Company Display Name: Use the name auto-populated in this field (based on your login information), or select the X icon to clear that name and enter your own.
- Note: This is what will display on the mobile app when attendees input their information on a tablet or iPhone.
- Event Owner
- Event Description: Enter a description that provides enough information about the event without being too lengthy.
- Note: This is an internal description and won't be seen by candidates.
When finished, select Next to move to Step 2.
Step 2: Team
The second step, which is optional, allows you to add employees from your organization to your event. These are individuals who are involved in the event in some way, such as other recruiters.
To add a new team member, select the Team Members field and select a person from the list of auto-suggestions. (You can also type a name in the field to find specific employees.) The employee you select will then display in a table on the page, which includes each person's name, phone number, and email address.
When finished, select Next to move to Step 3.
Tip: To remove a team member from the table, select the red Remove link in their row in the table.
Step 3: Registration
This step features different sections pertaining to event registration:
- Attendee Check-in Page: To enable and set up a check-in page for candidates attending your virtual event.
- Registration Page: To enable and set up your event registration page.
- Questions: To configure the questions/fields that display on the registration page and mobile app. (This section is unavailable if Form Management is enabled in your system.)
Note: Candidates sign up for your event through the registration page, which marks them as Registered for that event. They confirm their attendance at the event through the check-in page, which changes their status to Attended.
Tip: After setting up the information in this step, view and edit it through the Event profile, as outlined in Reviewing Event Profiles below.
Attendee Check-in Page
The Attendee Check-in Page section includes a toggle to generate a check-in page that you can send to your event attendees. This generated page includes fields for First Name, Last Name, and Email, all of which are required to complete the check-in process.
This toggle is off by default. When it is switched on, a text field opens underneath to configure the page's header (maximum 100 characters).
Note: If you save the event with the toggle enabled, an Attendee Check-in subtab displays on that event's profile under the Registration tab. This subtab includes the URL and QR code for attendees to access the check-in page.
Registration Page
The Registration Page section includes a toggle to generate your registration page, which if off by default. When this toggle is switched on, you can configure the following elements:
- Select Sign Up Form (only available if Form Management is enabled in your system): Select an existing sign-up form to place on the registration page. This field is required.
- Note: When you select a form, the system creates a duplicate of that form that cannot be edited. This means that if you make changes to the form on the Form Management page, those changes won't be reflected for the event (unless you select the edited form again in this field).
- Registration Page Headline: Add a headline that will display at the top of the registration page (maximum 100 characters).
- Event Description: Add a short description of the event that provides instructions and other information about the event (maximum 300 characters).
- Thank You Page Headline: Add a headline that will display at the top of the registration thank-you page. The thank-you page opens for the candidate after they complete their event registration (maximum 100 characters).
- Thank You Page Message: Add a short message to go along with the header on the registration thank-you page (maximum 300 characters).
Questions
If you don't have Form Management enabled in your system, a Questions section will display, allowing you to add up to 15 questions to an event. To add a new question, select the Questions field and select an option from the list of auto-suggestions. (You can also type a question name in the field to find specific questions.)
The question you select will then display in a table on the page, which includes the following columns:
- Question: The name of the question from the Question Library.
- Field Mapping: The field on the Candidate profile that corresponds to the question (i.e., the information entered for the question on the form will populate that profile field).
- Field Type: The type of question as presented on the form (e.g., date, checkbox).
- Required: A toggle to make the question required on the form.
Note: The Name and Email questions/fields are included on the registration page by default and will not display in the table.
Tip: To remove a question from the table, select the red Remove link in its row in the table.
Step 4: Communication
This optional step enables you to set up an automated reminder email and/or thank-you email to go out to candidates attached to the event. These emails are sent automatically once the event's status changes:
- The reminder email is sent when the event moves from the Scheduled status to the Active status.
- The thank-you email is sent when the event moves from the Active status to the Completed status.
Note: You must select an email template from your system to use for each of these event emails. iCIMS recommends that you create these templates or determine which existing templates to use prior to starting the configuration process below. For more on email templates, review the article
Creating Emails and Email Templates in iCIMS Candidate Experience Management (CXM) and iCIMS Candidate Relationship Management (CRM).
To configure these event emails, select the link for either Configure Reminder Email or Configure Thank You Email. This opens a window with the following fields:
- Email Subject: Enter a subject line for your email.
- Template: Select your template by typing in this field and selecting one of the matching auto-suggestions. Once you select a template, another field for Template Preview opens underneath displaying the content of that template.
If you need to make changes to the email content, select the Edit Design button from the window; this opens CXM and CRM's WYSIWYG (What You See Is What You Get) editor, where you can make various text and design updates.
Once you're satisfied with your email, select the Save Changes button from the window.
Publishing and Saving Events
To publish an event, enable the Draft/Publish toggle (making it yellow) and select Submit at the top. When you publish an event, the registration page for that event becomes active, and the event becomes available to be added to the event management mobile app (to capture attendee information).
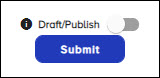
If you're not ready to publish an event but want to save your information as a draft, make sure the Draft/Publish toggle is disabled (which is the default) before selecting Submit. Your new Event profile will be created with the information you've entered so far, and you'll be able to make further edits and updates to the profile before publishing.
Notes:
- Once you select Submit, a confirmation message displays indicating that the event was created successfully, and the newly created Event profile will immediately open. For more on Event profiles, review Viewing Event Profiles below.
- Access any step (no matter what step you're currently on) by selecting the name of the step from the top menu.
- If you navigate away from the event creation process, a message displays asking if you want to discard your changes.
Reviewing Event Profiles
On the Events tab, selecting an event name from the table opens the profile for that event. An Event profile includes all information about that event; you can also take various actions from the profile, such as editing and archiving the event.
Each event profile features four tabs at the top:
- Basic Information: Includes the information entered in Step 1: Basic Information.
- Team: Includes the information entered in Step 2: Team.
- Registration: Includes the information entered in Step 3: Registration.
- Communication: Includes the information entered in Step 4: Communication.
These tabs include the most up-to-date information about the event and are outlined in more detail below.
Basic Information
The Basic Information tab, the first tab that displays when opening an event profile, includes the following sections:
- Basic Information: Lists information about the event, such as its venue and start/end date.
- Target Audience: Lists the event category and school assigned to the event.
- Candidate Statistics: Lists statistics for the event, including the number of pre-registrants, attendees, and total candidates.
- Tip: In this section, select the statistic for Registered or Attended to review all candidates on the Candidate Search page who are associated with that event and have that status.
- New Event Note: Allows you to enter any sort of note about the event (e.g., preparation details, attendee feedback).
- To create a new note, enter text in the box and select Save Note. All saved notes display in a section underneath that titled Recently Saved Noted, which includes the exact date/time each note was created and last updated.
- To delete a saved note, select the trash bin icon for that note in the Recently Saved Notes section.
- To edit a saved note, select the pencil icon.
- To make a note of yours private, check the box for Make Private. (This will turn the box yellow.)
Team
This tab lists the team members currently included on the event.
Registration Page
This tab includes three subtabs:
- Registration Page: To view the registration page for this event, copy the link for that page, download the registration QR code, and view the branding for the registration thank-you page.
- Registration Questions: To view the questions/fields currently included on the event, which display on the registration page and mobile app. All questions are taken from the Question Library tab on the main Events page (or from the specific sign-up form you selected for the event).
- Attendee Check-in: To access the URL for the generated check-in page, download the QR code for the page, and view the page's header (branding).
Communication
This tab includes the reminder and/or thank-you emails configured for your event in table format. The following columns are included:
- Email Subject Line: The subject line of the email. Selecting this link (or anywhere in the row) opens a preview of that email.
- Send Date: The date the email went out to candidates.
- Sent: The number of candidates the email was sent to.
- Delivered: The number of candidates the email was successfully delivered to.
- Open: The number of recipients who opened the email.
- Clicked: The number of recipients who clicked a link in the email.
- Bounced: The number of hard-bounces (i.e., emails that did not and will not get delivered). This is often caused by an invalid email address.
Notes:
- If you have not set up reminder and thank-you emails for your event, the Communication tab displays a Setup Email button, which directs you to Step 4 (Communication) of the Edit Event process. For more information, review Editing an Event below.
- Once a reminder or thank-you email has been sent to attendees, it cannot be edited or deleted.
Updating and Taking Action on Events
At the top right of each Event profile is an Actions button (accessible from any of the five tabs). Selecting this button opens a list of different actions to take on that event:
- View Candidates
- Edit Event
- Clone Event
- Archive Event
These options are discussed in more detail in the sections below.
Reviewing Event Attendees
To view a list of all candidates associated with a particular event, select View Candidates from the Actions button on that Event profile. This opens the Candidate Search page with the results automatically filtered by that event (i.e., the event is included in the Select Events filter on the Search Candidates panel).
Notes:
Editing an Event
To edit an Event profile, select Edit Event from the Actions button on that profile. This opens the Edit Event process, a replication of the Create Event process with the same four steps. Make edits or updates to fields in any of the four steps and select Submit at the top right to finalize your changes.
Notes:
- In Step 3: Registration, if you switch the Generate Registration Page toggle from on to off and then save your changes, the registration page and link for that event will be deactivated.
- In Step 4: Communication, if a reminder or thank-you email has not yet been set up, an Add Email button displays next to that email in the table. After the email has been added, Edit and Delete buttons display.
- Once a reminder or thank-you email has been sent to attendees, the Edit and Delete buttons for that email disappear from the table, and editing capabilities are removed from its preview window.
Cloning an Event
You have the option to create a new Event profile by working off an existing profile. To do this, make a duplicate of the profile by selecting Clone Event from the Actions button. This opens the Clone Event process, another replication of the Create Event process. All information from the profile is pre-filled in for all four steps, except the Event Name. (A new name is required.)
Keep information or make changes as necessary. Once you select Submit, the new event is added to the table on the main Events page.
Archiving an Event
If you have an event that is no longer active or relevant, you can archive it so it is no longer searchable from the main Events page. To archive an event, select Archive Event from the Actions button on its profile and then select Archive from the Archive Event window.
Note: Archiving an event eliminates it from search results but does not completely delete it from the system.
Accessing the Venues Tab
Venues are locations for your events; these can be as general or specific as desired. For instance, you can create one venue for a company's corporate headquarters and separate venues for individual buildings or auditoriums on that campus.
The Venues tab lists all of your organization's venues in table format. The following columns are included:
- Venue Name: The name of the venue. Selecting a venue name in the table opens the profile for that venue. For more information, review Viewing Venue Profiles below.
- Address: The address of the venue.
- Contact: The contact person for the venue, including their name, email address, and/or phone number.
Tip: Select the dropdown at the top right to sort results by any of these options:
- Venue Name (A-Z or Z-A)
- Address (A-Z or Z-A)
- Venue Contact (A-Z or Z-A)
- Updated Date (Ascending or Descending)
Searching for Venues
From the Venues tab, search for venues by selecting the magnifying glass at the top (next to the Event Management header) or on the right border. This opens the Search Venues panel, where you conduct your search.
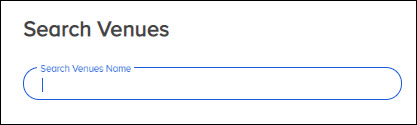
This panel includes the following search option:
- Search Venue Name: As you type a name in this field, the system automatically filters results in the table with venues matching that name.
Creating New Venues
To create a new venue, select the circular + button at the bottom right of the Venues tab. This opens the Create Venue page, which includes two sections:
- Venue Details: Enter basic information about the venue, including these fields: Venue Name (required), Country, Address (required), City (required), State/Province, and Zip Code.
- Venue Contact Details: Enter details for the point of contact at the venue, including their first and last name, email address, and phone number.
When finished, select
Submit at the bottom to save the new venue. The venue will then be added to the table on the Venues tab.
Reviewing Venue Profiles
On the Venues tab, select a venue name from the table to open the profile for that venue. This profile includes all information needed about that venue.
Each Venue profile includes two sections:
- Basic Information: Includes the latest information about the venue, such as address, phone number, created date, and updated date.
- Note: This section lists the same fields used when creating the venue, as outlined in Creating New Venues above.
- New Venue Note: Allows you to enter any sort of note about the venue (e.g., availability details, size and square footage). Venue notes work the same as event notes, which are described in Viewing Event Profiles above.
Editing and Archiving Venue Profiles
To edit a Venue profile, select the Actions button at the top right of the profile and select Edit Venue. This opens the Edit Venue page, which includes the same fields as the Create Venue page. Update any of the fields here and select Save to save your changes.
To archive a Venue profile, select Archive Venue from the Actions button and select Archive in the popup that opens to proceed. Archiving a venue prevents it from being searched; it does not completely delete it from the system.
Accessing the Schools Tab
The Schools tab enables you to create and maintain a list of academic institutions (e.g., universities) that you partner with on events. Each school on this tab has its own dedicated profile, and like venues, you can attach schools to individual events.
This tab, organized in table format, includes the following columns:
- School Name: The name of the school. Selecting a school name in the table opens its profile. For more information, review Viewing School Profiles below.
- Primary Contact Name: Your main point of contact at the school.
- Contact Phone: The phone number of your main point of contact at the school.
- Contact Email: The email address of your main point of contact at the school.
Events in CXM or CRM can have both a venue and school attached. For instance, when creating an event for an off-campus recruitment fair, you can add a venue for the event hall, along with the school whose students are invited.
Tip: If you hold events in several buildings at a school, you may want to create separate Venue profiles for each location. This allows you to attach both the school and the specific school venue to an event.
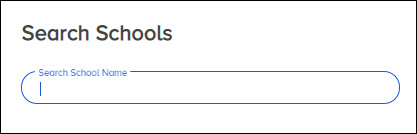
Searching for Schools
Searching for schools works similarly to venues. From the Schools tab, select the magnifying glass at the top or on the right border, and search for a school using the search panel that opens. As you type in the Search School Name field, the system automatically filters results in the table with schools matching that name.
Creating New Schools
To create a new school, select the circular + button at the bottom right of the Schools tab. This opens the Create School page, which includes the following sections:
- School Details: Enter basic information about the school, including School Name (required), Country, Street Address, City, State/Province, and Zip Code.
- School Contact: Enter details for any contacts at the school. Fields in this section include First Name (required), Last Name (required), Email (required), Department. Title, and Phone Number.
- To add additional contacts, select Add Contact at the bottom of this section. This opens another set of fields to enter that person's information.
- To make one of your contacts your main point of contact, select the toggle for Primary Contact next to their name. Since each school can only have one primary contact, you may need to disable the toggle for the current primary contact before enabling it for another.
- To remove a contact, select the Remove link for that person.
- Alumni Information: Enter details for any notable alumni you want to addl. The fields here are the same ones used for the School Contact fields.
- To add additional alumni, select Add Alumni at the bottom of this section and enter the new person's information.
- To remove alumni, select the Remove link for that person.
When finished adding information, select Submit at the bottom to save the new school. The school will then be added to the table on the Schools tab.
Reviewing School Profiles
On the Schools tab, select a school name from the table to open the profile for that school. Each School profile features the following sections:
- School Details: Includes the latest information about the school, such as address, phone number, created date, and updated date.
- Contacts: Includes the information for all contacts added to the school.
- Alumni: Includes the information for all alumni added to the school.
- Recent Events: Lists the number of events on which the school is included. Counts are broken up by event status: Draft, Scheduled, Active, and Completed. (For more on these statuses, review Accessing the Events Tab above.)
- School Notes: Allows you to enter any sort of note about the school (e.g., link to school calendar). School notes work the same as event and venue notes.
Editing and Archiving School Profiles
To edit a School profile, select the Actions button at the top right of the profile and select Edit School. Update any of the information on the Edit School page, and select Submit to save your changes.
To archive a School profile, select Archive School from the Actions button and select Archive in the popup that opens to proceed. Like venues, archiving a school prevents it from being searched but does not completely delete it from the system.
Accessing the Question Library Tab
The Question Library tab is the general repository for all questions/fields that can be added to the registration page and mobile app for individual events. When creating a new event, questions are selected in Step 3: Intake Form. You can always add or delete questions from an event by selecting Edit Event from the Actions dropdown at the top right of the profile and proceeding to the Intake Form step.
Note: If Form Management is enabled in your system, the Question Library tab will be unavailable. You will be able to add questions to your registration page by selecting a specific sign-up form (with questions already configured).
Searching for Questions
From the Question Library tab, search for questions by selecting the magnifying glass at the top or on the right border. This opens the Search Questions panel, where you conduct your search.
This panel includes the following search option:
- Search by Question: As you type a name in this field, the system automatically filters results in the table with venues matching that name.
Adding Candidates to Events from CXM and CRM
You can add candidates in your database to any Event profile using the Add to Event action. This functionality is available from all Candidate profiles, as well as any table where Candidate profiles can be accessed, such as the Candidate Search page and dedicated pipeline pages.
To access the Add to Event action:
- On a Candidate profile: Select Add to Event from the Actions button at the top right.
- From a candidate table: Select the checkbox next to the candidate(s) you want to add and then select Add to Event from the group of buttons that display at the top. Or hover your mouse over an individual candidate's row and select the Add to Event icon from the block at the far right.
In the Add to Event window that opens, select your event(s) from the Search for Events field and select Submit to add the candidates. Those individuals will immediately be added to the table on the selected Event profile(s) with the Registered status.
Notes:
- To designate your selected candidates as attendees of the event, select the toggle for Mark as Attended in the Add to Event window.
- To remove events from the Search for Events field, select the X next to the event name.

