Overview
iCIMS Candidate Relationship Management (CRM) allows you to build a database of qualified candidates you can consider when specific jobs or opportunities become available. These are candidates who applied to one of your positions or expressed interest in your organization, or whom your organization is interested in for future openings.
iCIMS Candidate Experience Management (CXM) combines the functionality of traditional candidate relationship management technology with AI-enhanced marketing automation capabilities to assess candidate engagement and automate campaigns.
For more on CXM and CRM, refer to the article Getting Started with iCIMS Candidate Experience Management (CXM) and iCIMS Candidate Relationship Management (CRM).
This article includes the following sections to assist you in using pipelines in CXM and CRM:
About Pipelines
Pipelines enable you to group candidates in your system based on location, skills, or any other criteria—allowing you to quickly find the best matches for open positions and target the right candidates for recruiting events and email campaigns. For example, you can organize candidates by keyword to find candidates with a particular word or phrase in their profile, like sales or human resources.
There are two types of pipeline in CXM and CRM:
- Standard pipelines (previously called groups) are populated manually by recruiters.
- Dynamic pipelines (previously called just pipelines) use a saved search to find candidates. When you create a dynamic pipeline, the system automatically adds candidates in your database who match that defined search. These matching candidates must be reviewed and approved by a recruiter to become part of the pipeline.
Note: Any pipeline can be changed from standard to dynamic or from dynamic to standard. For more information, review
Editing Pipeline Details below.
Using the Pipelines Page
Pipelines are accessed and managed in the system through the Pipelines page, accessible by selecting the Pipelines (file folder) icon in the vertical navigation menu. This page lists all your organization's standard and dynamic pipelines in table format. Selecting a pipeline name from the table opens the dedicated page for that pipeline, which is outlined in Reviewing Individual Pipelines below.
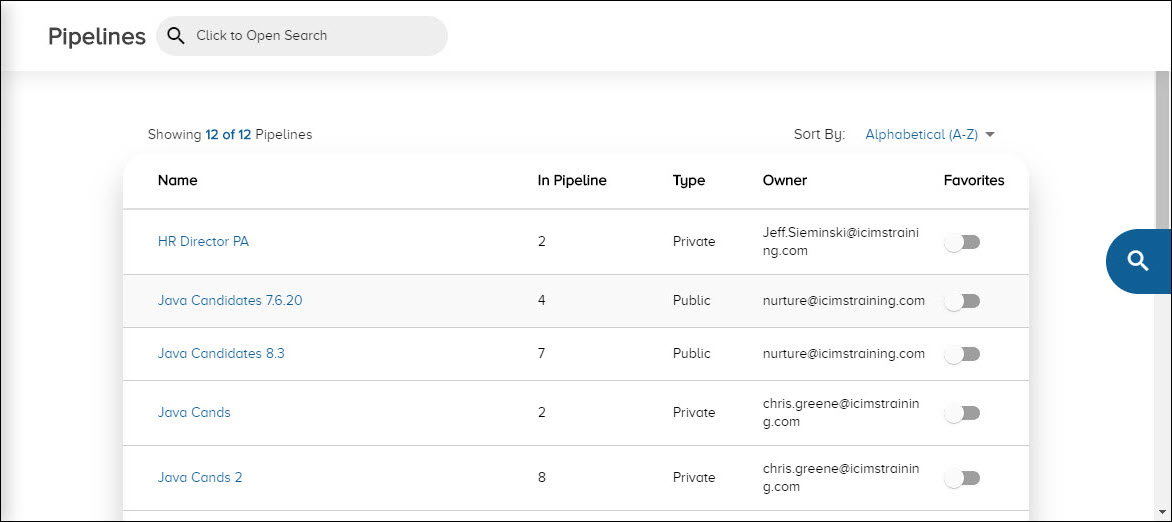
The following columns are included in the table:
- Name: The name of the pipeline. Selecting a pipeline name in the table opens the dedicated page for that pipeline, which displays the names of all candidates included.
- Dynamic Status: The designation of standard or dynamic.
- In Pipeline: The number of individuals in the pipeline. (For dynamic pipelines, candidates are considered "Unreviewed" and not part of the pipeline until a recruiter takes action on them, as discussed in Reviewing Candidates in a Pipeline below.)
- Unreviewed: A yes-or-no designation as to whether the pipeline has candidates needing review. (This column only applies to dynamic pipelines.)
- Categories: Any categories associated with the pipeline (e.g., design, sales). This column is off by default but can be enabled by submitting a case to iCIMS Technical Support.
- Sharing: The designation of public or private. A public pipeline can be viewed by all recruiters in your system, while a private pipeline can only be viewed by the pipeline owner and recruiter admins (as well as any recruiters the pipeline is shared with).
- Owner: The email address of the person who created the pipeline.
- Favorites: A toggle to designate a pipeline as a favorite. When searching for pipelines, you have the option to only display favorite pipelines, as discussed in Searching for Pipelines below.
Note: A recruiter admin can reorder these columns and remove certain ones, if desired, using the Configure Columns tab on the Admin Settings page. For more information, review the article Configuring Columns in iCIMS Candidate Experience Management (CXM) and iCIMS Candidate Relationship Management (CRM).
Tip: Use the Pipelines widget on the Dashboard to review your organization's most recently created pipelines. This widget includes each pipeline's name (linked to its dedicated pipeline page), dynamic status, and total number of candidates; it also has an Only Mine toggle to display pipelines that only you created. The Pipelines widget header is linked directly to the Pipelines page.
Searching for Pipelines
On the Pipelines page, you can search for any pipeline you have access to in the table. Selecting the magnifying glass at the top (next to the Pipelines header) or on the right border opens the Search Pipelines panel, where you conduct your search.
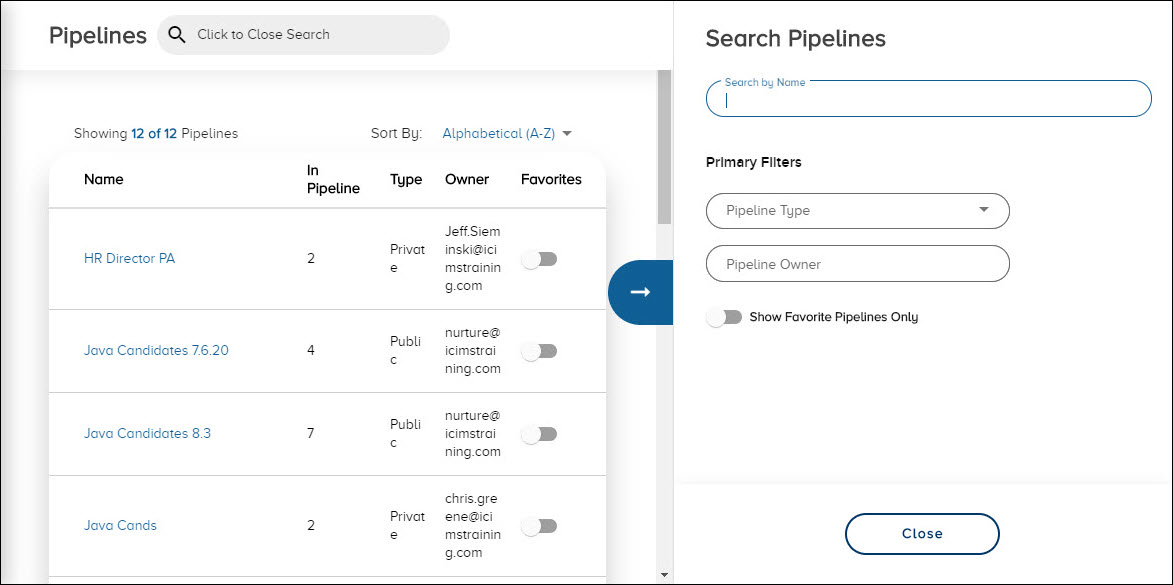
This panel includes a few different search options:
- Search by Name: As you type in this field, the system automatically filters results in the table with pipelines matching that name.
- Primary Filters: The following filters are available to narrow your results:
- Public/Private: A dropdown to only display pipelines that are public or private.
- Dynamic Status: A dropdown to only display pipelines that are standard or dynamic.
- Pipeline Owner: A search field to select an email address and display pipelines with that address as its owner.
- Show Favorite Pipelines Only: A toggle to only display favorite pipelines.
- Only Inactive Pipelines: A toggle to only display inactive pipelines.
When entering new search criteria, the table of pipelines updates with only those matching the search.
Creating New Pipelines
There are two ways to set up new pipelines in CXM and CRM:
- By creating a pipeline from the Pipelines page.
- By saving a search from the Candidate Search page.
Standard pipelines can only be created from the Pipelines page. Dynamic pipelines can be created using either option.
Creating Pipelines from the Pipelines Page
To create a new pipeline from the Pipelines page, select the +Create Pipeline button at the bottom right. This opens the Create Pipeline window, which includes the following fields by default:
- Pipeline Name: Enter a name for your pipeline.
- Pipeline Description: Enter a description for your pipeline. (This is optional.)
- Pipeline Type: Select either Standard Pipeline or Dynamic Pipeline.
- Automatic Reviewal: Enable the toggle to turn on automatic reviewal, whereby all candidates matching the saved search are added to the pipeline automatically each night. (Only displays for dynamic pipelines.)
- Sharing Type: Select either Public Pipeline or Private Pipeline.
- Add Recruiter: Select recruiters from your system to share the private pipeline with. (Only displays for private pipelines.) For more on recruiter sharing, review Sharing a Pipeline with Recruiters below.
When finished, select
Create. All new pipelines are added to the table on the Pipelines page.
Notes:
- Additional fields can be added to the Create Pipeline window by contacting iCIMS Technical Support:
- Pipeline Categories: Assign different categories to the pipeline.
- Target Candidate Count: Enter the number of candidates targeted for the pipeline.
- Target Fill Date: Select a date you would like to reach this target count.
- Fields that are enabled on the Create Pipeline window are also enabled on the Edit Pipeline page, as discussed in Editing a Pipeline below.
Setting Up a Dynamic Pipeline Search
Once you create a pipeline with Dynamic as the pipeline type, you are directed to a Create Dynamic Pipeline page, where you must set up the saved search for that pipeline.
The Search panel on the right of this page includes the same options as on the main Candidate Search page. For more on the search options available, review the article Searching for Candidates in iCIMS Candidate Experience Management (CXM) and iCIMS Candidate Relationship Management (CRM).
When you add, change, or remove a search parameter from this panel, the page automatically updates to display all candidates matching the current search (providing a preview of who and how many candidates would be included). When you are satisfied with your search, select Create Dynamic Pipeline at the top.
Note: If you leave the Create Dynamic Pipeline page before saving your search, the pipeline is still created, but it is standard instead of dynamic.
Creating Pipelines from the Candidate Search Page
The Candidate Search page, where all candidates in your system are listed, is accessible by selecting the Candidate Search (magnifying glass) icon in the vertical navigation menu. To create a dynamic pipeline from this page:
- Select the magnifying glass at the top or right of the screen to open the Search Candidates panel.
- Select all desirable search components (e.g., By Keyword, By Location, By Job) and filters (e.g., Country of Residence, Subscription Status) from this panel.
- Select the Save (disk) icon that displays at the top of the panel.
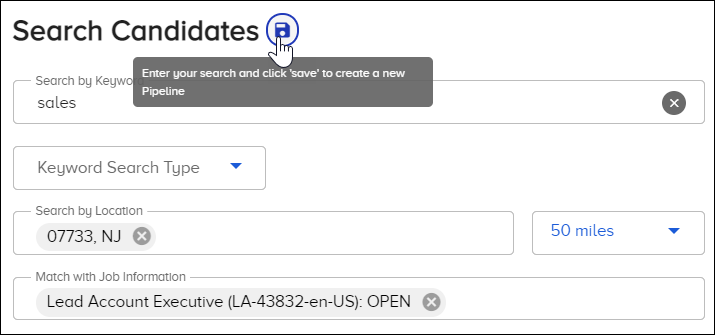
- On the Save Pipeline As window that opens, enter a name for your pipeline and, if desired, switch the Public toggle on. (A public pipeline is accessible to all recruiters in your CXM or CRM.)
- Select Create to save your search and create your pipeline.
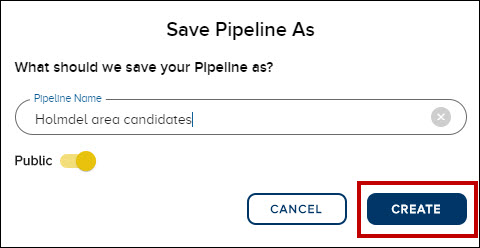
As soon as you create your pipeline, you are redirected to the dedicated page for that pipeline. This page includes all candidates in your database who match the search you just saved.
Important Note: For customers using iCIMS Talent Cloud AI, the functionality to create pipelines from the Candidate Search page is temporarily unavailable.
Reviewing Individual Pipelines
Selecting a pipeline from the table on the Pipelines page opens the dedicated page for that pipeline. On this page, the pipeline name and description are included in the header, and all candidates in the pipeline are listed in table view with the following columns:
- Name
- Tags
- Workflow Status
- Location
- Current Role
- Education
- Job Apps
- Activity
Notes:
- For dynamic pipelines, the dedicated pipeline page features two tabs of candidates: Unreviewed and In Pipeline. For more on these tabs, review Managing Unreviewed Candidates below.
- Activity refers to the candidate's current activity status (e.g., Unreviewed, Contacted). For more information, review the article Reviewing Profiles and Taking Action on Candidates in iCIMS Candidate Experience Management (CXM) and iCIMS Candidate Relationship Management (CRM).
- A clipboard icon displays in a candidate's row if they have a resume. Selecting this icon opens their resume.
- A phone icon displays in a candidate's row if they have a phone number in their profile. Hovering your mouse over this icon displays their phone number(s).
- If Pipeline Categories, Target Candidate Count, and/or Target Fill Date are enabled in your system, and a recruiter has filled in these details, they display in the header with the pipeline name and description.
Tip: Instead of reviewing pipeline candidates as part of a table, switch to resume view using the toggle at the top right. This allows you to quickly access and review the resumes of individual candidates by selecting the arrows at the far left and right of the screen.

Searching for and Filtering Candidates in a Pipeline
Search for candidates on a dedicated pipeline page by selecting the magnifying glass (at the top or on the right) and entering your search criteria in the Search Candidates panel. The search components and filters available in this panel are similar to other candidate search panels in CXM and CRM. For more information, review the Applying Search Criteria section of the Searching for Candidates in iCIMS Candidate Experience Management (CXM) and iCIMS Candidate Relationship Management (CRM) article.
Note: Running this search does not affect the underlying search parameters of a dynamic pipeline (i.e., the criteria that determines who is added the pipeline). That saved search remains frozen unless you edit the pipeline, as discussed in Editing the Saved Search for a Dynamic Pipeline below.
Reviewing Candidates in a Dynamic Pipeline
When you create a standard pipeline in CXM or CRM, only recruiters at your organization can add candidates to it (as discussed in Manually Adding Candidates to a Pipeline below). Thus, all candidates in a standard pipeline have already been reviewed and approved for that pipeline.
In a dynamic pipeline, however, candidates are added automatically by the system (i.e., they match the pipeline's underlying search). As a result, a recruiter has to determine if they are a true fit for that pipeline.
The following sections detail the candidate review process for dynamic pipelines.
Managing Unreviewed Candidates
In dynamic pipelines, candidates are included in two separate tabs:
- Unreviewed: Those who match the pipeline's underlying search but have not yet been reviewed and accepted to the pipeline by a recruiter. If any new or existing candidates match the search parameters of a pipeline, the system automatically adds them to that pipeline as "Unreviewed."
- In Pipeline: Those who match the search criteria and were reviewed and officially saved to the pipeline by a recruiter.
Notes:
- "Unreviewed" candidates who no longer match the search (e.g., you change the location radius) are removed from that pipeline.
- "In Pipeline" candidates are saved to that pipeline and remain there even if they no longer match the search, unless a recruiter manually removes them from the pipeline (as discussed in Manually Removing Candidates from a Pipeline below) or moves them back to the Unreviewed tab (as discussed in Taking Action on Pipeline Candidates below).
Tip: If you prefer that candidates automatically become "In Pipeline" without recruiter review (bypassing the Unreviewed tab), enable the toggle for Automatic Reviewal, as discussed in Editing Pipeline Details below.
Approving and Rejecting Unreviewed Candidates
To evaluate individual candidates on the Unreviewed tab, select their name from the table to open their Candidate profile and review their information. Or switch to resume view on the tab (using the toggle at the top right) to quickly access and read individual resumes.
When finished with your evaluation, return to the Unreviewed tab and either save (i.e, approve) or archive (i.e., reject) them, depending on how well you feel they fit that pipeline. There are two ways to perform either of these actions on the tab:
- Check the box at the far left of any candidate's row in the table and select either Save to Pipeline or Archive at the top. To apply an action to multiple candidates in bulk, check the box for all desired individuals in the table and select one of the two buttons.
- Select the three-dot button at the far right of a candidate's row and select either Save to Pipeline or Archive.
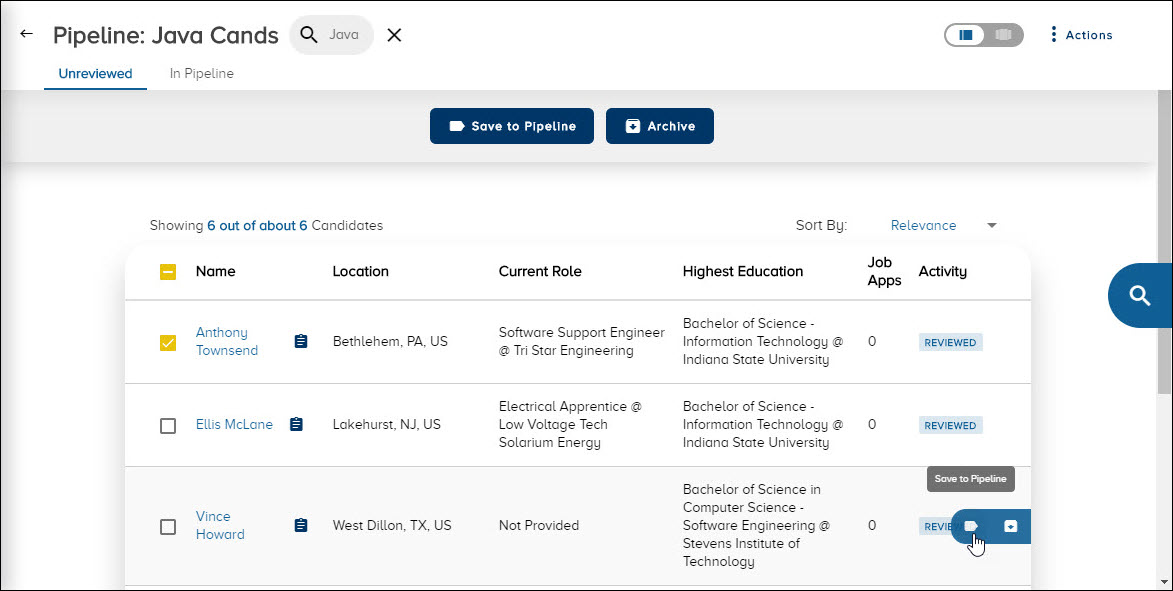
Candidates saved from this tab are moved to the In Pipeline tab. Candidates who are archived are removed from that pipeline.
Adding and Removing Pipeline Candidates
When reviewing candidates, you have the ability to add them to any other pipeline in your system (standard or dynamic) or remove them from a pipeline as you see fit. These actions are discussed in the sections below.
Manually Adding Candidates to a Pipeline
To manually add candidates to pipelines in your system (individually or in bulk), use the Add to Pipeline action, which is available from a candidate's profile and from candidate tables on the Candidate Search page and dedicated pipeline pages. For more on accessing this action, review Performing Individual or Bulk Actions below.
After you select the Add to Pipeline action, review the available pipelines listed and check the boxes of those you want to add your candidate(s) to. The Search Pipelines panel is available to help you find specific pipelines or narrow down this list. When finished, select Submit at the top.
You can also add candidates to a pipeline from iCIMS Applicant Tracking (ATS) using the Submit to CRM Pipeline action. For more information on this feature, review the Submitting Candidates to iCIMS CXM and CRM Pipelines from iCIMS Applicant Tracking article.
Notes:
- When manually adding candidates to a dynamic pipeline, those individuals do not have to match the pipeline's underlying search.
- Candidates manually added to a dynamic pipeline are included on the In Pipeline tab, not the Unreviewed tab, since they were already reviewed by the recruiter who took that action
Tip: If you're uploading a batch of new candidates to your system using a CSV file, you have the option to add those candidates to a pipeline when setting up your import. For more on this CSV upload, review the article Adding Candidates in iCIMS Candidate Experience Management (CXM) and iCIMS Candidate Relationship Management (CRM).
Manually Removing Candidates from a Pipeline
There are several methods to manually remove candidates from pipelines in CXM and CRM.
From the dedicated pipeline page (standard or dynamic)
Select the candidates to remove and select the Remove from Pipeline action (as discussed in Taking Action on Pipeline Candidates below). You have the option to remove the candidates from that pipeline only or select other pipelines to remove them from.
From the Candidate Search page
Select the candidates to remove and select the Remove from Pipeline action. Then select all pipelines you want them taken out of.
From a candidate's profile
- Navigate to their profile and select Pipelines underneath the Background tab. (As an alternative, select their row in the candidate table and access Pipelines from the profile preview that opens.) This Pipelines tab lists all pipelines that the candidate is included in, both standard and dynamic.
- Select the Remove button next to any pipelines you feel they no longer belong in.
Using a CXM Automated Campaign to Add and Remove Candidates from Pipelines
For customers with CXM, automated campaigns can include steps to add or remove candidates from pipelines based on various criteria. For more information about automated campaigns and the Add to Pipeline and Remove from Pipeline actions they can include, review the
Creating and Sending Automated Campaigns in iCIMS Candidate Experience Management (CXM) article.
Taking Action on Pipeline Candidates
You can take a number of actions on candidates selected from the table on a dedicated pipeline page. Among the actions available to all recruiters are:
- Email: To send a message to the candidate.
- Invite to Apply: To email the candidate with a recommended job to apply to.
- Manage Tags: To add or remove the candidate's tags.
- Add to Pipeline: To add the candidate to other pipelines in your system.
- Remove from Pipeline: To remove the candidate from pipelines in your system.
- Add to Event: To add the candidate to events in your system.
- Download Resumes: To download the candidate's resume.
- Submit to Job: To submit the candidate to an open job in iCIMS Applicant Tracking.
- Bulk Text: To send one or more text messages to several candidates at once through Text Engagement. (This action is only available for customers with an active Text Engagement integration from iCIMS.)
- Add Status: To assign the workflow status to the candidate in your system.
- Export: To export a .TXT file with all information from the candidate's profile.
The following bulk actions are also available to recruiter admins only:
- Subscribe: To subscribe candidates from campaign emails in bulk.
- Unsubscribe: To unsubscribe candidates from campaign emails in bulk.
Note: The Subscribe and Unsubscribe buttons are accessible when selecting any of the 50 candidates visible on the page. The buttons are disabled when selecting more than 50 candidates (e.g., when using the "select all candidates from search" functionality).
Performing Individual or Bulk Actions
There are several different ways to take action on candidates in a pipeline, as outlined below. (This is the same functionality as on the main Candidate Search page.)
- Check the box at the far left of any person's row in the table and select one of the action buttons at the top. To apply an action to candidates in bulk, check the box for all desired individuals in the table and select the appropriate action button.
- Select the three-dot button at the far right of a candidate's row and select an action from the dropdown. The actions available here are Manage Tags, Email, Add to Pipeline, and Invite to Apply.
- Select the candidate's name from the results to open their Candidate profile and select the Actions button at the top right to select a particular action. For a list of all actions available from a Candidate profile, review the article Reviewing Profiles and Taking Action on Candidates in iCIMS Candidate Experience Management (CXM) and iCIMS Candidate Relationship Management (CRM).
Tip: If you want to send emails to pipeline candidates, set up a standard email campaign by selecting
Create Campaign from this Pipeline from the Actions button on the dedicated pipeline page, or (in CXM only) create an automated campaign from the Email Search page. For more information on creating a standard campaign from a pipeline, review
Creating Email Campaigns from a Pipeline below. For more information on automated campaigns, review the
Creating and Sending Automated Campaigns in iCIMS Candidate Experience Management (CXM) article.
Using the Actions Button on a Dedicated Pipeline Page
Recruiters admins and pipeline owners have the ability to update and take action on a pipeline as a whole. This is done through the Actions button at the top right of a dedicated pipeline page. The options available include:
These actions are discussed in the sections below.
Editing a Pipeline
To edit pipeline information, select Edit Pipeline from the Actions button. This opens the Edit Pipeline page, which has two sections of editable information:
- Pipeline Details
- Recruiter Sharing
These sections are discussed below.
Editing Pipeline Details
In the Pipeline Details section, you have the ability to take the following actions:
- Edit the pipeline name: Select the Pipeline Name field and type/edit the text.
- Change the pipeline owner: Delete the email address listed in the Pipeline Owner field and input the email address for the new owner. As you type in this field, the system will provide auto-suggestions; you must select one of these suggestions.
- Edit the pipeline description: Select the Pipeline Description field and type/edit the text.
- Activate or deactivate the pipeline: Enable the Active Pipeline toggle to activate the pipeline, or disable the toggle to deactivate it. For more on this action, review Deactivating a Pipeline below.
- Change the pipeline's dynamic status: Enable the Dynamic Pipeline toggle to make the pipeline dynamic, or disable it to make it a standard pipeline. If the toggle is switched on, you must have a search saved to proceed; the exact parameters of that search will display in this section.
- Note: Adjusting the dynamic status does not affect candidates currently in the pipeline. For instance, when changing a pipeline from standard to dynamic, candidates previously in the pipeline will be included in the In Pipeline tab and not require any approval.
For dynamic pipelines, these additional actions are available in the Pipeline Details section:
- Edit the pipeline's search parameters: Select the Edit Saved Search button to make changes to the pipeline's underlying search. For more on this action, review Editing the Saved Search for a Dynamic Pipeline below.
- Configure the pipeline to bypass the manual review of candidates: Select the toggle for Automatic Reviewal so that the system automatically moves all dynamic pipeline candidates from the Unreviewed tab to the In Pipeline tab overnight each day.
Note: If Pipeline Categories, Target Candidate Count, and/or Target Fill Date are enabled in your system, you can edit these details in this section, as well.
Sharing a Pipeline with Recruiters
In the Recruiter Sharing section, which is for private pipelines only, you have the ability to take the following actions:
- Share the pipeline with other recruiters: Select the Add Recruiter search field and select the email address for the recruiter you want to add. You must select one of the auto-suggestions to successfully add the recruiter to the list. (Note: If the pipeline is public, this functionality is unavailable, since public pipelines are automatically shared with all recruiters.)
- Unshare the pipeline with recruiters: Select the Remove link next to the recruiter you want to remove from the list.
Note: You can also take these actions when
creating a private pipeline, as discussed in
Creating Pipelines from the Pipelines Page above.
Editing the Saved Search for a Dynamic Pipeline
There are two ways to change the search parameters that populate candidates for a dynamic pipeline:
- By selecting Edit Saved Search from the Actions button on the dedicated pipeline page.
- By selecting the Edit Saved Search button on the Edit Pipeline page under Pipeline Details. (This button will not display if the Dynamic Pipeline toggle on this page is disabled.)
Selecting either option opens the Search panel on the Editing Pipeline: [Pipeline Name] page, which includes the search fields you would find on the Candidate Search page. Change the displayed search criteria and filters as desired.
![The Editing Pipeline: [Pipeline Name] page](/servlet/rtaImage?eid=ka0PK0000008AOz&feoid=00N8X00000Htp3R&refid=0EM1V000000fBUp)
Once you adjust the search parameters, results on this page update with only candidates matching your new parameters; this allows you to preview how your changes would influence the results. (You cannot take action on candidates from this page, but you can view their profiles.)
If you're satisfied with your changes, select the Save Pipeline Search button at the top to officially update the search. If you make a mistake or do not want to proceed, select Cancel instead.
Notes:
- Saving your new search parameters for the pipeline will remove any candidates from the Unreviewed tab who no longer match the search. Other candidates in your CXM or CRM who match the search will be added to that tab.
- Updating the search parameters will NOT remove saved candidates from the In Pipeline tab.
- Archived candidates will remain archived even if you update the search.
Duplicating a Pipeline
You have the option to create a duplicate version of your pipeline by selecting Duplicate Pipeline from the Actions button. This allows you to set up a new pipeline similar to that existing pipeline, without having to start from scratch. When selecting this option, a Duplicate Standard/Dynamic Pipeline window opens, with fields to enter the new pipeline's name and other information (e.g., description, category, sharing type).
Once you duplicate a pipeline, it is accessible from the table on the Pipelines page; you can edit it as normal, including its saved search (if the pipeline is dynamic).
Creating Email Campaigns from a Pipeline
Email campaigns can be created for candidates in a pipeline by selecting Create Campaign from this Pipeline from the Actions button. This opens the Add Campaign window, the same one used to create new campaigns from the Campaigns page. Fill out the fields in this window and select Save to create the new campaign. All current, approved candidates in the pipeline will be recipients of your campaign emails.
Note: The Please Select a Pipeline field in this window is already populated with the name of the pipeline. To change this to another pipeline, select the field and select your new pipeline from the list.
For more on creating email campaigns in CXM and CRM, review the article Creating and Sending Email Campaigns in iCIMS Candidate Experience Management (CXM) and iCIMS Candidate Relationship Management (CRM) and, for CXM only, the article Creating and Sending Automated Campaigns in iCIMS Candidate Experience Management (CXM).
Viewing Associated Campaigns
Select View Associated Campaigns from the Actions button to review a table of all campaigns sending emails to your pipeline. This table includes the same columns as on the Campaigns tab of the Emails page. For a description of each column, review this section of the Email Campaigns article.
Deactivating a Pipeline
There are two ways to deactivate a pipeline so it is no longer searchable in your system:
- By selecting Deactivate Pipeline from the Actions button on the dedicated pipeline page.
- By disabling the Active Pipeline toggle on the Edit Pipeline page.
When either option is selected, a Deactivate Pipeline confirmation window opens. To proceed, select the Deactivate button; the pipeline will then be deleted from the table on the Pipelines page.
Note: You can reactivate a pipeline (i.e., make it searchable again) in the same two ways:
- By selecting Activate Pipeline from the Actions button on the dedicated pipeline page. (Once a pipeline is deactivated, the Deactivate Pipeline option becomes Activate Pipeline.)
- By re-enabling the Active Pipeline toggle on the Edit Pipeline page.

