Overview
iCIMS Candidate Experience Management (CXM) combines the functionality of traditional candidate relationship management technology with AI-enhanced marketing automation capabilities to assess candidate engagement and automate campaigns.
CXM tracks and assesses candidates’ engagement with your organization’s recruiting content. With pre-set campaign logic created by recruiters, CXM can automatically adjust which messages are sent to candidates, move candidates between pipelines, or add tags to a candidate’s profile based on whether and how they interact with your content. This enables recruiters to personalize what content is sent to which candidates at scale and to better assess which candidates are highly engaged.
For more information on CXM, review the CRM and CXM Resources section of the Getting Started with iCIMS Candidate Relationship Management (CRM) and iCIMS Candidate Experience Management (CXM) article.
The following sections outline how CXM users can create and manage automated campaigns:
Understanding Email Options in CXM
CXM includes three options for emailing candidates, all of which are available from the Email Search page:
- One-off emails are individual emails sent to one or more candidates.
- Campaigns are email blasts, potentially including follow-up emails, sent to large numbers of candidates or entire pipelines. These standard campaigns do not include CXM’s marketing automation capabilities.
- Automated campaigns are pipeline-based campaigns that include CXM’s marketing automation capabilities, including conditional logic that adjusts which messages are sent to which candidates, and potentially their tags and pipelines, based on their interactions with previous content. (Note: SMS messages require enablement and must be sent from a US phone number to a US phone number.)
This article focuses on automated campaigns. For information on sending one-off emails, review the Creating Emails and Email Templates in iCIMS Candidate Relationship Management (CRM) and iCIMS Candidate Experience Management (CXM) article. For information on creating standard campaigns, review the Creating and Sending Email Campaigns in iCIMS Candidate Relationship Management (CRM) and iCIMS Candidate Experience Management (CXM) article.
Creating and Building Automated Campaigns
Automated campaign creation is a three-step process: first you create the campaign, then you build the steps of the campaign workflow, and finally you activate the campaign. These phases of the process are described in the following sections:
Creating Automated Campaigns
Users can create automated campaigns based on one or more pipelines and starting from either an empty automation or a template. Empty automations have a start and an end point and leave everything in between up to you. Automated campaign templates include pre-built combinations of emails and other actions and conditions geared toward achieving a particular goal, which you can then adjust as desired.
Users can create an automated campaign from an empty automation by completing the steps outlined below.
- Navigate to the Email Search page, select the Automated Campaigns tab, then select the + Create Automation button to the lower right. Select Empty Automation. The Create Campaign Automation page displays.
- Complete the form on the Create Campaign Automation page.
- In the Campaign Details section, enter a name for your campaign into the Campaign Name text field.
- In the Audience section, select one or more pipelines from the Pipeline dropdown. The campaign is sent to candidates in these pipelines.
- Optional: Disable the Enable Dynamic Enrollment toggle to limit the campaign to candidates in the associated pipelines at the time the campaign starts. Keep the Enable Dynamic Enrollment toggle enabled to include candidates added to the associated pipelines after the campaign begins.
- Once you have completed all required fields, select Submit. The Automation Builder: [Campaign Name] page displays, and you can now build the steps of your campaign workflow (described in the next section of this article).
Users can create an automated campaign from a template by completing the steps outlined below.
- Navigate to the Email Search page, select the Automated Campaigns tab, then select the + Create Automation button to the lower right. Select From Template. The Select Template page displays.
- Review the available template options. Locate the template you want, then select Use Template from the card on the Select Template page, or select Create from within the preview popup.
- Notes:
- If you are unsure which template you would like to use, select the Preview button for any template you want to learn about in more depth. To select a template from the preview popup, select Create.
- If you have changed your mind and want to create your campaign from an empty automation, choose Create Empty Automation on the Select Template page.
- Complete the Edit Settings page.
-
- In the Campaign Details section, enter a name for your campaign into the Campaign Name text field.
- In the Audience section, select one or more pipelines from the Pipeline dropdown. The campaign is sent to candidates in these pipelines.
- Optional: Disable the Enable Dynamic Enrollment toggle to limit the campaign to candidates in the associated pipelines at the time the campaign starts. Keep the Enable Dynamic Enrollment toggle enabled to include candidates added to the associated pipelines after the campaign begins.
- Once you have completed all required fields, select Submit. The Automation Builder: [Campaign Name] page displays with the templated actions and conditions already built. You can now adjust the steps of your campaign workflow and the contents of emails. For more information on building and editing campaigns, review the next section of this article.
Building Automated Campaigns
Once you have created an automated campaign, you can build the steps of the campaign workflow on the Automation Builder: [Campaign Name] page.
- If you have just created your campaign, this page displays after you select Submit.
- If you are returning to a previously created campaign, navigate to the Email Search page, select the Automated Campaigns tab, and select the name of your campaign.
When you first create a campaign and have not started building the campaign workflow, the Automation Builder: [Campaign Name] page displays two steps: Pipeline Entry and End of Campaign. These are the beginning and end points for all automated campaigns.
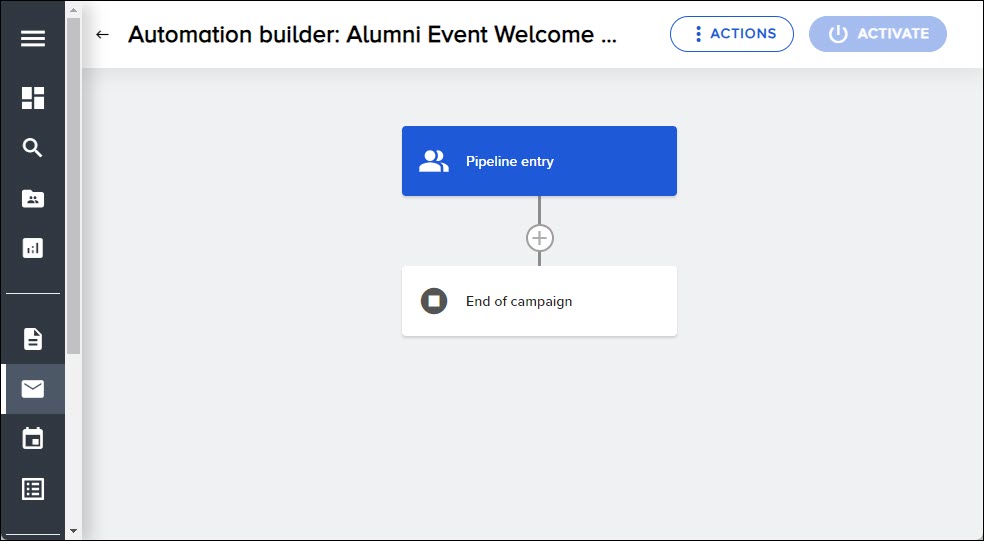
The initial Automation Builder workflow
A plus sign displays between these two steps; when you select it, a popup displays offering a series of actions and a series of conditions. You use these to build your workflow, including branching paths based on candidate behavior.
For example, you can add a Send Email action as the first step after Pipeline Entry, then add an If Email Opened condition as the following step. This condition creates two branches, which can have different following steps. A candidate who does not open the email within a set number of days could be sent a second email, while a candidate who does open the email could be added to another pipeline.

An example automated campaign workflow
At any point between steps, you can add an action or a condition by selecting the plus sign and then selecting the desired action or condition. In each case a popup displays to gather additional information and confirm your selection. The available actions and conditions are listed below.
If you are building your campaign from a template, the campaign comes pre-populated with actions and conditions, but these steps require additional input from you (e.g., a Send Email step requires you to specify which email template to use). This requirement is indicated by a blue information icon on the step.
Notes:
- Automated campaigns are sent to all candidates in the selected pipelines at the time the campaign starts. Candidates who are added to the associated pipelines after the start of the campaign are only included if the Enable Dynamic Enrollment toggle is enabled.
- Automated campaigns can be edited up until the campaign start date and time. Once an automated campaign has begun, it can no longer be edited.
- Some actions and conditions may include delays by default (e.g., the Send Email action includes a two-day delay by default because iCIMS recommends a delay of two days between sending an email and assessing whether the candidate has clicked or opened the email and continuing to the next step in the campaign workflow). Once you have built your campaign workflow, you may need to adjust the End Date for your campaign to ensure enough time for all steps.
Actions
You can add the following action steps as part of your campaign workflow. The action occurs when a candidate flows into the action step from the previous step (often a condition).
Send Email
You can add a Send Email action by completing the steps below.
- Select the plus sign where you want the action to occur, then select Send Email. The Send Email popup displays.
- Review the From Name; if desired, enable Change ‘From Name’ to My Name toggle.
- Type the email Subject into the corresponding text field and select an email template from dropdown menu; the selected template displays within the popup. If desired, select Edit Email Content to edit from the template or select Delete Email Content to select a different template.
- Optional: Select the Add Delay toggle; if engaged, a text field for Number of Days displays, where you can type in a number directly or use the up and down arrows at the right end of the field to increase or decrease from the number currently listed.
- When finished, select Save.
Send Message
You can add a Send Message action by completing the steps below. (Note: This option only displays if SMS for automated campaigns is enabled.)
- Select the plus sign where you want the action to occur, then select Send Message. The Send Message popup displays.
- Enter the SMS message into the Body text area. If desired, select the Add Variable dropdown to add one or more variables to your message. The text message displays in the Preview panel with variables resolved using example data.
- Optional: Select the Add Delay toggle; if engaged, a text field for Number of Days displays, where you can type in a number directly or use the up and down arrows at the right end of the field to increase or decrease from the number currently listed.
- When finished, select Save.
Modify Tags
You can add a Modify Tags action by completing the steps below.
Note: For more information on tags, review the Creating and Managing Tags in iCIMS Candidate Relationship Management (CRM) and iCIMS Candidate Experience Management (CXM) article.
- Select the plus sign where you want the action to occur, then select Modify Tags. The Modify Tags popup displays.
- If desired, select any tags to add from the Add Tags dropdown, or type in keywords to search for tags.
- If desired, select Remove to display the Remove Tags dropdown, from which you can select any tags to remove. (Both allow multiple selections.)
- Optional: Select the Add Delay toggle; if engaged, a text field for Number of Days displays, where you can type in a number directly or use the up and down arrows at the right end of the field to increase or decrease from the number currently listed.
- When finished, select Save.
Modify Pipelines
You can add a Modify Pipelines action by completing the steps below.
Note: Adding a candidate to a new pipeline does not remove them from other pipelines they are also in, including the pipeline connected to the automated campaign. Similarly, removing a candidate from a pipeline does not automatically add them to another. To move a candidate from one pipeline to another, you must complete both the Add To and Remove From sections of the popup.
- Select the plus sign where you want the action to occur, then select Modify Pipelines. The Modify Pipelines popup displays.
- If desired, select a pipeline to add candidates to from the Select Pipeline dropdown. (Single select only.) If desired, select a workflow status from the Workflow Status dropdown. (Single select only.)
- If desired, select Remove From to display the Remove from Pipelines dropdown, from which you can select any pipelines to remove the candidate from.
- Optional: Select the Add Delay toggle; if engaged, a text field for Number of Days displays, where you can type in a number directly or use the up and down arrows at the right end of the field to increase or decrease from the number currently listed.
- When finished, select Save.
Subscribe
You can add a Subscribe action by completing the steps below.
Note: This subscribes candidates to receive recruitment emails from your organization.
- Select the plus sign where you want the action to occur, then select Subscribe. The Subscribe popup opens with confirmation message.
- Select Save to confirm. (The action applies to all candidates who flow into this step.)
Unsubscribe
You can add an Unsubscribe action by completing the steps below.
Note: This unsubscribes candidates from future recruitment emails from your organization.
- Select the plus sign where you want the action to occur, then select Unsubscribe. The Unsubscribe popup opens with confirmation message.
- Select Save to confirm. (The action applies to all candidates who flow into this step.)
Conditions
You can add the following condition steps as part of your campaign workflow. The action occurs immediately after the previous step (often an action step), unless that previous step includes a delay.
If Email Opened
You can add an If Email Opened condition by completing the steps below.
- Select the plus sign where you want the condition to be assessed, then select If Email Opened. The Add Condition popup opens with If Email Opened already selected (not editable; to change, cancel and select a different condition) and the current campaign selected (editable via dropdown to existing campaigns only).
- Select the email to have been opened from the dropdown.
- The Delay toggle is enabled and the delay set to two days by default; this delay determines the time between when the previous step is completed (e.g., when an email is sent) and when the condition is assessed (e.g., whether candidates opened the email or not). If desired, edit the number to adjust the delay period. (iCIMS recommends against disabling the delay for conditions, as this would leave no time for candidates to meet the condition.)
- Select Save.
If Email Clicked
You can add an If Email Clicked condition by completing the steps below.
- Select the plus sign where you want the condition to be assessed, then select If Email Clicked. The Add Condition popup opens with If Email Clicked already selected (not editable; to change, cancel and select a different condition) and the current campaign selected (editable via dropdown to existing campaigns only).
- Select the email to have been clicked from the dropdown.
- The Delay toggle is enabled and the delay set to two days by default; this delay determines the time between when the previous step is completed (e.g., when an email is sent) and when the condition is assessed (e.g., whether candidates clicked on links in the email’s contents or not). If desired, edit the number to adjust the delay period. (iCIMS recommends against disabling the delay for conditions, as this would leave no time for candidates to meet the condition.)
- Select Save.
If Tag Present
You can add an If Tag Present condition by completing the steps below.
- Select the plus sign where you want the condition to be assessed, then select If Tag Present. The Add Condition popup opens with If Tag Present already selected (not editable; to change, cancel and select a different condition).
- Select one or more existing tags from the dropdown. (These are treated as connected by the Boolean operator OR – the presence of any one of the tags counts as meeting the condition, regardless of whether the other listed tags are also present.)
- Optional: Select the Add Delay toggle; if engaged, a text field for Number of Days displays, where you can type in a number directly or use the up and down arrows at the right end of the field to increase or decrease from the number currently listed.
- Select Save.
If Engagement Score Is
You can add an If Engagement Score Is condition by completing the steps below.
- Select the plus sign where you want the condition to be assessed, then select If Engagement Score Is. The Add Condition popup opens with If Engagement Score Is already selected (not editable; to change, cancel and select a different condition).
- Select an engagement score (Inactive, Engaged, Highly Engaged) or select Any from the dropdown. (Single select only.) For more information on engagement scores, review the Understanding Engagement Tracking section of the Understanding and Tracking Engagement in iCIMS Candidate Experience Management (CXM) article.
- Optional: Select the Add Delay toggle; if engaged, a text field for Number of Days displays, where you can type in a number directly or use the up and down arrows at the right end of the field to increase or decrease from the number currently listed.
- Select Save.
If Pipeline Is
You can add an If Pipeline Is condition by completing the steps below.
- Select the plus sign where you want the condition to be assessed, then select If Pipeline Is. The Add Condition popup opens with If Pipeline Is already selected (not editable; to change, cancel and select a different condition).
- Select a pipeline from the corresponding dropdown. (Single select only.) Optionally, select one or more workflow statuses from the corresponding dropdown.
- Optional: Select the Add Delay toggle; if engaged, a text field for Number of Days displays, where you can type in a number directly or use the up and down arrows at the right end of the field to increase or decrease from the number currently listed.
- Select Save.
Activating Automated Campaigns
Once you have created and built an automated campaign, you can activate it by following the steps below.
- From the Automation Builder: [Campaign Name] page, select the Activate button to the upper right. The Schedule Automated Campaign popup displays.
- Enter a start date and start time into the associated fields, either by typing or by using the date and time pickers.
- Optional: Enable the Specify End Date/Time toggle and enter an end date and end time into the fields that display, if desired.
- Select Submit to activate the campaign.
- Important Note: Once an automated campaign begins to run, it can be stopped but it cannot be edited.
Reviewing, Editing, Duplicating, and Stopping Automated Campaigns
Users can review existing automated campaigns by navigating to the Email Search page, selecting the Automated Campaigns tab, and selecting the name of the desired campaign. The Automation Builder: [Campaign Name] page displays.
Note: You can also access the Automation builder: [Campaign Name] page from a campaign’s analytics.
If the automated campaign has not reached its start date and time yet, you can edit the steps of the campaign workflow using the options outlined in the Building Automated Campaigns section above. Once an automated campaign reaches its start date and time, it can no longer be edited.
You can also review the campaign details, associated pipelines, and schedule from the Automation Builder: [Campaign Name] page by selecting the Actions button to the upper right and then selecting Edit Automated Campaign. If the campaign has not reached its start date and time yet, you can edit these details; once a campaign has reached its start date and time, these details can no longer be edited.
Once a campaign has been activated, you have several options from the Actions menu:
- Stop Automated Campaign ends the campaign; candidates who are partway through the campaign do not complete any remaining steps in the workflow.
- Important Note: This action cannot be undone.
- Edit Automated Campaign brings you to the Edit Campaign Automation page; once the campaign’s start date and time has occurred, only the campaign name can be changed.
- Duplicate allows you to create a duplicate draft of the campaign. You can choose whether to use the same pipelines or different ones, and you can choose whether to include the original workflow content (e.g., a Send Email action with a specific email template selected) or only the steps (e.g., a Send Email action but with no email template specified). This can be done at any time in the life cycle of an automated campaign.
- Revert to Draft allows you to revert an activated campaign to a draft state as long as the start date and time has not yet occurred. Once the campaign starts running, this option is no longer available.
- Re-Schedule allows you to reschedule the start date and time (and, optionally, the end date and time) for an automated campaign as long as the start date and time has not yet occurred. Once the campaign starts running, this option is no longer available.
Reviewing Automated Campaign Analytics
Users can review analytics for an automated campaign by navigating to the Email Search page, selecting the Automated Campaigns tab, and selecting the View link in the Analytics column for the desired campaign.
This page displays various metrics related to the campaign workflow and to the campaign emails, as outlined below.
Note: You can also access the Automation builder: [Campaign Name] page from a campaign’s analytics by selecting the Edit Campaign Automation button.
Campaign Workflow Stats
This section provides individual metrics organized in cards.
- # of Pipelines Attached to Campaign: The number of pipelines attached to the campaign.
- Days Campaign Is Active: The number of days that the campaign has been running. (If the campaign has not started, this lists No Results.)
- 7-Day Total Enrollment: The candidates enlisted into the campaign over the last seven days.
- # Workflows Started: The total number of times candidates have started the automated campaign workflow.
- # Workflows Completed: The total number of times candidates have completed the automated campaign workflow.
- # of Candidates Enrolled: The total number of candidates enlisted into the campaign.
- # of Candidates Completed: The total number of candidates who have completed the automated campaign workflow.
- Enrollment Over Time: A graph displaying how many candidates have enrolled on each day.
Email Stats
This section provides individual metrics organized in cards.
- # of Emails Sent: The number of emails sent as part of the campaign (e.g., if two email messages are each sent to 100 candidates, the number of emails sent is 200).
- Emails Opened Rate: The percentage of emails opened.
- Email Click Rate: The percentage of emails in which a candidate has clicked a link.
- Bounces: The total number of emails that could not be delivered.
- Emails Opened: The total number of emails opened.
- Email Clicks: The total number of emails in which a candidate has clicked a link.
- Unsubscribes: The total number of candidates who unsubscribed from an email in this campaign.
Email Performance by Subject
This section provides a chart with the following four columns:
- Subject: Each campaign email listed by subject.
- Emails Sent: The number of candidates that email was sent to.
- Emails Opened (Unique): The number of candidates who opened that email.
- Emails Clicked (Unique): The number of candidates who clicked a link within that email.

