Overview
iCIMS Candidate Relationship Management (CRM) is a powerful tool that organizations can use to recruit, attract, and engage qualified candidates. Working seamlessly with iCIMS Applicant Tracking (ATS), CRM provides comprehensive search and email capabilities that enable recruiters to find and communicate with the best-matching candidates for their jobs.
iCIMS Candidate Experience Management (CXM) combines the functionality of traditional candidate relationship management technology with AI-enhanced marketing automation capabilities to assess candidate engagement and automate campaigns.
CXM and CRM users have one of two roles: recruiter or recruiter admin. Recruiters have access to all functionality that allows them to search for and contact candidates. Recruiter admins, however, have extra permissions and capabilities not possessed by regular recruiters. This includes configuring columns that display in candidate tables in CXM or CRM.
For more information on user access and recruiter admin permissions, review the
Managing Recruiter User Access and Configuration Settings in iCIMS Candidate Experience Management (CXM) and iCIMS Candidate Relationship Management (CRM) article.
Configuring Columns
The Configure Columns tab of the Admin Settings page enables recruiter admins to add and remove columns from candidate tables in CXM or CRM and to configure the order, width, and priority of those columns. Recruiter admins can access the Admin Settings page by selecting the Admin Settings (gear) icon from the vertical navigation menu.
Note: Changes made here apply to all CXM or CRM users in your organization.
The interface on this tab lists columns for each candidate table and includes the following components:
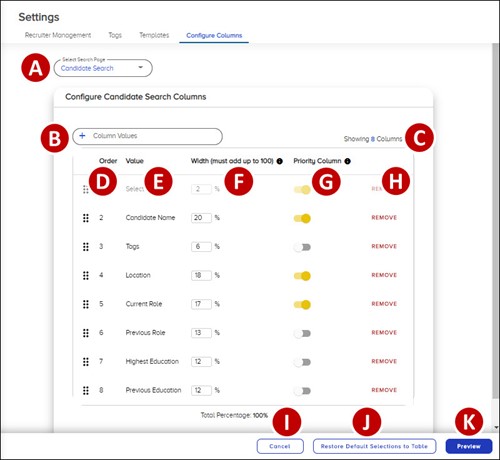
- Select Search Page: A dropdown to select the candidate table to configure: Candidate Search (i.e., the Search page), Pipeline Unreviewed (i.e., the Unreviewed tab of dedicated pipeline pages), or In Pipeline (i.e., the In Pipeline tab of dedicated pipeline pages).
- Column Values: A field to add any unused columns to the interface. When recruiter admins select in this field, a dropdown opens with all available column names. Columns already included in the interface are not available for selection; names can be added that aren't grayed out.
- Column Count: The count of total columns shown in the interface.
- Order: The number order of columns (with the top column having the number 1). Each number determines how the columns display from left to right in the candidate table. Recruiter admins can rearrange the order of columns by dragging and dropping a column's row to a new spot in the interface; the order numbers change automatically.
- Note: The interface must have at least one column listed; as a result, the top column with number 1 is always grayed out and cannot be removed.
- Values: The names of all columns included in the selected candidate table. New values can be added using the Column Values field.
- Width: The percentage of horizontal space that each column takes up in the table. Each column in the interface must have a percentage, and all percentages must add up to 100. (The system calculates and displays the total percentage of all columns at the bottom.) To edit a column's percentage, select the box with the percentage; then, either type in a new value or use the up and down arrows to increase or decrease the value.
- Priority Column: Toggles that determine which columns display when the search panel is open on the page (and there is less space for the candidate table). Columns with the toggle enabled have priority. However, giving priority to too many columns may affect the readability of information in the candidate table.
- Remove: A link in each row to remove a column from the interface. When a column is removed, it can be re-added by selecting it from the Column Values field.
- Cancel: A button to abort all changes made to the interface.
- Restore Default Selections to Table: A button to undo all changes made and restore the interface's default setup.
- Preview: A button to preview the candidate table with the current configurations and then save changes. For more information, review Previewing and Saving Column Configurations below.
Previewing and Saving Column Configurations
Before saving changes made to the interface, recruiter admins must preview how the current configurations look in the selected candidate table. Selecting the Preview button at the bottom of the interface loads a sample version of that table within the tab.
This preview allows recruiter admins to evaluate the readability and overall look of the table. They can also assess the layout of priority columns (as if the search panel was open) by enabling the toggle for Expanded Search Drawer View.
To return to the interface to make additional changes, recruiter admins should select the Back to Editing button at the bottom of the preview.
To save and finalize all changes, recruiter admins should select the Submit button at the bottom. Configurations for the selected table will take effect in CXM or CRM within minutes.
Note: The Select Search Page dropdown is included at the top of the preview. Recruiter admins can select a different candidate table to configure from this field; however, doing so closes the preview and discards all changes made to the interface.

