Overview
iCIMS Candidate Relationship Management (CRM) allows you to create and manage a network of talent consisting of job applicants, event attendees, referrals, and candidates who joined your community through your talent network sign-up forms. With various tools and functionality built in, CRM allows you to search for, organize, and engage with these individuals
iCIMS Candidate Experience Management (CXM) combines the functionality of traditional candidate relationship management technology with AI-enhanced marketing automation capabilities to assess candidate engagement and automate campaigns.
For more information on CXM and CRM, review the Getting Started with iCIMS Candidate Experience Management (CXM) and iCIMS Candidate Relationship Management (CRM) article.
This article includes the following sections to assist you in using Form Management in iCIMS Candidate Experience Management (CXM) and iCIMS Candidate Relationship Management (CRM):
Understanding How Sign-Up Forms Work
Any organization with CXM or CRM can add a talent network sign-up form to their existing career site (even if it is not built using iCIMS Career Sites) or other customer-managed web properties. Through this form, candidates interested in your employment brand can enter their information to join your community and be considered for any new jobs.
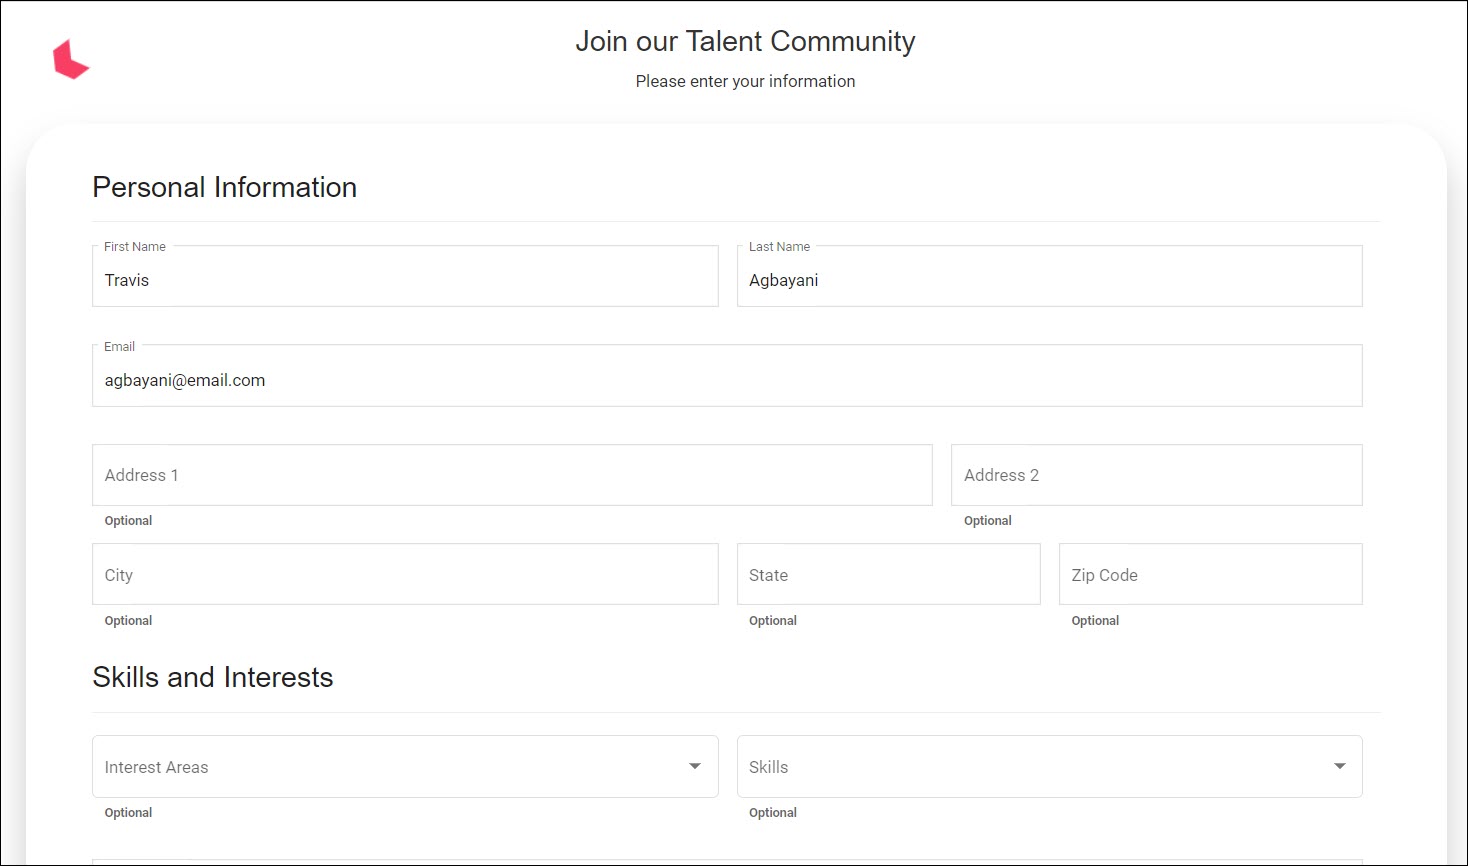
When candidates submit one of these forms, their information is transferred to your organization's CXM or CRM, and a profile is automatically created with that information. Recruiters can search for and take action on these individuals like any other candidate in your database.
Notes:
- It is the customer’s responsibility to collect consent when necessary and to comply with data protection regulations. For customers that use third party cookie management tools (e.g., OneTrust), the sign-up form code can be wrapped with a third-party script to map it to a category on your cookie banner. It is the customer’s responsibility to configure the third party tool to auto-block these forms until consent is provided, if desired.
- Any sign-up form automatically includes a consent checkbox at the bottom, which the candidate must check to submit the form. The form also includes default privacy notice language, which your organization must configure during implementation or by submitting a case to iCIMS Technical Support.
- On the Reporting & Analytics page, users can access a CXM or CRM analytics dashboard for Talent Community Traffic & Conversion, which provides insight into your sign-up form submissions and the kind of traffic they’re generating. For more information, review the article Creating and Reviewing Reports and Analytics for iCIMS Candidate Experience Management (CXM) and iCIMS Candidate Relationship Management (CRM).
About Form Management in CXM and CRM
The Form Management feature in CXM and CRM allows recruiter admins to create and configure multiple sign-up forms for your career site. In addition, admins can set up multiple landing pages on your site (i.e., specific Web pages that users land on after selecting a link) or multiple versions of the same page for different locales to host these forms. They can determine the exact form to place on each page.
Once the feature is enabled, your iCIMS implementation manager or technical point of contact will sync your career site and CXM or CRM so that any sign-up forms and landing pages that your admins create through CXM or CRM display on your career site upon setup.
Tip: When Form Management is turned on, all your existing sign-up forms and talent community landing pages will be disabled. Therefore, if you prefer or currently utilize a highly customized landing page for your form, you may not want to use Form Management at this time.
Notes:
- If you have iCIMS Career Sites, any landing pages you add will utilize the same domain as other pages on your site (with the specific page name appended to it).
- If you do not have an iCIMS career site, any landing pages you add will utilize an iCIMS-specific URL that is unique from other pages on your site.
- You can also enable embedding for a given form. For more information, review the Embedding Sign-Up Forms section below.
- Regular recruiters will not have access to the Form Management feature in CXM or CRM, even if it is enabled in your organization’s system.
Using the Form Management Page
Sign-up forms and landing pages are created and managed through the Form Management page in CXM or CRM, accessible by selecting the Form Management (checklist) icon in the vertical navigation menu on the left.
This page includes two tabs at the top:
- Sign-Up Forms: A listing of your organization's forms. Here, you can create new forms and take action on forms that your organization has already created.
- Landing Pages: A listing of landing pages that your organization has created for your iCIMS career site. Here, you can add new landing pages and assign any form to an existing page.
These tabs are discussed in more detail in the sections below.
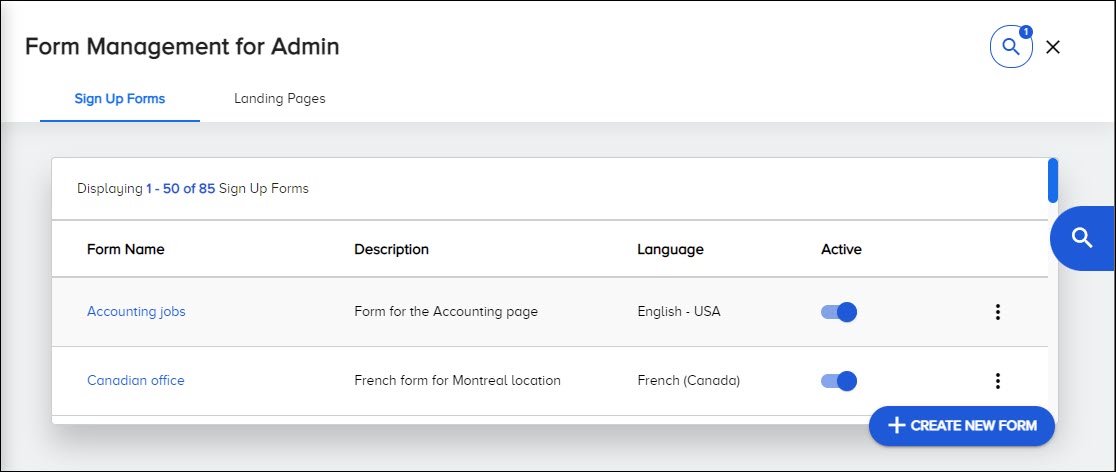
Managing Sign-Up Forms
The Sign-Up Forms tab, which opens by default upon selecting the Form Management icon, lists all of your organization's sign-up forms in table format. The following columns are included in the table:
- Form Name: The name of the form (which is visible to recruiters in CXM or CRM but not to candidates using the form on a career site). Selecting a form name from the table opens a page to view and edit that form. For more information, review Reviewing and Editing Saved Forms below.
- Description: The description for that form. Forms descriptions, which are optional, are used to provide more information about a form and/or distinguish it from other forms.
- Language: The language used for text on the form.
- Active: A toggle that determines if the form is active (i.e., able to be added to landing pages) or inactive (i.e., unable to be added to landing pages). For more information, review Deactivating Forms below.
Searching for Forms
Search for forms in the table by selecting the Open Search Drawer button at the top or the magnifying glass on the right border. This opens the Sign-Up Form Search panel on the right, where you conduct your search.
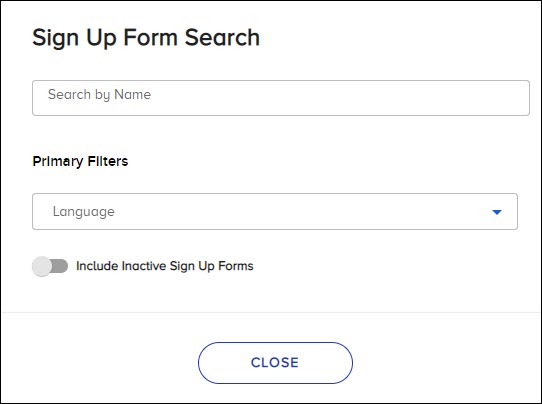
This panel includes the following search options:
- Search by Name: Enter a form name in this field; forms matching that name will display in the table.
- Primary Filter: Language: Use the dropdown to select one or several languages; forms in any of those selected languages will display in the table.
- Include Inactive Sign-Up Forms: Enable the toggle to display inactive forms in the table.
Creating Forms
To create a new form, select the Create New Form (+) button at the bottom right of the Sign-Up Forms tab and select one of these options:
- Default Form: To work off of CXM's or CRM's default sign-up form, which includes Upload Resume and Contact Info sections as a starting point.
- Blank Form: To build your form from scratch, with only a Contact Info section as a starting point.
Either option opens the Create Form page, which allows you to configure the new form with your desired information.
Once you select Submit at the bottom of the Create Form page, your form is saved and added to the table on the Sign-Up Forms tab.
Understanding Form Configuration
On the Create Form page, you can customize the form to include different sections of information, arranged to your specifications.
Each section is made up of questions that the candidate answers or fills out on the form, and each question corresponds to a particular field on the Add Candidate page in CXM or CRM. (When selecting the Default Form option, various sections and questions are already laid out.)
Once a candidate submits a form on your career site, the information they entered for each question is transferred to the corresponding field on their new CXM or CRM profile.
Example Scenario: On the form, you want to ask the candidate for their preferred method of communication. To do this, you would add that question on the Create Form page and map it to the Select Best Communication Method field. The candidate’s answer would then be accessible on their profile where that field lives (on the Background tab > Additional Information subtab > Communication Preferences section).
Notes:
- Questions are laid out in the order they are added to a particular section.
- Each question on the form has the same field type as its corresponding field on the Add Candidate page. For instance, if your selected field is a date picker, your question will also display as a date picker on the form.
Filling In Form Details
By default, the Create Form page includes a Form Details section at the top, which features the following fields:
- Form Name (required): Enter a name for the new form.
- Form Description: Enter a short description of the form.
- Sign-Up Form Language (required): Select the language the form should be in.
- Note: Form field labels are translated for standard question fields, but section headings and custom fields must be amended manually.
- Preview Form in Selected Language: Enable this toggle to translate all sections and questions on the Create Form page in the selected language. (This allows you to confirm that the translations are satisfactory before saving the form in that language.)
- Enable Embed Option: Enable this toggle to allow the form to be embedded manually on web pages instead of creating landing pages via CXM or CRM.
- For each web page where you plan to embed the form, enter the domain name into the Source Hostnames text field. If you want to be able to embed the form on multiple pages with different domain names, enter the domains separated by commas, e.g., icims.com, community.icims.com.
At minimum, you must provide a name and select a language to save a new form.
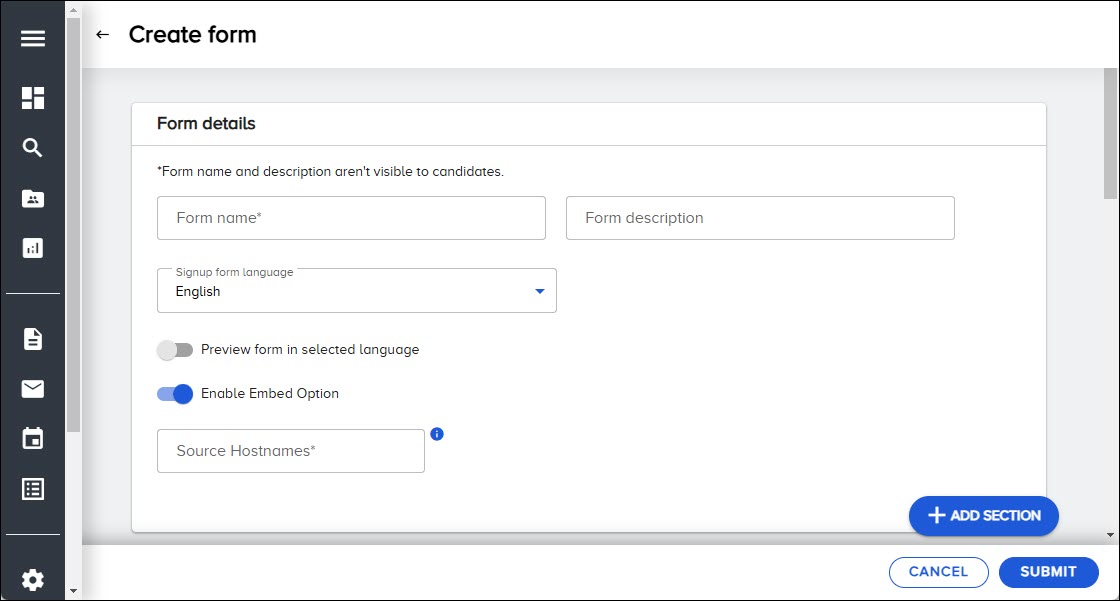
Note: By default, any sign-up form embedded on a career site landing page will include a resume upload option for candidates; information from the uploaded resume will automatically get parsed into the appropriate fields on the form. Keep that in mind as you proceed to configure new forms, as discussed in the sections below.
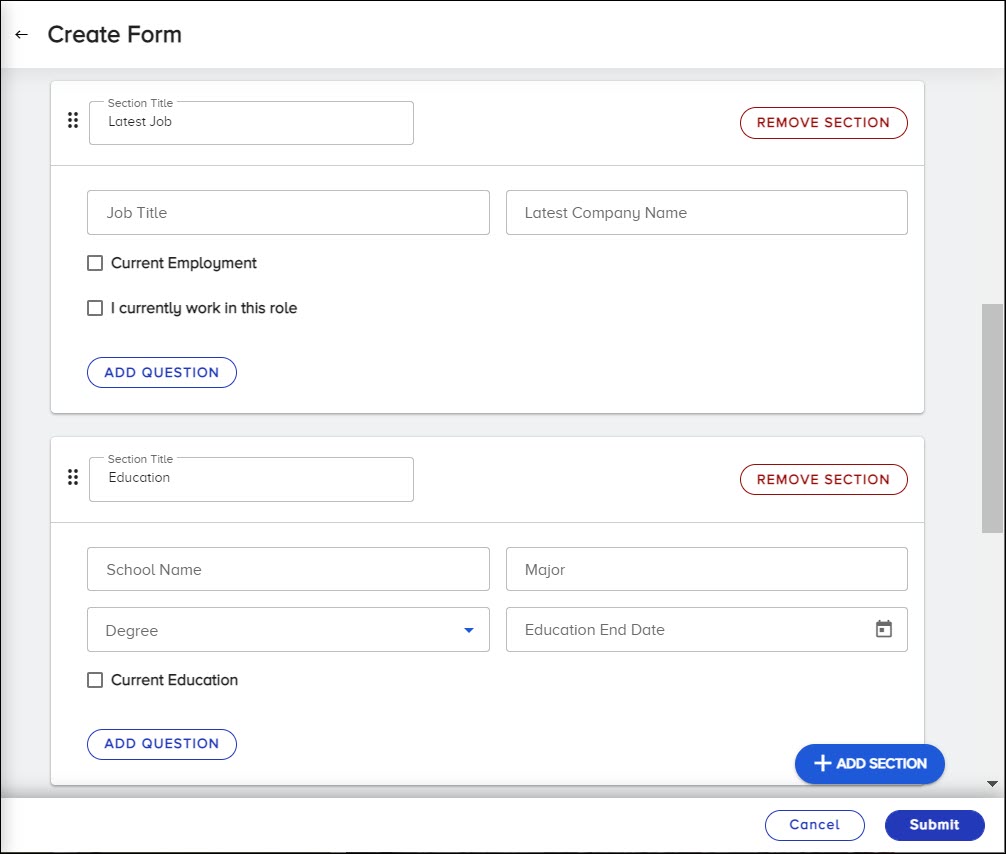
Adding Sections
To add a new section to the form, select the Add Section (+) button at the bottom. A new section opens on the page with a Section Title field displayed. You must enter a title in this field to add the new section to the form.

Note: A Contact Info section displays on all forms by default, featuring three fields that candidates are required to fill out: First Name, Last Name, and Email. This section and these three fields cannot be removed from the Create Form page. However, you can add new fields to this section, and those fields can be deleted.
Adding Questions to a Section
To add questions to a section, select the Add Question (+) button in that section of the Create Form page. This opens the Add Question window, where you provide the following information:
- New Row: Enable this toggle for the question to display on the form in a new row.
- Note: You will not have access to this toggle once your question has been saved.
- Select Field: Use this dropdown to select the field you want to map to your new question. For instance, if you select City, the candidate on the form will be presented with a simple text field to enter their city of residence.
- Answer Options (will only display if the selected field above is a dropdown or yes/no question): Check the box next to the specific options you want to display for that question on the form. For instance, if your selected field is Desired Job Type, you can add any of that field’s default options: Full Time, Part Time, Internship/Co-Op.
- Translated Field Label: Enter a label for the question, which will be displayed to candidates on the form and translated in the form’s selected language. Once you select a field above, its field name is automatically populated as the label, but you can overwrite that default field label here.
- Tip: To determine if your field label is translatable in your selected language, enable the Preview Form in Selected Language toggle in the Form Details section.
- Field Width: Select the width of the question in its row on the form. Choose from the following options: Full, Three Quarters, Two Thirds, Half, One Third, One Quarter.
- Note: Only the widths available for the current row will be selectable options. For instance, if the current row is three-quarters full, the only option for your new question will be One Quarter. To select a different width option, enable the New Row toggle to place the question in a new row.
- Required Field: Enable this toggle to require candidates to answer the question.
When finished, select Save at the bottom of this window. The new question will then display in the appropriate section on the Create Form page, with the label you entered and in the width you selected.
Example Scenario: On your form, you need all candidates to answer the following question: How active are you in finding a new job? You prefer that it displays in its own row, taking up half the space, and uses all default options. To set this up, fill out the Add Question window as such:
- New Row: Enable the toggle to place this question in a new row.
- Select Field: Select Job-Seeking Status. (Since that field is a dropdown on the Add Candidate page in CXM or CRM, it would also display as a dropdown on your sign-up form, with the same default options.)
- Answer Options: Check the boxes for all available options: Active, Passive, and Not Seeking.
- Translated Field Label: Enter How active are you in finding a new job?
- Field Width: Select Half.
- Required Field: Enable the toggle to make this a required question.
Available Question Fields
You can add questions to populate any of the following standard fields. If the Signup Form Language is set to a language other than English (US), these questions are translated into the language selected.
- Address 1
- Address 2
- City
- State
- Zip
- Country
- Offers a dropdown list of countries from which you must select potential answers to make available
- Phone number
- Phone type
- Offers checkboxes for Home, Mobile, Work, and Other, from which you must select potential answers to make available
- Best communication method
- Offers checkboxes for Phone, Email, and SMS, from which you must select potential answers to make available
- Best time to contact
- Offers checkboxes for Afternoon, Evening, and Morning, from which you must select potential answers to make available
- Job title
- Employer
- Employer start month and year
- Employer end month and year
- I currently work in this role
- School name
- Major
- Degree level
- Offers checkboxes for High School, Associates degree, Bachelors degree, Masters degree, and Doctorate, from which you must select potential answers to make available
- GPA
- Education start month and year
- Education end month and year
- I am currently a student
- Eligible to work in the us?
- Offers checkboxes for Yes and No from which you must select potential answers to make available
- Eligible to work in the EU?
- Offers checkboxes for Yes and No from which you must select potential answers to make available
- Do you have a non-compete?
- Offers checkboxes for Yes and No from which you must select potential answers to make available
- Fluent languages
- Offers a dropdown list of languages from which you must select potential answers to make available
- Willing to relocate?
- Offers checkboxes for Yes and No from which you must select potential answers to make available
- City, state, country
- Preferred skills
- Offers a dropdown menu of any preferred skills added to your account, from which you must select potential answers to make available – to add or edit preferred skills, submit a case to iCIMS Technical Support
- Tags
- Offers a dropdown list of existing tags from which you must select potential answers to make available
- Link
- Link type
- Offers checkboxes for different social media platforms or more general labels (e.g., accomplishment) from which you must select potential answers to make available
- Already hired?
- Category
- Offers a dropdown list of customer-defined categories from which you must select potential answers to make available
- Skills
- Offers the ability to search for skills (either from the standard list or from your organization’s custom library) and select potential answers to make available
- Pipelines
- Offers a dropdown list of existing pipelines from which you must select potential answers to make available, which candidates can then use to self-select which pipelines they would like to join
- Job seeking status
- Offers checkboxes for Active, Not seeking, and Passive, from which you must select potential answers to make available
- Student level
- Offers checkboxes for Undergraduate and Graduate from which you must select potential answers to make available
- Have you previously worked for this company?
- Offers checkboxes for Yes and No from which you must select potential answers to make available
- Upload resume
Recruiter admins can also create custom fields for questions beyond the standard field options. For more information on how to do this, review the Creating and Managing Custom Fields in iCIMS Candidate Experience Management (CXM) and iCIMS Candidate Relationship Management (CRM) article.
Note: There may sometimes be a delay between when you create the field and when it displays in the list of available question fields to add to a sign-up form.
Editing and Deleting Questions from a Section
You can make changes to any question in any section. To edit a question, select its box on the Create Form page. This opens the Edit Question window, which mimics the Add Question window. Update any information, and select Save when finished.
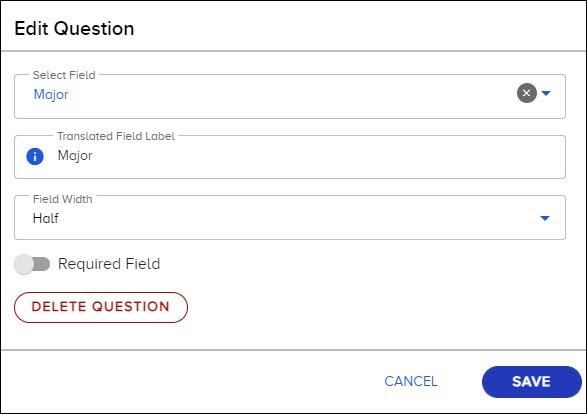
To delete the question entirely, select the Delete Question button in the Edit Question window. (This button is not available when first setting up the field; it only displays in the window after the field has been created.) Once you delete a field, its box is removed from the Create Form page.
Note: If you want to change a question’s field width, you will only be presented with widths that fit within its current row.
Moving Questions within a Section
You can rearrange individual questions within a section by dragging and dropping them to a new spot or row in that section. (Once you start to drag a question, its box becomes highlighted with a thick blue outline.)
Field widths do not change when moving a question. As a result, you can only drop a question in a row that has available width. For instance, if a row is half-full, you won't be able to insert a question that is two-thirds wide.
Tip: Drag a question to the very bottom of the section to insert it into its own new row.
Deleting and Moving Sections
To completely delete a section from the form, navigate to that section on the Create Form page and select the Remove Section button.
To move a section to a different spot on the form, select the three-dot icon to the left of the Section Title, drag the section up or down, and drop it in its new place on the form.
Reviewing and Editing Saved Forms
After a form has been created, you can review that form and make changes to it by:
- Selecting the form’s name from the table on the Sign-Up Forms tab, or
- Selecting the three-dot action button in the form’s row in the table and selecting Edit.
Either option opens the Edit Form page, which includes the current form information populated in the appropriate sections and questions. Add, edit, and remove sections and fields as desired (described in the subsections under Creating Forms above).
Duplicating Forms
To create a new form based on an existing form, use the duplication feature. This saves you time as you do not have to create a brand-new form from scratch.
To duplicate a form, select the three-dot action button in the desired form’s row in the table; then select Duplicate. A Duplicate Form page displays, which mimics the Edit Form page and includes the current information for that existing form. Update the form as needed, and select Submit at the bottom to create your duplicate.
Tip: Use this functionality to duplicate the same form in multiple languages. For each duplicate, simply change the selected language in the Sign-Up Form Language field. The translated field labels will update for all supported languages. Custom fields will not be translated.
Deactivating Forms
If your organization no longer wants to use a form, you have the option to deactivate it. Deactivated forms remain in the system but cannot be added to landing pages for candidates to fill out.
To deactivate a form, navigate to its row on the Sign-Up Forms tab and disable the Active toggle, turning it gray. (Active forms have a blue toggle.) You can reactivate a form at any time by turning its Active toggle back on.
Managing Landing Pages
The Landing Pages tab lists all of your organization’s landing pages in table format. The following columns are included in the table:
- Landing Page Name: The assigned name of the landing page (not necessarily the header or text that displays on the page itself). Selecting a landing page name from the table allows you to view and edit the details for that page. For more information, review Reviewing, Editing, and Deleting Saved Landing Pages below.
- Creator: The email address of the recruiter in CXM or CRM who created that landing page.
- Created Date: The exact date the landing page was created (in MM/DD/YYYY format).
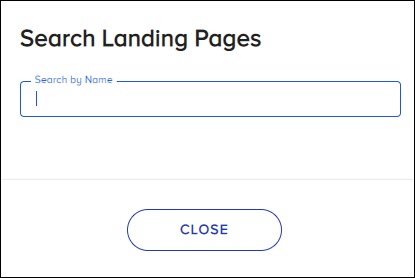
Searching for Landing Pages
To search for landing pages in the table, open the search panel by selecting the Open Search Drawer button at the top or the magnifying glass on the right border. Then, use the Search by Name field in the panel to find your page(s).
Creating Landing Pages
To create a new landing page, select the Create New Landing Page (+) button at the bottom right of the Landing Pages tab, then select a primary language from the dropdown menu that displays on the Select Primary language popup and select Continue.
Note: The languages available from this dropdown are set during implementation. To add languages later, submit a case to iCIMS Technical Support.
This opens a page with three sections of information (which are discussed in the sections below):
Use the fields provided to set up and provide information for your new page. Once you have created the initial version of a page you can add variants in other languages for different locales.
Once you select Submit at the bottom, your landing page is saved and added to the table on the Landing Pages tab; the page is made live on your career site within one hour of submission, with the selected sign-up form automatically embedded.
Note: Depending on the type of landing page you’re creating, its purpose, and its location, you may want to make some design changes. After saving your new landing page, work with your iCIMS technical point of contact to customize the fonts and colors on the page.
Filling In Name Details
The Landing Page Name section includes the following fields:
- Landing Page URL Name (required): Enter a name that will be added to your URL, leading candidates to the new landing page. For example, the HexDigital company has an iCIMS career site and creates a new landing page with the URL name financejobs. Candidates would access it via www.hexdigitaljobs.com/financejobs.
- Notes:
- Once set, this field cannot be changed.
- As in the example above, best practice is to use only lowercase letters.
- If you do not have an iCIMS career site, the URL name you select here will be appended to the iCIMS-specific URL used for sign-up forms on your site.
- Landing Page Title (required): Enter a title for your landing page. This is the title that will display in the table on the Landing Pages tab, as well as in any external search results (e.g., Google).
- Sign-Up Form: Use this dropdown to select the specific sign-up form you want added to your landing page. All forms from the Sign-Up Forms tab are available here for selection. Your selected form will automatically be embedded on your new page once it goes live on your career site.
- Add Pipelines: Use this dropdown to assign pipelines to this landing page. This means that any candidate who completes the sign-up form on this page will automatically be added to those assigned pipelines in CXM or CRM. All pipelines from the Pipelines page are available here for selection.
- Add Tags: Use this dropdown to assign tags to this landing page. This means that any candidate who completes the sign-up form on this page will automatically be assigned those tags on their CXM or CRM profile. All tags from the Tags tab (on the Admin Settings page) are available here for selection. For more on tags, review the article Creating and Managing Tags in iCIMS Candidate Experience Management (CXM) and iCIMS Candidate Relationship Management (CRM).
Filling In Header Details
On each landing page, you can insert header text at the top of the whole page, as well as separate header text for any content you add later. You may not need to utilize all of the header options in the Landing Page Headers section, but you can use them as desired to provide the best flow and organization for your page.
- Main Header Text: Enter text for the top-most header of the entire page.
- Main Subheader Text: Enter text for the header directly underneath the main header.
- Redirect Candidate to Form: Select this toggle to have candidates bypass a landing page and go straight to the associated sign-up form.
- Drag & Drop Landing Page Background Image: Include your own background image for the page by selecting Browse and uploading an image from your device, or by dragging and dropping an image from your device onto the rectangular Drag & Drop box.
- Notes:
- For the image to upload successfully, it must be:
- In landscape orientation
- 5MB or less
- 1200px or greater in width
- An error message will display at the bottom if any of these requirements are not met.
- Once an image has been uploaded, its file name will display directly underneath the Drag & Drop box.
- Tip: Use the preview image in this section to get a sense of a landing page's layout.
Customizing Success Messaging
You can determine the specific messaging that displays to candidates once they submit the form successfully on your career site. The following fields are available under Success Page Content to set this up:
- Success Header Text: Enter text for the header at the top of the success page.
- Success Message: Enter the exact messaging you want to include on the success page.
Localizing Landing Pages
You can create alternate versions of the same landing page in different languages—and linking to sign-up forms in different languages—by completing the steps below.
Note: CXM and CRM do not translate page content for you; when following the steps below to create versions of a landing page in different languages, all content aside from the page URL must be re-entered in the selected language.
- From the Form Management for Admin page, select the three-dot action button next to the landing page to be localized, then select Manage Languages. The Manage Languages popup displays.
- Select Add Language in the lower right corner of the popup. The Add Language popup displays.
- Select the desired language from the dropdown menu and select Continue. The Create Landing Page Language page displays.
- Available languages are set during implementation. Additionally, if a version of a landing page already exists for an available language, the language is listed as Active and a new version of the page cannot be created in that language (though the existing page can be edited; for more information, review the Reviewing, Editing, and Deleting Saved Landing Pages section below). Only inactive languages can be selected for new landing page variants.
- The Create Landing Page Language page is identical to the Create Landing Page page that displays when creating a new primary version of a landing page, with the exception that the Landing Page URL Name field is already filled in and cannot be edited.
- Complete the Create Landing Page Language page in the selected language. When you have finished, select Submit. A confirmation message displays, including a button to return to the Form Management for Admin page.
- Repeat the steps above for each additional language variation desired.
Reviewing, Editing, and Deleting Saved Landing Pages
After a landing page has been created, you can take action on that page from the table on the Landing Pages tab. This includes:
- Viewing the page: Select View in the page's row in the table to open the page on your career site (in your default Web browser). Review formatting, content, and other information to determine if any changes need to be made.
- Note: If your page is not yet live on your career site, a Landing Page Status message opens, alerting you that the page is still being updated.
- Editing the page: Select the three-dot action button at the far right of the page's row and select Edit. This opens the Edit page, which includes the current page information populated in the Landing Page Name, Landing Page Headers, and Success Page Content sections. This also includes a language dropdown menu to the upper right, which you can use to switch between the versions of the page for different languages. Make changes to any of the information here (described in the subsections above), and select Submit.
- Note: Selecting the landing page name in the table also opens the Edit page.
- Deleting the page: Select the three-dot action button and select Delete to remove the page from the Landing Pages tab (and your career site). Selecting this option opens the Delete Landing Page window, where you must confirm the deletion before proceeding.
- Warning: Deleting a landing page is a permanent action that cannot be undone.
Embedding Sign-Up Forms
As an alternative to creating a landing page for your sign-up form, you can enable embedding to have CXM or CRM generate code for you to embed your form on your career site or other web properties. There are two steps to this process: enabling embedding and copying and pasting the code.
You can enable embedding while creating or editing a sign-up form using the Enable Embed Option toggle. Once you have enabled this toggle, the Source Hostnames text field displays. Enter the domain name for your career site into this field. If you want to be able to embed the form on multiple pages with different domain names, enter the domains separated by commas, e.g., icims.com, community.icims.com.
To embed a form that has this feature enabled, complete the steps below:
- From the Form Management page, select the Actions icon next to the form you want to embed. Select Embed Form from the list of options. The Embed Sign-Up Form popup displays.
- Select the Copy Form Code button to copy the embedding code.
- Paste the code into your career site or other web page’s html where desired.

