Overview
Candidate Relationship Management (CRM) is a powerful tool that enables you to create and maintain a network of qualified candidates. CRM works with iCIMS Applicant Tracking (ATS), enabling you to recruit for open jobs using the candidates already in your network.
iCIMS Candidate Experience Management (CXM) combines the functionality of traditional candidate relationship management technology with AI-enhanced marketing automation capabilities to assess candidate engagement and automate campaigns.
For more on CXM and CRM, review the Getting Started with iCIMS Candidate Experience Management (CXM) and iCIMS Candidate Relationship (CRM) article.
This article includes the following sections to assist you with adding candidates in CXM and CRM:
Understanding How Candidates Are Added to CXM and CRM
iCIMS has created a sync between ATS and CXM or CRM so that certain job and applicant information from ATS is automatically transferred to CXM or CRM. (For more information, review the Understanding Data Syncing Between iCIMS Applicant Tracking (ATS) and iCIMS Candidate Experience Management (CXM) or iCIMS Candidate Relationship Management (CRM) article.) For customers with both products, candidates are added to CXM or CRM automatically in the following instances:
- When they submit an application for a job on your ATS career site. CXM or CRM creates a profile for each new candidate using the information they input in their application.
- When they join your talent network through a sign-up link on your career site (so they can connect with your organization and be considered for future job opportunities).
- When a recruiter creates a profile for a candidate in ATS. Candidates in ATS are automatically imported into CXM or CRM.
In all other instances, candidates must be added to CXM or CRM manually by a recruiter through the Candidate Search page, which is accessible by selecting the Candidate Search (magnifying glass) icon from the vertical navigation menu, or through the Sourcing Extension feature of the iCIMS Browser Extension. For more information on adding candidates directly within CXM or CRM, review Creating New Candidates Manually below. For more information on the Sourcing Extension feature, review the Using the iCIMS Sourcing Extension for iCIMS Candidate Experience Management (CXM) and iCIMS Candidate Relationship Management (CRM) article.
Notes:
- For customers who have CXM or CRM set up to sync with their iCIMS ATS, candidates added to CXM or CRM are automatically added to iCIMS ATS if they are not already in that system (i.e., they do not have an existing ATS ID). This ensures that candidates who appear in one system also appear in the other.
- In addition, updates made to a candidate’s profile in either system are instantly reflected in the other. For instance, if a recruiter manually changes a candidate’s phone number in their CXM or CRM profile, that updated phone number is immediately populated in their ATS profile, as well.
Creating New Candidates Manually
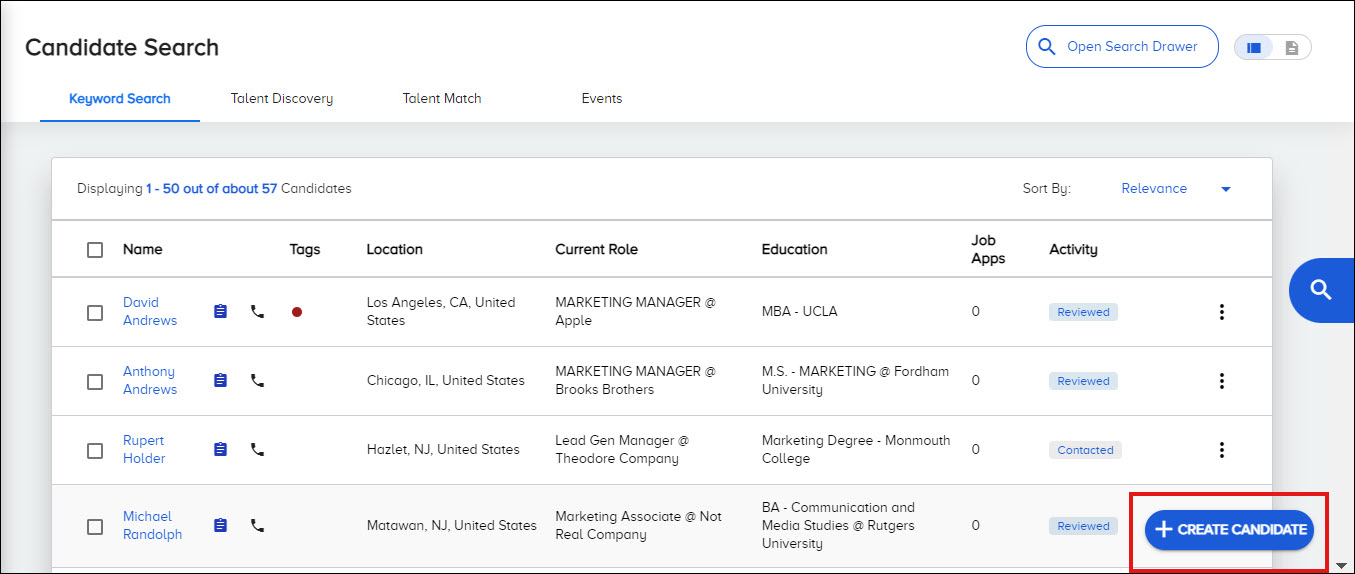
To manually add candidates to your CXM or CRM, select the Create Candidate (+) button at the bottom right of the Candidate Search page.
The following options are available from this menu, which are outlined in the sections below:
- Manual Entry: To create one new candidate by manually filling in fields for their candidate profile.
- Resume Upload: To create one or multiple new candidates by uploading resume files.
- CSV Upload: To create one or multiple new candidates by uploading a CSV import file. (This option is only available to recruiter admins.)

Selecting the Create Candidate button opens the three options available.
Using the Manual Entry Option
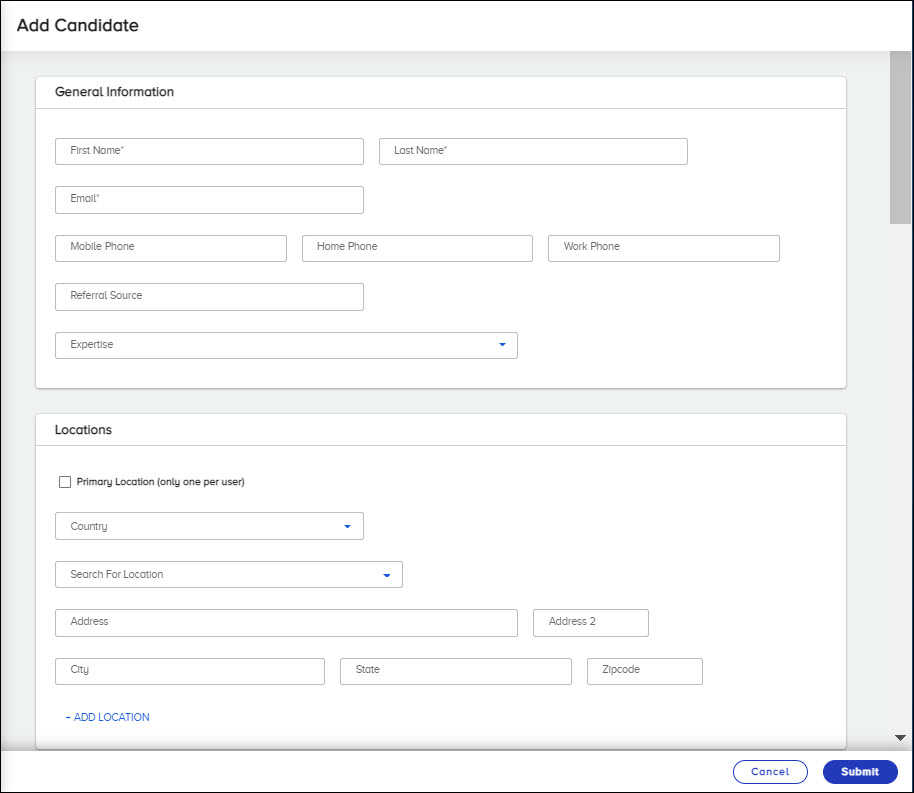
The Manual Entry option can be used to create a new profile for an individual who is not already in your CXM or CRM, such as a candidate recruited through a networking channel.
After selecting this option, the Add Candidate page opens, which includes the following sections of fields to be completed:
- General Information
- Locations
- Employment History
- Employer History
- Education History
- Eligibility Information
- Skills
- Communication Preferences
- Websites
- Custom Fields
Once you select Submit, the new candidate profile is created with the information provided in each section. For more on Candidate profiles, review the article Reviewing Profiles and Taking Action on Candidates in iCIMS Candidate Experience Management (CXM) and iCIMS Candidate Relationship Management (CRM).
Tips:
- The only required fields on this page are First Name, Last Name, and Email; however, to best evaluate the candidate for recruiting, complete as much information as possible.
- To add multiple locations, jobs, schools/degrees, or websites for a candidate, select the +Add link in that respective section on the page.
Using the Resume Upload Option
The Resume Upload option can be used to create new profiles in bulk when you have a batch of electronic resumes. For example, when accepting employee referrals for an open position, you can use this option to quickly import all submitted resumes.
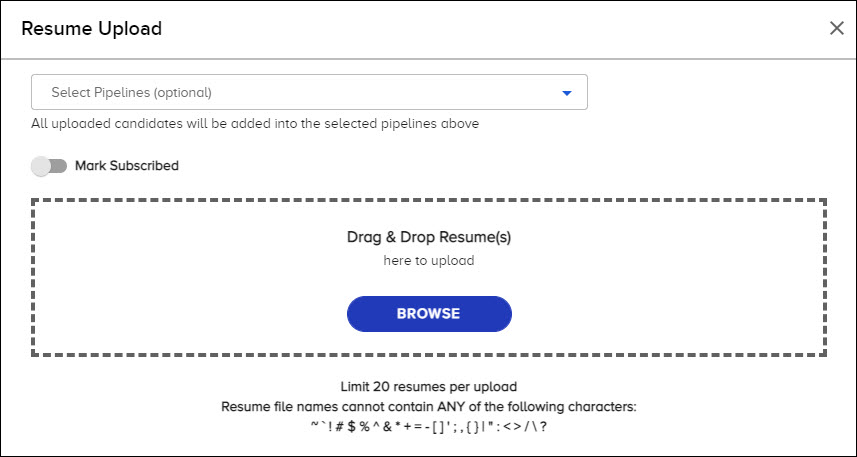
Selecting this option opens the Resume Upload window to add your resumes. Upload up to 20 resumes at one time by browsing for them on your computer or dragging-and-dropping them onto the Drag & Drop Resume(s) box.
The system will then parse information from each resume to create the new profiles.
Notes:
- On the Resume Upload window, you have the option to add your new candidates to one of more pipelines (i.e., groups of candidates) in your system. To do this, type the name of a pipeline in the Search Pipelines field at the top and select one of the matching auto-suggestions. Add any additional pipelines to this field as desired. For more on pipelines, review the article Setting Up Pipelines in iCIMS Candidate Experience Management (CXM) and iCIMS Candidate Relationship Management (CRM).
- You can request to add a Mark Subscribed toggle to the top of this window by reaching out to your iCIMS technical point of contact. When this toggle is included in the window and enabled, your uploaded candidates will be subscribed to mass emails. For more on emails in CXM and CRM, review the following articles:
Uploading One Resume
If you upload a single resume, an Edit Candidate page opens to create the individual candidate profile, with the parsed resume information auto-populated into the appropriate fields. (This page features the same fields and sections as the Add Candidate page discussed above.) Before selecting the Submit button, you have the ability to alter the information from any field and fill in fields that weren't populated.
Uploading Multiple Resumes
If you upload more than one resume, the system will process all resume files and then display a notification at the bottom with a link to view your results. Selecting this link opens a popup to view all candidates included in the upload:
- Candidates uploaded successfully are marked with a checkmark icon. Select View in a candidate's row to open their new profile.
- Candidates uploaded unsuccessfully are marked with an exclamation point icon. Hover your mouse over Failed in a candidate's row to determine why they were not uploaded (e.g., the email address in that candidate's resume already exists in your CXM or CRM).
Using the CSV Upload Option
The CSV Upload option, accessible only to recruiter admins, can be used to create multiple profiles at once from compiled candidate data. This is especially helpful for those who want to build full profiles for candidates, with all appropriate fields filled out as desired.
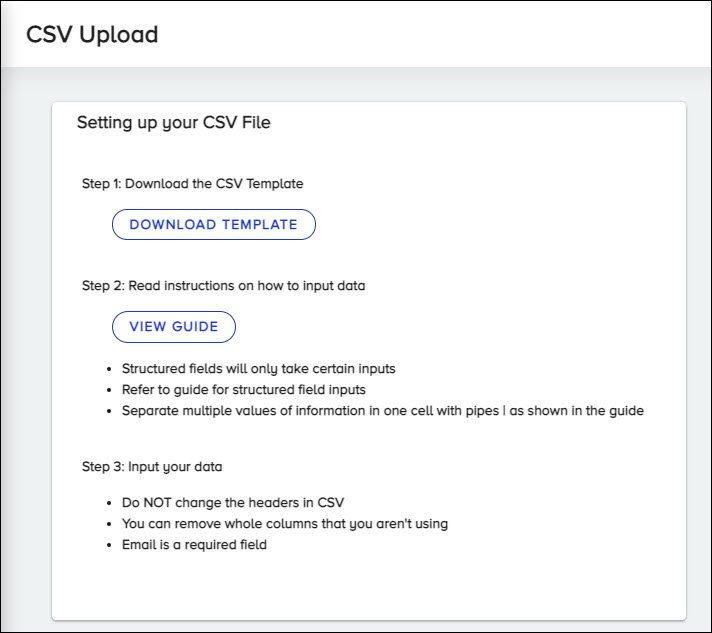
Selecting this option opens the CSV Upload page, which is broken up into three sections:
- Setting Up Your CSV File: Outlines how to set up headers in your CSV file (to correspond to fields on the candidate profile) and input content correctly under each of those headers. In this section, a CSV template is provided as an example to work off of; a detailed user guide is also included with instructions to set up the file.
- Notes:
- Headers in your CSV need to match those outlined in the template and user guide exactly for the file to upload successfully. After upload, if any header in your CSV does not match, the system will display a confirmation page allowing you to resolve each unmatched header. For more information, review Fixing Unmatched Columns below.
- Columns in the CSV can be laid out in any order. At minimum, the file must have one column for Email Address.
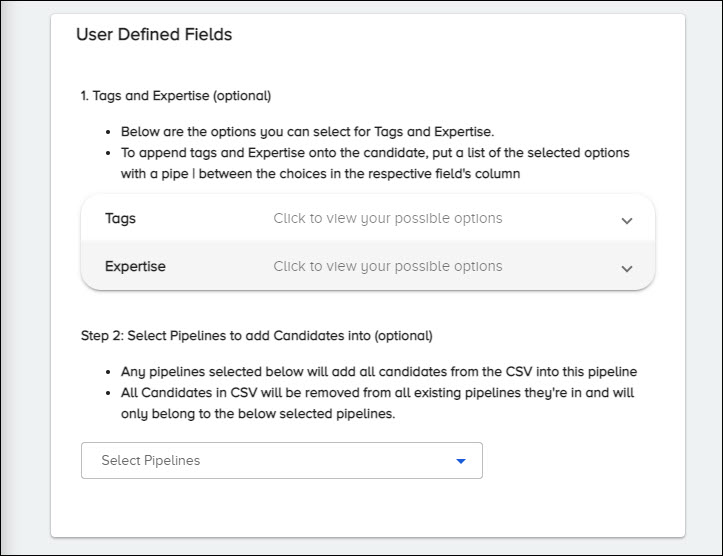
- User Defined Fields: Allows you to better perform the import by:
- Listing all customer-specific tags and expertise values so you can easily choose the appropriate one(s) when setting up the file.
- Giving you the ability to add all candidates in the upload to particular pipelines in your system. Select one or multiple pipelines using the Select Pipelines field.
- Warning: If candidates uploaded through your CSV are already in your CXM or CRM, they will be added to all pipelines selected in this field and removed from any other pipelines they currently belong to.
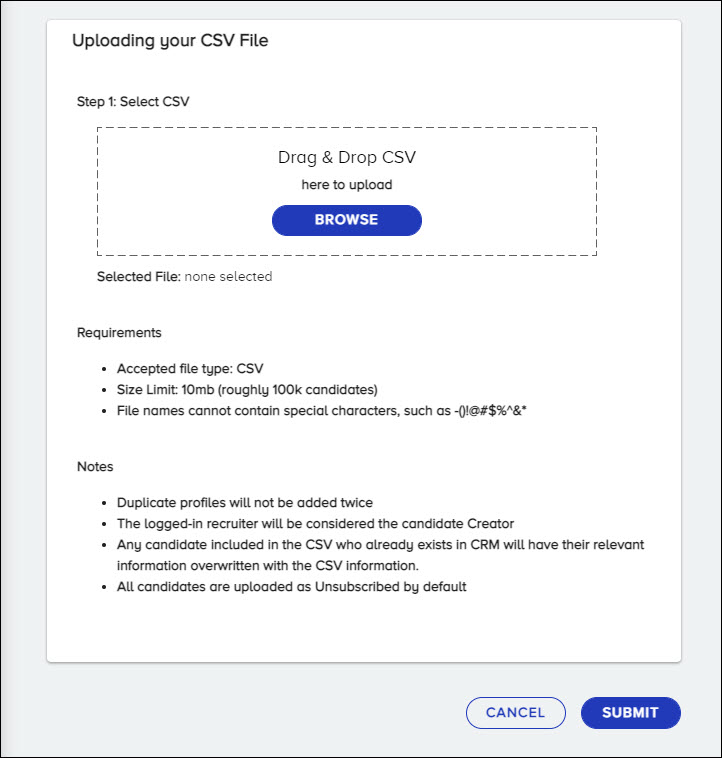
- Uploading Your CSV File: Enables you to upload a CSV file by browsing for it on your computer or dragging-and-dropping it onto the Drag & Drop CSV box. Only CSV files under 10 MB are accepted; the file name cannot have any special characters, such as hyphens and ampersands.
- Note: Once the file is uploaded, the file name displays underneath the Drag & Drop CSV box. The upload is started after you select Submit.
- Warning: Once the file is processed, CXM or CRM overwrites any existing candidates with information from your CSV. To avoid this, make sure candidates in your CSV are not already in your system.
Reviewing Upload Results
Upon selecting Submit, a confirmation message displays. It can take anywhere from 30 seconds to 30 minutes for the system to process the file, depending on how large it is. Once the file is processed, a notification displays at the bottom with a link to view your results.
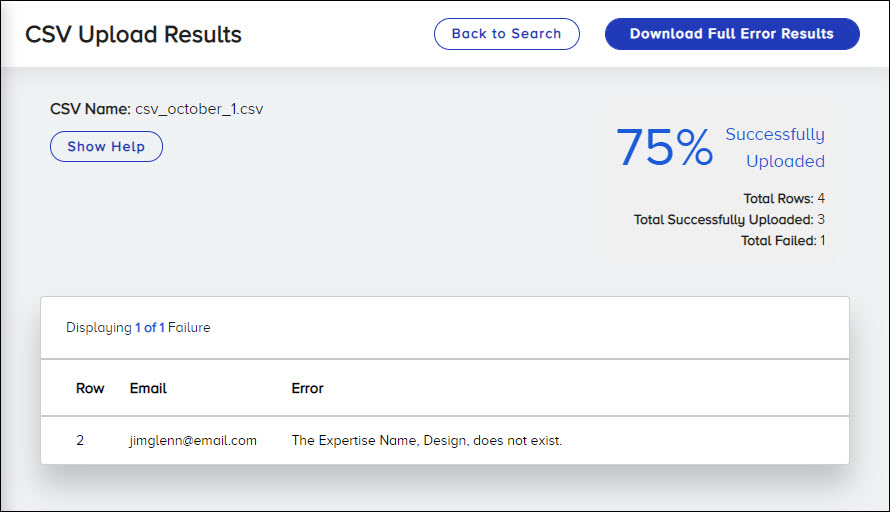
This results page shows:
- The percentage of candidates successfully uploaded
- The total number of candidate rows in the CSV
- The total number of candidates successfully uploaded and added to the Candidate Search page (Note: Duplicate candidates in the CSV are only added once.)
- The total number of failed candidates
- A list of the first 100 failing candidates and the errors that caused those failures
- Note: To download all errors as a CSV, select the Download Full Error Results button at the top right.
To fix any errors with your import, make the appropriate changes in your CSV and re-upload the file with the failed candidates only. If you still experience issues, submit a case to iCIMS Technical Support.
Fixing Unmatched Columns
If your CSV file contains any column headers that do not match the headers in the template exactly, the system will not display the CSV Upload Results page once the upload is complete. Instead, it will display a confirmation page flagging all unsupported column headers from your CSV. Here, you have the opportunity to fix these unmatched headers without having to reupload the file.
On this confirmation page, each unmatched header is displayed in its own box, along with the first value from that column in the CSV. To fix an unmatched header, select Choose Field in that header's box and select the correct header from the dropdown. (Only unclaimed headers are available for selection.) For example, for an incorrect header labeled 1st Name, you would match it to the correct header, First Name.
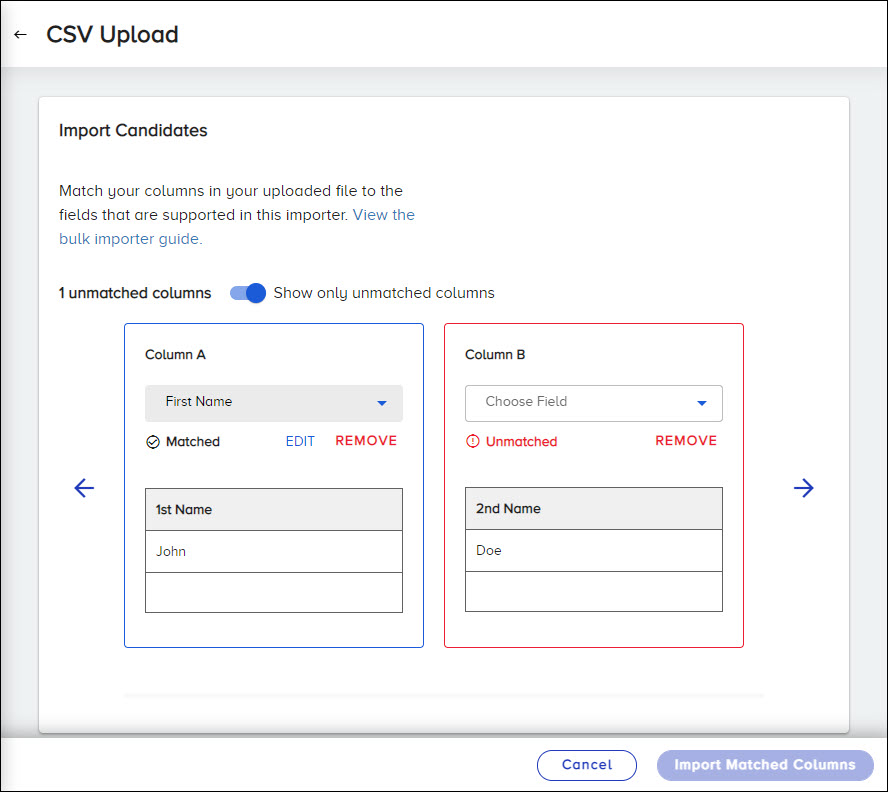
Once all unsupported headers have been matched, select the Import Matched Columns button at the bottom to proceed. This button is unavailable until all columns have been matched.
Notes:
- To display all columns from your CSV, not just unmatched columns, disable the toggle on this page for Show Only Unmatched Columns.
- After you have matched a column from this page, you can change your selection by selecting Edit in that header's box and choosing another option from the Choose Field dropdown.
- To completely delete a column, select Remove in that header's box.

