Overview
iCIMS Application Tracking (ATS) enables users to submit candidates, offers, jobs and iForms through an approval chain prior to taking action on the item. By default, user admins, recruiters, and hiring managers can all start any approval process. Permissions related to approval processes can be configured based on each client’s unique workflow and existing approval methods.
The Candidate Approval Process is used to submit a candidate for internal approval prior to sending the candidate to the hiring manager, allowing the corporate hierarchy to review the candidate before starting the interview process.
For information regarding how to configure the results available within an approval search, please refer to the Configuring Approver Searches Knowledge Base article. For information on acting as an approver for a candidate, please refer to the Acting as an Approver on a Job section of the Understanding and Initiating the Job Approval Process Knowledge Base article, as the steps are similar.
Routing Candidates for Approval
Note: A candidate must be associated with the relevant Job profile in order to route that candidate for approval. Please review the
Introduction to the Person Profile Knowledge Base article for additional information on working with candidates and submitting candidates to a job.
- Locate the relevant Job profile for which you are interested in submitting a candidate for approval through a quick search or full search.
- On the People tab in a Detailed View, select the checkbox next to the name of the candidate to send for approval, and click the Advance button at the bottom of the screen.
- Within the Advance status list, select the appropriate candidate approval status for your organization. (The name and availability of the status may be configured for your specific organization.) If a popup message displays, click OK.
- On the Edit Approval List screen, click the Edit Default Message link to view or change the email message that is sent to approvers, if desired. When finished editing this message, click the Save button in the Compose Email popup.
- Note: Message variables are highlighted in green and will populate with data when the email is sent. If the template says that it Contains Unavailable Variables, there are variables in the template that the system cannot access. If a variable is unavailable, it will appear with a strikethrough.
- Tip: Verify the presence of or add the Approval Button variable to the email message to allow approvers to approve or decline the candidate directly from the email they receive. This may be accomplished by clicking the Add Variables button, clicking Approval, then clicking General > Approval Button and clicking the Add Selected button.
- To access or generate a list of approvers, locate the Add Approvers section of the Edit Approval List screen. The dropdown to the immediate right of the Add Approvers label can include options to select a Person, Relational Person, and/or a Global Approval List. (Available options may differ depending upon specific system configurations and access permissions.)
- Select Person to add a specific person to the approval list. Click into the Make a Selection dropdown to search for and select the correct approver by clicking their name. Repeat to add as many approvers as necessary.
- Select Relational Person to add a person with a specific relationship to the candidate or job to the approval list. In the popup that displays, search for and/or identify the correct kind of approver. Click the correct title, and then click Add Selected.
(For example, to select the manager of the hiring manager for the job, select Relational Approvers > Job File > Job > Detail Tab > Hiring Manager > Employee Tab > Manager, and then click Add Selected.)
To add additional Relational Persons, click the Show Relational Approvers button. Repeat to add as many approvers as necessary.
- Select Global Approval List to add all persons and relational persons from a global approval list to this list. Click into the Make a Selection dropdown to search for and select the correct global approval list by clicking the name of the list. Note that the global approval list will populate as individual person or relational persons, not as a list, so that individuals can be removed or moved within the newly-created list. Repeat to add as many global approval list as necessary.
- Tips:
- Person, Relational Person, and Global Approval List selections may be made in any order, and adding a new selection will not overwrite existing approvers in the list.
- It is possible to add the same individual multiple times in an approval list. An individual who appears multiple times (by name and/or by relationship) will receive the approval request multiple times.
- For additional information about moving, deleting, and managing approvers from this screen, please refer to the Tips for Managing Approvers and Approval Lists article.
- Click the Save & Begin Approval button.
- Note: If the Begin Approvals button does not display on the approval screen, the minimum number of approvers may not have been reached. Enter at least the minimum number of approvers and click Save to prompt the Save & Begin Approval button to display.
- Click the OK button in the popup window to confirm the start of the approval process, if applicable. The system will automatically email each approver one at a time in the order they are listed. This process will continue until all approvers listed have responded.
- Note: Once the approval is initiated, the system uses the current information to resolve any relational approvers and send requests for approval to the appropriate people. If any relational approver cannot be resolved, the system will indicate that this approver is unavailable and, upon any attempt to proceed, will display a popup prompting the user to acknowledge that that approver will be removed from the list.
- View the finalized approval process in a Candidate Approval window. Each approver will be listed along with the status of their approval.
Warning: The link and/or approval buttons provided in the default email to each approver will allow them to approve the candidate and make comments without logging in. To avoid security concerns, this email should not be forwarded or carbon-copied to others.
Tips:
- Resend approval emails as reminders to listed approvers by clicking the Resend button.
- Skip over any listed approvers to advance the approval process by clicking the Skip button.
- The iCIMS system assigns a status to the approver so that the recruiter knows where the approval stands. These statuses can also be manually changed by users with appropriate permissions. The most common statuses are:
- Pending - Approvers have been assigned, but the approval email has not been sent.
- Notified - Approver has been notified, but hasn't yet viewed the email.
- Approved - Job, candidate, offer, or iForm has been approved.
- Rejected - Job, candidate, offer, or iForm approval has been declined.
- Skipped - Recruiter has manually set the status to Skipped so that the process does not stall.
- Viewed - Manager has viewed the approval email.
- Unable to Contact - Email has not reached the recipient.
- When a candidate is either approved or declined, the approval initiator will be notified automatically by the system. User admins can use the Candidate Approval Notification Recipients setting to update who receives this notification. For more information, see the Configuring Approval Notifications article.
- If an approved candidate must be sent back through the approval process, navigate to the People tab on the Job profile. Click Modify Filters, then click Advanced Search to view the full search form. Click Add Column and search for the Manager Approval Icon; add this icon to the search output if it is not already present (refer to the image below for more detail). Click Search to run the search.
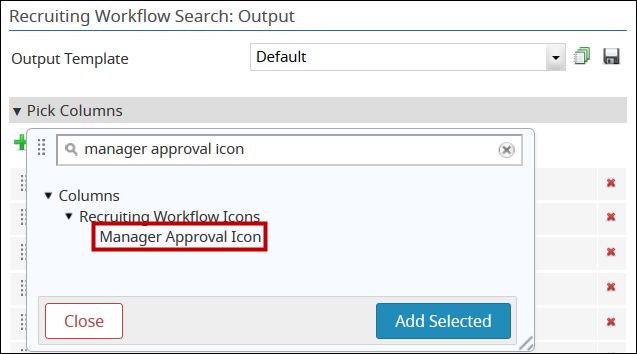
The Manager Approval Icon will display as a column in the search results; click this icon to review or Edit the approval process.

