| Note: This article pertains to iCIMS Applicant Tracking (ATS) and iCIMS Onboarding approval processes. If you are using iCIMS Offer Management to manage the offer process, refer to the following resources:
|
Overview
User admins can configure the automated notifications that are sent out when an approval process is approved or declined within iCIMS Applicant Tracking (ATS) and Onboarding. For each approval type within the system — Job, Offer, Candidate, and iForm—a unique recipient list can be created to determine who is notified upon completion of an approval process. Additionally, the email templates used by these automated notifications can also be configured.
Note: Only user admins are able to follow the steps in this article.
Managing Approval Notification Recipient Lists
For each approval type within the system, a unique recipient list can be configured to ensure the proper individuals are being notified when an approval process is approved or declined. By default, the recipient lists for each approval type are as follows:
- Job Approval
- Individual who initiated the approval process
- Creator of the Job Profile
- Job Owner (jcf3024)
- Offer, Candidate, and iForm Approvals
- Individual who initiated the approval process
Individuals can be added to or removed from these lists to tailor the automated notifications to your organization's needs. The steps below outline how to configure the Job Approval recipient list within iCIMS ATS. The steps are similar for configuring the lists for Offer, Candidate and iForm approvals.
1. Navigate to Admin > System Configuration > Applicant Tracking > Approval Settings >Job Approval Notification Recipients. Select Manage Notification Recipients. The Edit Notification Recipients page displays where recipients can be removed from the existing list, and new recipients can be added.
- Note: To configure the recipient list for another approval type, locate that approval type's corresponding Approval Notifications section.
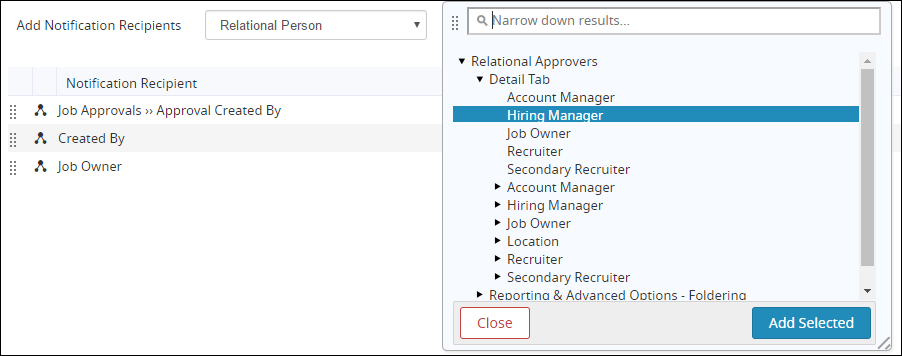
2. Locate the Add Notification Recipients section on this page. The dropdown to the immediate right of the Add Notification Recipients label includes Person, Relational Person, and Global Approval List options. Add all desired recipients to the list by following the appropriate steps below:
- Select Person to add a specific person to the recipient list. Select the Select dropdown to search for and select the correct recipient by selecting their name.
- Select Relational Person to add an individual with a specific relationship to the job to the recipient list. From the popup that displays, select the desired relational recipient. For example, to select the hiring manager listed on the job, select Relational Approvers > Detail Tab > Hiring Manager on the popup, then select Add Selected.
- To add additional Relational Persons, select the Show Relational Approver button.
- Select Global Approval List to add all persons and relational persons from an existing global approval list. Select the Select dropdown, and search for and select the desired global approval list by selecting the name of the list. For more information on global approval lists, refer to the Creating and Editing Global Approval Lists Knowledge Base article.
4. After reviewing the recipient list, select Save to save the configured list.
Notes:
- To remove a recipient from the list, select the Delete (X) icon on the right side of the row containing the individual to be removed. The row will become grayed out, and the individual will be deleted from the list upon saving.
- Each recipient list must contain at least one individual. If all recipients are removed from the list, an error will display upon saving. To disable these notifications, refer to the Disabling Approval Notifications section of this article.
- Each approval type available within the system has one approval notification recipient list that will be used for all approval processes of that type (e.g. the Job Approval recipient list will be used for every Job Approval process created in the system). Recipient lists cannot be configured on an individual approval process basis.
- The individuals on an approval notification recipient list will be notified when an approval process is either completed or declined (if both types of notifications are enabled). Separate approved and declined recipient lists cannot be configured.
- All individuals on a recipient list will be notified at the same time upon completion of an approval process; the order of the individuals on the Manage Notification Recipients page does not matter.
Configuring Approval Notification Email Templates
Separate Approved and Declined notification email templates can be configured for Job, Offer, and Candidate approvals. For iForm approvals, separate Approved and Declined templates are available for each of the most popular iForm types: Job, Person, Recruiting Workflow, and Company (Location). Notifications for other iForm types will use the default templates and cannot be configured.
The steps below discuss how to edit the Approved template for Offer Approvals within iCIMS ATS. The steps for configuring the other available templates are similar.
- Navigate to Admin > System Configuration > Applicant Tracking > Approval Settings > Offer Approval: Approved Email Template. Select Edit to launch a Compose Email window with the Approved template displayed.
- Note: To configure the templates for another approval type, locate that approval type's corresponding Approval Notifications section and select the appropriate Edit link.
- From the Compose Email window, edit the template as necessary. When finished, select Save.
- Note: Approval notification templates can leverage email variables. The variables available for use will differ depending upon the type of approval the template being edited corresponds to.
Disabling Approval Notifications
Each approval type within the system has separate automated Approved and Declined notifications. By default, both of these notifications are enabled for each approval type, though one or both of the notifications can be disabled, as desired.
The steps below outline how to disable the Declined notification for Job Approvals within iCIMS ATS. The steps to disable the other available notifications are similar.
1. Navigate to Admin > System Configuration > Applicant Tracking > Approval Settings > Job Approval: Declined Email Template. To the right of the setting, uncheck the box to disable the notification.
2. After disabling the desired notification(s), select Save on the top right.

