Overview
The searches and reports identified in the Common Reports article are the most commonly requested and include the following report type in iCIMS Applicant Tracking (ATS). To learn how to run searches and reports in iCIMS ATS, refer to the Creating a Recruiting Workflow Search article. To learn how to save a report for future use, refer to the Saving Search & Output Templates article.
For more information on the filters and columns used in this search, see Feature Highlight: Recruiting Workflow History Reports.
Recruiter Activity Report
Helpful Hint: When creating a search, it is helpful to first come up with a clear idea for your report. Think about which candidates you want to report on (the "Who"), what details you want to know about them (the "What"), and how you want to organize the information (the "How"). The more specific you are with your idea, the easier it will be to break it down into these three sections, which will help you choose the right Keywords and Filters (for "Who"), Columns (for "What"), and/or Group-Bys and Sort-Bys (for "How") for your report. This three section concept is used below to create a Recruiter Activity Report.
Scenario: You want to see every status change that your recruiting team made this month to track their recruiting activity.
1. Break your report idea down into the three sections to help determine the best way to create your search:
- Who are you reporting about: Using filters, you can focus your activity report on candidates who changed statuses during the current month.
- What do you want to know about them: Using columns, you can view details for each workflow status change.
- How would you like this information organized: Using group-bys, you can organize your results by the individual who made the status change to see each individual recruiter's activity.
2. To create your search inside the iCIMS system, from the top menu bar, select Search > Recruiting Workflow. The "Who," "What," and "How" directly correlate with the three sections (A, B, and C, respectively) outlined in the below image.
A. Keywords and Filters: Who are you reporting about?
To report on all status changes that occurred this month, add a filter for History Updated Date. To remove any status changes made by candidates themselves (such as submitting or withdrawing an application) to focus on recruiter activity, add a filter for Self-Nominations.
- Keywords: N/A for this report.
- Filters:
- Click Add Filter and add History Updated Date. The selection path is Reporting & Advanced Options - General > Recruiting Workflow History > Reporting & Advanced Options - Recruiting Workflow History > History Updated Date.
- Select This Month from the dropdown list to the right of the added filter.
- Click Add Filter and add Self-Nominations. The selection path is Reporting & Advanced Options - Advanced > Self-Nominations.
- Select Remove Self-Nominations from the dropdown list to the right of the added filter.
B. Columns: What do you want to know about these candidates?
To see who made each workflow status change, add a column for History Updated By. To view the status associated with each change and the date of the change, add columns for History Recruiting Workflow Status and History Updated Date. To view which candidate received the workflow status change, add a column for Recruiting Workflow Profile Name.
- For this report, the default output columns are not needed. Select – None – from the Output Template dropdown to quickly remove all unneeded default columns.
- Click Add Column and add History Updated By: Full Name: First Last. The selection path is Reporting & Advanced Options - General > Recruiting Workflow History > Reporting & Advanced Options - Recruiting Workflow History > History Updated By > Contact Tab > Full Name: First Last.
- Click Add Column and add History Recruiting Workflow Status. The selection path is Reporting & Advanced Options - General > Recruiting Workflow History > Reporting & Advanced Options - Recruiting Workflow History > History Recruiting Workflow Status.
- Click Add Column and add History Updated Date. The selection path is Reporting & Advanced Options - General > Recruiting Workflow History > Reporting & Advanced Options - Recruiting Workflow History > History Updated Date.
- Click Add Column and add Recruiting Workflow Profile (Person Full Name: First, Last Label). The selection path is Reporting & Advanced Options - General > Recruiting Workflow Profile (Person Full Name: First, Last Label).
C. Group Results By and Sort Results By: How would you like this information organized?
To review all workflow status changes made by an individual, add a group-by for History Updated By. To view the candidates that were moved into each status, add a group-by for History Recruiting Workflow Status.
- Click Add Group-By and add History Updated By: Full Name: First Last. The selection path is Reporting & Advanced Options - General > Recruiting Workflow History > Reporting & Advanced Options - Recruiting Workflow History > History Updated By > Contact Tab > Full Name: First Last.
- Click Add Level to add a subgrouping. In the new "Then, group by the following:" box, select the Add Group-By icon (green plus sign) and add History Recruiting Workflow Status. The selection path is Reporting & Advanced Options - General > Recruiting Workflow History > Reporting & Advanced Options - Recruiting Workflow History > History Recruiting Workflow Status.
Understanding the Search Results
After configuring the filters and output as described above, click Search and review the results. The screenshots below show how the search results may look.
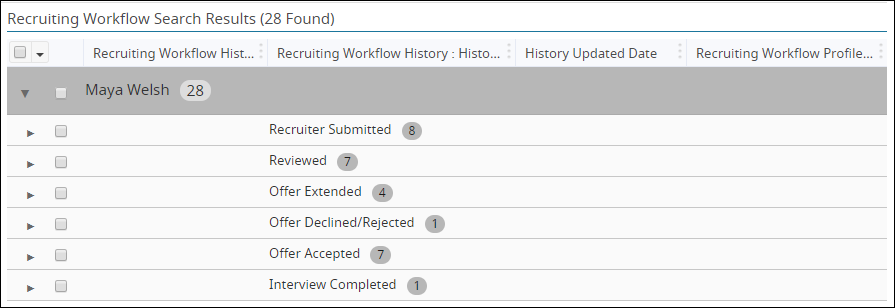
Search results with the first level grouping expanded for one user.
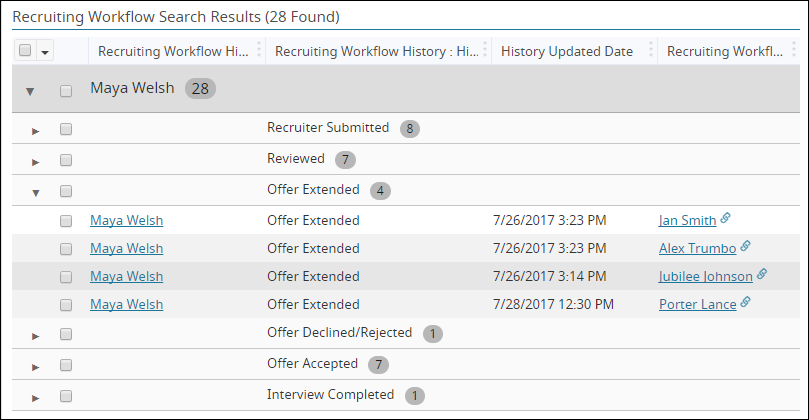
Search results with the first and second level grouping expanded for one Recruiting Workflow status.
The results of this search are grouped by the individual that made the changes to the applicant's status, then by the historical Recruiting Workflow status that the applicant was moved into. This allows you to review all of the moves that a recruiter has made to see which statuses were (and were not) used during the month.
Note that when using any History Filter or Column, the same candidate will appear in the search for each Recruit Workflow Status that the candidate has been moved into. It is important to use both History Filters and History Columns together, as the search results may be confusing when not using both.

