Overview
A Recruiting Workflow search
allows users to search for and report on candidates associated with specific jobs in iCIMS Applicant Tracking (ATS). Recruiting Workflow searches are the most popular search type as they contain a wealth of information, combining candidate, job, and status information into a single search type.
A Recruiting Workflow search can be leveraged to create time-to-fill, source effectiveness, and activity workflow searches. As with Job and Person searches, users can save Recruiting Workflow searches as templates for future use, as well as add them to the Dashboard for convenient viewing and up-to-date results.
To learn more about popular Recruiting Workflow searches, refer to the
Common Reports article.
Creating a Recruiting Workflow Search
Example: This section will demonstrate how to run a Recruiting Workflow search by guiding you through the following example:
- Search for all candidates in a rejected status.
- Group the search output by recruiter and then by job.
Steps
- To access the Recruiting Workflow search, select Search from the menu bar, then select Recruiting Workflow.
- Within the Recruiting Workflow Search: Filters section, click Show more to expand the section, if necessary, then click the Add Filter button.
- Type status into the search box on the filter popup and select Status (Category) under Filters > General. Then, click Add Selected.
- Tip: The Status (Category) filter allows you to select types (or categories) of statuses. This is helpful if you're looking for all rejected candidates, as in this example search, because you do not have to individually select all rejected statuses. An alternative option is the Status filter, which allows you to select specific statuses to filter your results by. This is helpful if you are looking for candidates in specific statuses.
- Verify the is operator displays in the center column of the added filter, then select Rejected Flag from the list of categories.
- If necessary, select the Show more link in the Recruiting Workflow: Output section to view any default columns that have been automatically selected for your search. Then, click the Add Column button to add additional columns to the search results.
- On the column picker popup, locate and add the following columns, if they are not already selected in your search output:
- Recruiting Workflow Profile (Person Full Name: First Last Label) under Columns > Reporting & Advanced Options - General
- Job: Title under Columns > Job File > Job > Details Tab
- Status under Columns > General
After selecting the columns on the popup, click Add Selected.
Tip: The Recruiting Workflow Profile (Person: Full Name: First Last) column used in this example displays a chainlink icon beside the candidate's name in the search results. Clicking the hyperlinked name (or the chainlink icon) will bring you to the candidate's Recruiting Workflow profile, rather than their Person profile.
- If necessary, click the triangle beside Group Results By to expand the Group Results By section. Then, click the red Delete icon to remove any existing groupings at any level, if applicable.
- Click the Add Group By button and search recruiter full name on the popup, then select Full Name: First Last under Group-Bys > Job File > Job > Details Tab > Recruiter > Contact Tab. Click Add Selected on the popup to add Recruiter: Full Name: First Last as your first grouping.
- Click Add Level to add a new subgroup. Notice the new subgroup area displays beneath the first group-by. Click the green Add Group-By (plus sign) icon within the subgroup to add the second level of grouping.
- Add Job Title as your second level of grouping by searching title and then selecting Title under Group-Bys > Job File > Job > Details Tab. Click Add Selected to add this grouping.
- Review your filters and output. Click Search to run the search.
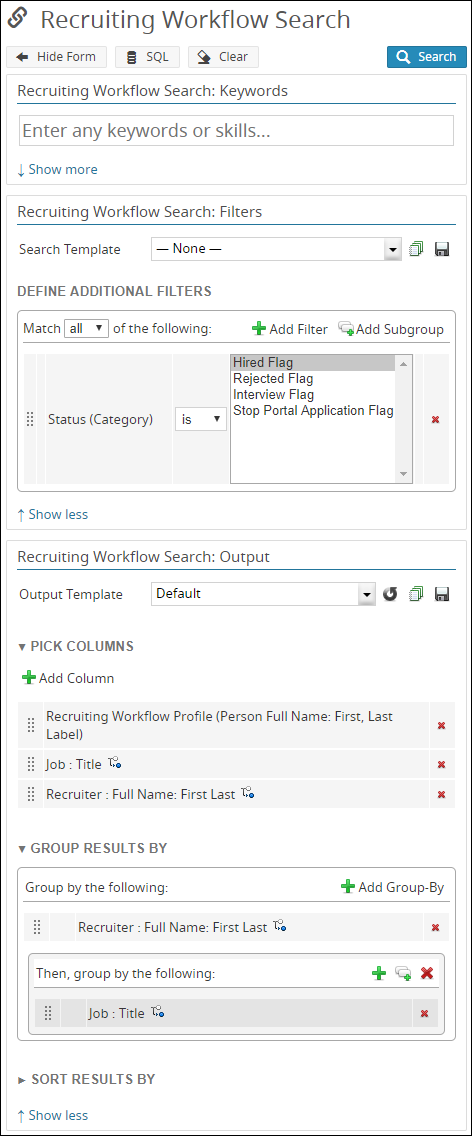
- Review your search results. Click the expand triangle to the left of each desired grouping to expand your groupings and view results.
Searching & Reporting Curriculum
The iCIMS Knowledge Base includes additional resources to introduce users to searching and reporting within the iCIMS system. These resources have been compiled in the following article: Searching & Reporting Curriculum. 
