Overview
iCIMS' Onboarding (formerly Preboard) streamlines new hire onboarding processes. Follow the steps below to onboard a new hire, assign additional tasks, and view or update a new hire's status.
Onboarding a New Hire
- Select Job in the Quick Search options. Search for a job with at least one candidate ready to be hired and onboarded.
- Access the People tab on the Job profile and select the By Status grouping option. Then, expand the Bins and Statuses to locate a candidate to be hired.
- Tip: Candidates may also be hired from a Recruiting Workflow profile. To do so, navigate to the Recruiting Workflow profile that connects the candidate with the job that you would like to hire them for, and proceed with the steps below.
- Select the candidate and then click Advance. Then, select the Hired:Hired status (or the appropriate status used by your organization).
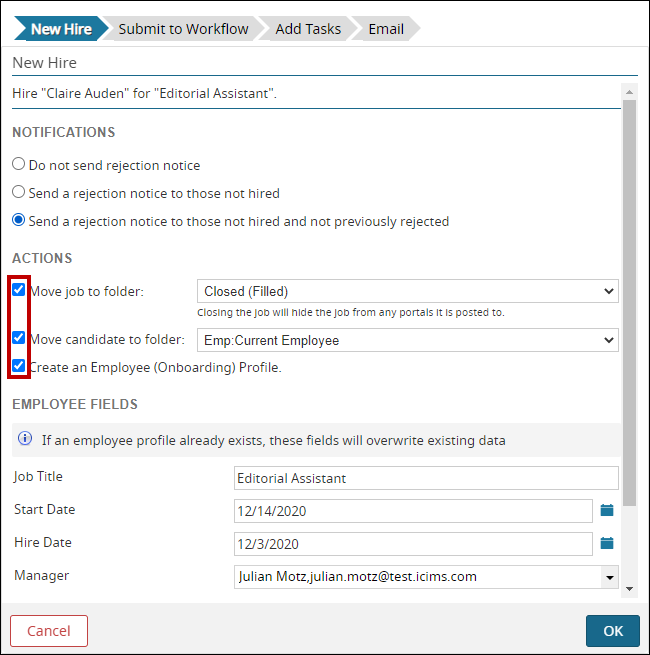
- Choose an option in the Notifications section, and then verify that all options in the Actions section (which are checked by default) are accurate. Finally, update any necessary information in the Employee Fields section and click OK.
- Tips:
- Select Move job to folder Closed (Filled) if the job should be closed at this time. If there are still more openings to fill, select the other options and leave Move job to folder unselected.
- Note: Depending on your organization's specific user group permissions, a user will be able to edit the Move job to folder field even if they cannot edit the Job Folder field from the Detail Tab of the Job profile.
- The fields in the Employee Fields section will auto-populate based on information in the Job profile. Make sure to enter or update the new hire's Start Date, which is commonly used for task due dates and some integrations.
- When the Create an Employee (Onboarding) Profile option is checked, the Employee tab will be added to the new hire's profile automatically, and you will be brought to this tab after completing the Onboarding Wizard.
- Configure the rejection notification that will be sent to other applicants (if applicable). Skip this step if you did not select one of the Send rejection notices on the previous screen.
- Filter by either the Type New Hire Category name to search or All New Hire Category Profiles option to select the appropriate Onboarding Workflow (which is represented by a New Hire Category), then click Submit.
- Tips:
- If you have previously associated a New Hire Category with the Job for which the new hire is being onboarded, the New Hire Category will be pre-selected for you.
- If the individual being hired is a rehire, any previous New Hire Category submissions will be indicated on the Submit to Workflow step of the popup. Rehires can be resubmitted to the same New Hire Category multiple times, if needed.
- An Assign Onboard Portal field will display on the Submit to Workflow step if you have two or more new hire portals enabled. It will allow you to select the new hire portal that the new hire should report to, and will determine which automated Onboard task notifications are sent to the new hire. (For more information about per-portal Onboard task notifications, please review the Configuring Onboard Task Notifications article.)
- Suggested Onboarding Workflow Tasks will be pre-selected. Click Add task(s) to assign these tasks to the new hire.
- Tips:
- If a new hire or rehire has previously completed a given task, the completed date will display in the Last Completed Date on the popup.
- To add additional tasks other than the suggested tasks, change the Filter By Category dropdown to a different category to view more tasks.
- Suggested tasks are determined by the task list on the Suggested Tasks tab of the associated New Hire Category.
- Click Send to email the Onboard Welcome Letter. This email will give the new hire access to the new hire portal so they can complete their tasks.
- Tips:
- The Onboard Welcome Letter template is created during implementation. To learn more about email templates and how to update them, please see the Creating and Editing Email Templates article.
- To resend the Onboard Welcome Letter to a new hire, navigate to the new hire's Person profile and click their email address, located on the top of the profile. Then, select the Onboard Welcome Letter template, modify as necessary, and click Send.
Assigning Additional Tasks to a New Hire
Additional Onboarding Workflow tasks can be assigned to a new hire from the Person profile Onboard Status tab. A count of these tasks displays in the new hire’s task progress bar. (Note: Only Onboarding Workflow tasks can be assigned from this tab. To assign Person tasks, use the Tasks tab and refer to the Creating Tasks article.)
- Navigate to the applicable new hire's Person profile.
- Select the Onboard Status tab and click Add Tasks.
- Tip: If multiple Onboarding Workflows exist, the Add Tasks button will display a dropdown of all available workflows. Select the appropriate workflow to assign tasks to from the list.
- Select the library tasks you want to assign to the new hire and click Add Task(s).
- Tip: Alternatively, to assign tasks that are not in the Task Library, select the create a non-library task link. Then, complete all of the required information and then click Save. (Note: The ability to create Non-Library Tasks is granted on a per-user group basis, and it is suggested that most tasks be added to the Task Library and re-used rather than created ad hoc. Non-Library Tasks will create complications when reporting on tasks with the Task Search.)
- Review the task(s) and click Save.
- On the new hire’s Onboard Status tab, view, edit, or delete tasks as applicable. .
Tips:
- Task notifications will be sent by the user who assigned each task, using the appropriate task notification template (configured by user admins in System Configuration).
- To re-open or reassign a task to a new hire, navigate back to their Onboard Status tab, click the Edit (pencil) icon beside the desired task, and then update the task's status to Open. Click Save to finalize this change.
Viewing and Updating a New Hire's Onboarding Workflow Status
New hires' Onboarding Workflow statuses will be automatically updated as they complete required tasks and finish the process on the new hire portal. However, these statuses may also be manually modified if necessary by following these steps.
- Navigate to the applicable new hire's Person profile.
- Select the Workflows tab and expand the Onboarding section to view their current status. Click the Take Action icon to update their status.
- Select a new status. Then, click Save.
iCIMS' Onboarding Curriculum
The iCIMS Knowledge Base includes additional resources to prepare users to use iCIMS' Onboarding. These resources have been compiled in the following article: Getting Started with iCIMS' Onboarding

