Overview
A number of iCIMS’ Talent Cloud products use email templates, including:
- iCIMS Applicant Tracking (ATS)
- iCIMS Offer Management
- iCIMS Onboarding
- iCIMS Connect (Legacy CRM)
Email templates are leveraged when creating emails with the Compose Email tool, saving users time and keeping an organization’s messaging consistent. Users can create and manage email templates in one central location via the Email Template Library (Library > Email Template).
Users can manage whether other users can use, edit, or delete their email templates. Template admins (typically user admins) can manage sharing and editing settings of all user templates, as well as edit the contents of the templates.
Access Note: Some functionality or actions described in this article may not be accessible to certain user groups based on an organization’s configurations.
This article is composed of the following sections:
Creating Email Templates
Users can leverage the Email Template Library to create new email templates and access a large range of variable types from one location. The steps to create a new email template are as follows:
- Click Library from the menu bar, then click Email Template.
- On the top right of the Email Template Library, click Create Template. The New Mail Template popup displays.
- Click the Profile Types dropdown and select an applicable option.
- Selecting a profile type automatically updates the variables available in the Add Variable dropdown within the toolbar. For more information, visit the Understanding Profile Types section of this article.
- For more information about variables, visit the Using Email Variables Knowledge Base article.
- Complete the Subject field.
- Enter the body of the email template, and format as applicable using the toolbar. The toolbar includes options for attachments, email variables, formatting, links, and images.
- Click Next. The Save Mail Template page displays.
- Complete the Title field and if desired, the Description field.
- Click the Template Category dropdown and select an applicable option.
- Tip: If you're a CRM user creating a template for an email campaign, select the Connect Email Campaign Templates option. Your saved template will then be accessible from that category in the Email Template Library.
- In the Sharing Options section, if applicable, determine which user groups should be able to use the email template and/or edit and delete the template.
- Click Save to save the template to the Email Template Library.
Note: Email templates can be created from any Compose Email window via the Save Current Email as Email Template icon. However, the range of variables available is limited based on where the
Compose Email window is launched in the system. Creating an email in the Email Template Library gives users access to all available variables based on their products.
Managing Email Templates
The Email Template Library allows template owners, template admins, and users given editing access to manage email templates after they have been created. Existing templates can be located based on category, searching, or filtering. Once located, an email template can be edited or archived.
Locating Email Templates
While in the Email Template Library, the user can locate an email template in one of several ways:
- By default, email templates display by title alphabetically. In addition to title, the user has the option to sort by creator, date created, date last used, and reverse alphabetical order.
- The user can filter email templates by using options within the left panel. The following display by default:
- All Templates: All email templates available to the user.
- Archived: Email templates that are no longer used and do not display on the Email Template Library page.
- My Templates: Email templates created by the user.
- Uncategorized: Email templates with no assigned category.
- Connect Email Campaign Templates (only displays by default for CRM users): Email templates meant to be used for CRM email campaigns.
- Categories: A list of organization-specific categories displays under the Categories header.
- The search bar in the main section of the Email Template Library enables the user to keyword search within email template titles or descriptions. Results are filtered based on the option selected in the left panel (e.g., All Templates, Archived, My Templates, Uncategorized, and Categories).
- Users can filter based on templates that were created by a specific user by clicking the Filters dropdown and completing the Created By field.
Editing Email Templates
The Email Template Library allows template owners, template admins, and users given editing access to make changes to email templates. Those who are only given access to use an email template can view that email template in the Email Template Library but cannot edit it.
- Locate the relevant email template in the Email Template Library. Click the dropdown to the right of the email template and select Edit. The Edit Mail Template popup displays.
- Note: Clicking the title of an email template or the View button brings the user to a read-only view. The user then has the option to click Edit on the bottom right.
- Make updates as applicable to the email template’s content. Click Next.
- Make updates as applicable to the email template’s details, category, and user access.
- User access can also be directly edited by clicking the dropdown to the right of the email template and selecting Settings.
- For additional information on these aspects of an email template, refer to the Creating Email Templates section of this article.
- Click Save to save the changes.
Archiving Email Templates
Templates in the Archived category do not display in any searches in the Email Template Library and cannot be selected for use in the Compose Email tool. Template owners, templates admins, and users given editing/deleting permissions can archive email templates one at a time or in bulk.
- Locate the email template(s) that should be removed from use.
- Archive single email template: Click the dropdown to the right of the email template and select Archive.
- Archive email templates in bulk: Select the checkboxes to the left of the templates. Click the Actions dropdown located above the template list, then select Archive.
- A confirmation popup displays. Click Archive to confirm that the template(s) should be removed from use and placed in the Archived category.
Note: Templates that are placed into the Archived category can be recategorized (i.e. taken out of the Archive category) if the title of the archived template does not match other existing template titles.
Managing Email Template Categories
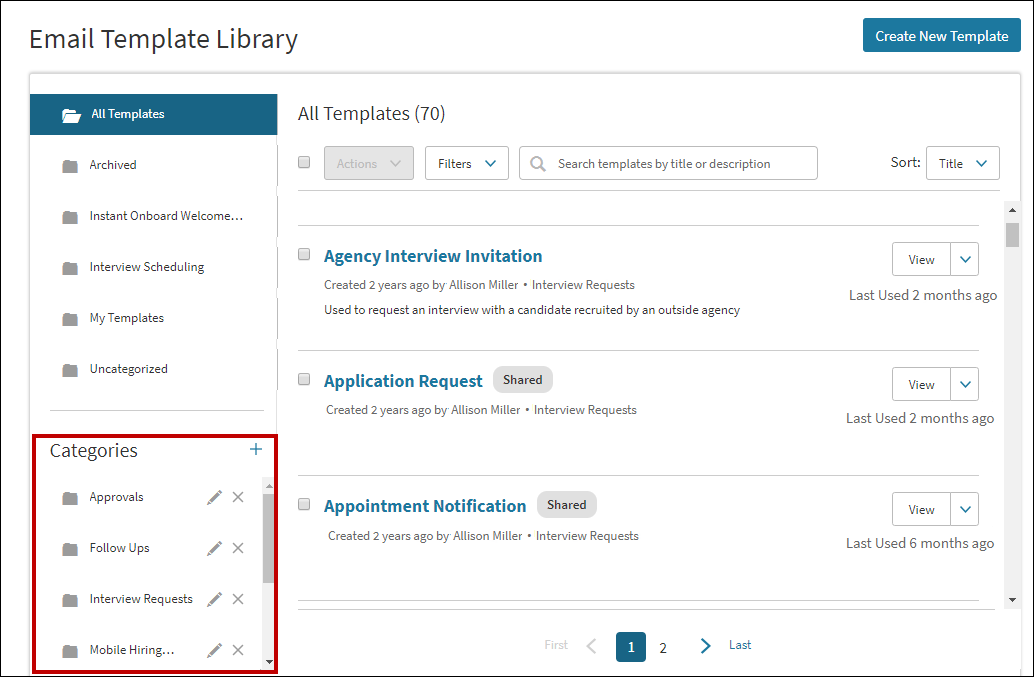
To help organize email templates in the Email Template Library, template admins may create, edit, and delete categories via the Categories section in the left side panel. Category permissions can be configured per user group by submitting a case to iCIMS Technical Support.
- To add a new category, locate the Categories heading and click the Add (plus) icon to the right of the heading, then enter a category name.
- To edit an existing category, locate the relevant category and click the Edit (pencil) icon beside the category name, then make desired updates.
- To delete an existing category, click the Delete (X) icon beside the category name, then click Remove to confirm the removal of this category.
- Deleting a category removes the category from any associated email templates; these templates are then housed in the Uncategorized category.
Any user who has permissions to edit a specific template can change its category while editing the template as described in the
Editing Email Templates section of this article. The following steps can also be used to change the category of a single template or multiple templates:
- Locate the applicable template(s) in the Email Template Library.
- Select the checkbox beside the template(s), then click the Actions dropdown and select Change Category. The Save Multiple Mail Templates popup displays.
- From the Template Category dropdown, select the new category. Click Save.
Understanding Profile Types
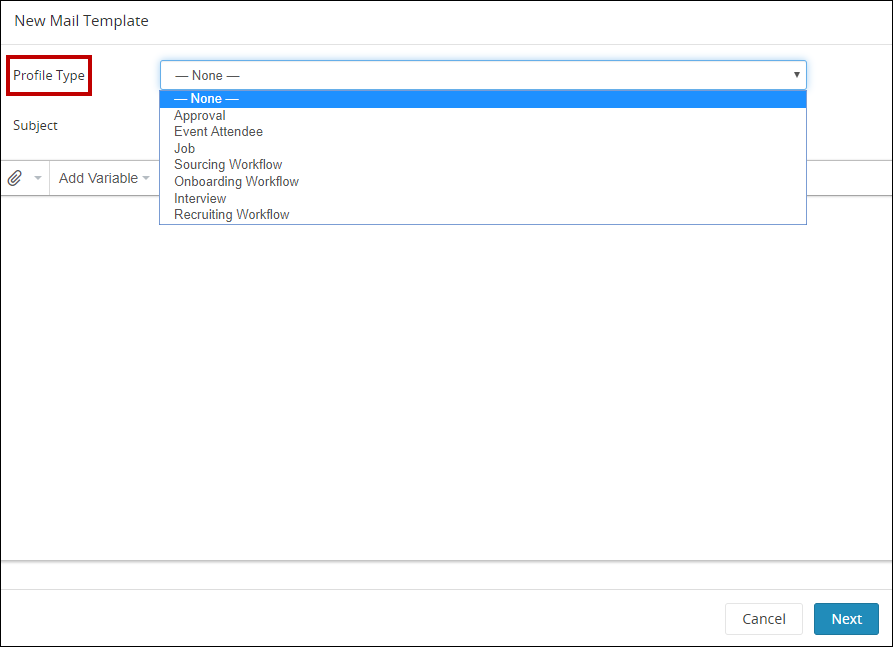
Users can access a large range of variable types when creating or editing email templates in the Email Template Library. The Profile Type dropdown field displays selections based on the customer’s available iCIMS products, and is not configurable at the user group level. Selecting a profile type automatically updates the variables available in the Add Variable dropdown within the toolbar. For more information about variables, visit the
Using Email Variables Knowledge Base article.
Applicant Tracking customers can select the following profile types:
- Approval
- Job
- Recruiting Workflow
- Interview
- Note: Interview is only available if the interview management feature is enabled.
CRM customers can select the following profile types:
- Event Attendee
- Sourcing Workflow
Onboarding customers can select the following profile type:
Additionally, the following variables are available in the Add Variable dropdown for any selected profile type. These variables are also available when None is selected from the Profile Type dropdown:
- Sender: Populate information from the Person profile of the email’s sender
- Recipient: Populate information from the Person profile of the email's recipient

