Overview of iCIMS Connect (Legacy CRM)
Connect provides customers with an easy way to attract and engage individuals who have expressed interest in your organization or whom your organization may be interested in for potential jobs. With various functionality, including built-in event management features, Connect allows you to build a pipeline of talent that can be nurtured over time until specific requisitions become available that match their skills and interests.
For more on Connect, visit Getting to Know iCIMS Connect (Legacy CRM).
|
iCIMS continues to support new and existing Connect customers while innovating a more robust CRM solution, iCIMS Candidate Relationship Management (CRM).
CRM includes:
- A drag-and-drop email editor to quickly design templates for your emails and campaigns.
- A comprehensive event management feature for virtual and on-site events.
- Functionality to match candidates in your CRM to any open job.
For more information, review Getting Started with iCIMS Candidate Relationship Management (CRM). |
About Event Management in Connect
Connect provides an efficient way to track and manage the logistics and data collection associated with your events. Through a simple registration and sign-in process, you can capture attendees' information either in advance or at the event itself. You can then provide feedback on them during or after the event. Any qualified individuals you meet can be added to your talent pipeline for future job opportunities.
Using the Event Manager
Event management in Connect starts on the Event Manager page, which is accessible via Communicate > Create/Manage Events. There are two tabs at the top of this page: Events (a listing of your events) and Reports (the reporting hub for your events). You create and manage your events from the Events tab.
Creating an Event
Your organization can create numerous events and tailor them as desired. The following steps detail how to set up a new event from the Events tab on the Event Manager page in Connect:
- Select Communicate from the menu bar, then Create/Manage Events. This opens the Event Manager page, with the Events tab open by default.
- Select the Create Event button on the right side of the screen.
- Fill out any required and necessary information. Then, select Save. After creating an event, you will be brought to the newly-created Event profile.
The Event profile uses the following default fields (most of which cannot be hidden or renamed), which display on the Details tab of the profile:
- Name: the name of the event
- Start Date: the date and time the event begins
- End Date: the date and time the event ends
- Event Host: the host of the event (e.g., the person running the event, the location of the event, or the medium over which the event is taking place)
- Folder: the folder that the event is in (e.g., Open, Closed, Archived)
- Category: the category of the event
- Additional Details: additional details a user viewing the Event profile may be interested in
- External Message: the message that displays on the event registration page
- Cost: the cost of the event
For more on the Event profile, review
Using the Event Profile below.
Notes:
- By default, when creating a new event, users admins and recruiters can select –Add New Item– from the Event Host dropdown to create a new event host option; all other user groups must select an existing option from this dropdown. To enable on-the-fly Event Host creation for other groups, user admins can use the Edit Connect Event Hosts setting in System Configuration.
- User admins can also edit the list used by the Event Host field in System Configuration.
- An event will not be moved into the Archived folder automatically. Users with the appropriate permissions can set the folder manually at their own discretion.
- By default, the categories available for an event are Career Fair, Social Media Campaign, and Conference. New categories can be added by user admins in System Configuration, and any new category can be associated with the three available default categories for reporting purposes.
- User admins can also add custom fields in the Additional Data section of the Details tab. Custom fields that are added to the Additional Data section cannot be later moved to the General Information section.
Reviewing Your Events
You can review all your open events on the Events tab of the Event Manager page. Events are organized by three groupings:
- Current: an event for which the start date has passed but the end date has not yet occurred
- Upcoming: an event for which the start date has not yet occurred
- Recent: an event for which the end date has passed but is still within the Event Registration Threshold (5 days by default)
An event is moved into the Closed folder once it has ended and the Event Registration Threshold has passed. To display closed events on this page, as well, select the button at the top left for Show Closed Events.
Note: If an Event profile was created but does not display on the Event Manager page, it can be found by running an Event search via Search > More... > Event.
Adding and Sorting Event Information
Events on this page are displayed in a table with the following columns showing by default: Name, Start Date, End Date, Folder, Event Host, and Category.
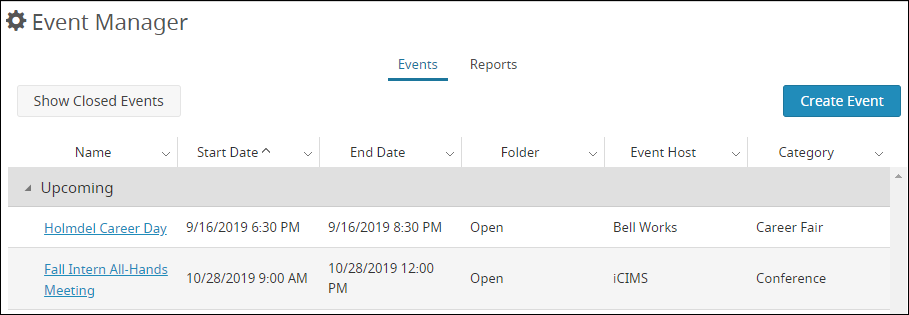
You can use the dropdown arrow on these column headers to further organize your event information:
- Add two other columns, Status and System ID, by selecting the dropdown on any column header, hovering over Columns, and checking the box for these unchecked items.
- Sort the table by selecting a particular column header (or by selecting the dropdown on a header and selecting either Sort Ascending or Sort Descending).
- Filter the information in a particular column by selecting the dropdown on that column header, hovering over Filter, and selecting your preferred filter options. For instance, you can use the filter on the Start Date column to only show events beginning before or after a particular date.
Using the Event Profile
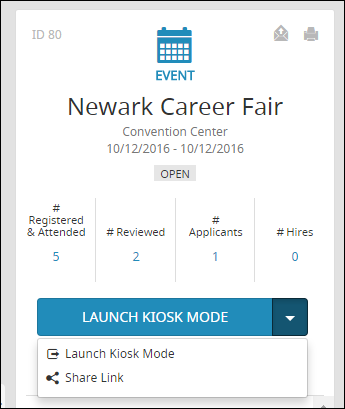
Once you create an event, a profile for that event is created in the system. You can manage all information associated with your event directly from this dedicated profile, including registering and reviewing attendees.
Sharing Event Information
Connect automatically generates a sign-up link and QR code for each event, which you can then send out for easy registration. The link and code can be accessed directly from the Event profile, as discussed in the steps below.
- On the Event profile, select the Share Link button that displays in the profile card to launch the Share Registration Portals popup. (If the primary label for this button is Launch Kiosk Mode, select the arrow on the right side of the button and select Share Link from the resulting dropdown. The action that was last selected will always display as the primary label.)
- Within this popup, select either Copy or QR Code for the link associated with your preferred Connect portal, depending on your organization's preferred method of advertising.
- Paste the link into any message being used to advertise the event, or print the QR code to use in printed distribution materials.
Notes:
- Connect Event link URLs are case-sensitive (i.e., characters that are upper- or lower-case must remain in their given case in order to be recognized). To maintain the functionality of the link, the URL should not be edited.
- The Share Link/Launch Kiosk Mode button is only available on events in the Open folder.
Signing In Attendees
At your event, you can use Kiosk Mode to sign in your registrants and even capture the information of those who didn't register ahead of time. Kiosk Mode is enabled right from the Event profile (via the Launch Kiosk Mode button) and can be used on a tablet, desktop, or mobile device. For complete information and instructions, review Using and Configuring Kiosk Mode for iCIMS Connect (Legacy CRM).
Note: Candidates who sign up for an event through a registration link or through Kiosk Mode will notice a modified Connect landing page, with event information in the header. There, they can express interest in any talent pool you have posted on your Connect portal.
Managing Attendees from the People Tab
The People tab on an Event profile displays everyone who registered for and attended that event. These individuals are associated to the Event profile via an Event Attendee profile, similar to how a Recruiting Workflow profile links a Person profile with a Job profile.
Each attendee on the People tab displays with an attendance status of either Registered or Attended.
- An attendee who signs up for the event through the registration link (described above) will have a status of Registered.
- If that registered attendee later signs in at the event through Kiosk Mode, their status will update to Attended. (If they do not sign in at the event, their status remains Registered.)
- If an attendee does not register for the event through a registration link but signs in at the event through Kiosk Mode, their attendance will also display as Attended.
Notes:
- The People tab comes equipped with a search bar, where a user can search for a specific attendee who has registered for or attended the event.
- The tab also includes buttons for Share and Email. When a user (with appropriate permissions) selects attendees from the tab, they can either share their information with other users via the Share button or email them directly via the Email button. This is similar to the functionality available on the People tab of other profiles.
- The maximum number of event attendees that can be associated with an event is 2,000.
Reviewing Attendees in Recruiter Review Mode
By default, event attendees on the People tab display in three groupings: Unreviewed, Needs Further Review, and Reviewed. You can review all event attendees with an Unreviewed status, even while the event is taking place, using Recruiter Review Mode on the tab. The following steps discuss how to review attendees at an event.
- On the Event profile of interest, select the Review Attendees button at the top of the People tab to launch the Review Mode screen.
- Review the event attendee by viewing their resume, adding tags, and evaluating their fit for the talent pools in which they have already expressed interest.
- Tip: Evaluate an attendee's fit for a particular talent pool by selecting either the Thumbs Up, Neutral, or Thumbs Down icon. Each button is associated with a related talent pool workflow status, as configured in your system. For instance, selecting Thumbs Up may place the attendee in the Hot or Pursue status in that talent pool. For more on these statuses, review Evaluating Candidates in Talent Pools in iCIMS Connect (Legacy CRM).
- Select Save & Exit to save updates, or toggle to the next person by selecting the Next arrow in the upper right corner of the screen. Switching to another event attendee will automatically save any changes made to the previous event attendee.
- Note: Selecting Clear will delete any unsaved changes made to this event attendee during this session.
- Tip: Select the dropdown beside the event attendee's name to select another attendee to review next, without toggling.
Notes:
- Resume view is only available in desktop mode.
- Only talent pools that an event attendee expresses interest in over the course of registering for or attending an event display in Recruiter Review Mode.
- The tagging action may not be available if your organization does not grant tagging permissions to your specific user group.
- To review only a specific set of event attendees, check the boxes beside the attendees to be reviewed, then select the Review Attendees button. Only the selected attendees will display in Review Mode.
- To review only one specific attendee, select the Individual Review Mode icon beside that person's name, if available.

Searching & Reporting for Events
Users with the appropriate search permissions can use an Event search (Search > Event) or an Event Attendee search (Search > Event Attendee Search) to locate Event profiles or event attendees within the system, respectively.
Event Metrics and Reporting
Metrics for an organization's events can be found in two places in the iCIMS system:
- Through the Metrics Dashboard, accessed by selecting the pie chart icon on the menu bar, followed by the Connect panel on the left, and then the Events tab at the top.
- Through the Event Manager, accessed via Communicate > Create/Manage Events.
The following sections will discuss event metrics in relation to the Event Manager page, where you can access detailed reports to determine the success rates of past events. This is done through the Reports tab, which features various filters and widgets.
Filters
You can filter reports by utilizing one of three dropdowns at the top: Filter by Category, Filter by Host, or Filter by Event. Each dropdown includes event items from the Events tab. The default option for each filter is — All —.
Widgets
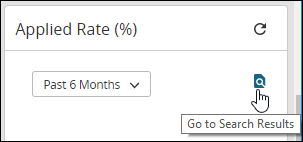
Widgets on this page include:
- A large line chart for Event Workflow Statistics
- Smaller bar charts for Resume Upload Rate (%), Applied Rate (%), and Hired Rate (%)
- Factoids for the number of Attendees, Applies, and Hires in the past 90 days
The data displayed in each widget is based on the filters chosen and retrieved by way of Event Attendee search.
You can narrow down their results by choosing a specific time frame from the dropdown on each line and bar chart. The default is Past 6 Months, but many other options are available—including daily, weekly, monthly, quarterly, and yearly time frames.

Notes:
- Hovering over specific dates on a chart will display more detailed statistics.
- Any widget, including factoids, can be refreshed by hovering over the widget header and selecting the circular arrow that appears to the right.
Event Attendee Search Results
Selecting any widget brings up its Event Attendee Search Results. Organized by bins, these results feature various output columns, including:
- Applied: how many event attendees applied to a job at the organization
- Applied (%): the percentage of attendees who applied for a job
- Hired: how many event attendees were hired for a job at the organization
- Hired (%): the percentage of attendees who were hired for a job
You can perform several tasks within these search results by selecting the buttons displayed at the top (e.g., Email, Submit to Workflow, Export).
- Note: Search results from a widget can also be accessed by hovering near the dropdown and selecting the paper/magnifying glass icon that appears to the right.
Recommended Next Steps
Once you've reviewed your event attendees, you can add them to any related talent pools in your system and even open positions for which they might be a good fit.
- To add an individual person from an Event profile, select their name from the People tab; this takes you to their Person profile. Then, select either Submit to Job or Submit to Talent Pool from their profile card on the left.
- To add individuals in bulk, run an Event Attendee search (Search > More… > Event Attendee), using filters and output columns for Associated Event and Status. In your search results, check the box for all attendees you want to add, select the Submit to Workflow button, and select the appropriate workflow(s).
For more information, review Adding Qualified Candidates to Existing Talent Pools in iCIMS Connect (Legacy CRM).
iCIMS Connect (Legacy CRM) Curriculum
The iCIMS Knowledge Base includes additional resources to prepare users to use iCIMS Connect (Legacy CRM). These resources have been compiled in the following article: Getting to Know iCIMS Connect (Legacy CRM).

