Overview
The Common Searches & Reports article identifies the most commonly requested searches and includes this report type. To learn how to run searches and reports in the iCIMS system, see Creating a Person Search for an example. To learn how to save a report for future use, see Saving Search & Output Templates.
Candidates by Postal Code Radius
Helpful Hint: When creating a search, it is helpful to first come up with a clear idea for your report. Think about which candidates you want to report on (the “Who”), what details you want to know about them (the “What”), and how you want to organize the information (the “How”). The more specific you are with your idea, the easier it will be to break it down into these sections which will help you choose the right Keywords and Filters (for “Who”), Columns (for “What”) and/or Group-Bys and Sort-Bys (for “How”) for your report. This three section concept is used below to search for candidates within a certain distance of a given location.
Scenario: Your company is opening a new store location. You want to identify interested candidates who live in the area of the new location to begin your sourcing efforts for the new store.
1. Break your report idea down into the three sections to help determine the best way to create your search:
-
Who are you reporting about: Using filters, you can narrow down your results to candidates who expressed interest in retail positions who are located within a certain radius of your new location.
-
What do you want to know about them: Using columns, you can see their resume right from the results as well as see if they have submitted any job applications.
-
How would you like this information organized: No specific group-bys or sort-bys are required for a successful search.
2. To create your search inside the iCIMS system, from the top menu bar, select Search > Sourcing Workflow. The “Who,” “What,” and “How” directly correlate with the three sections (A, B, and C, respectively) outlined in the below image. (Tip: To search through all candidates within your organization's system rather than just those within certain talent pools, you can create a similar Person search through Search > Person > Candidate.)
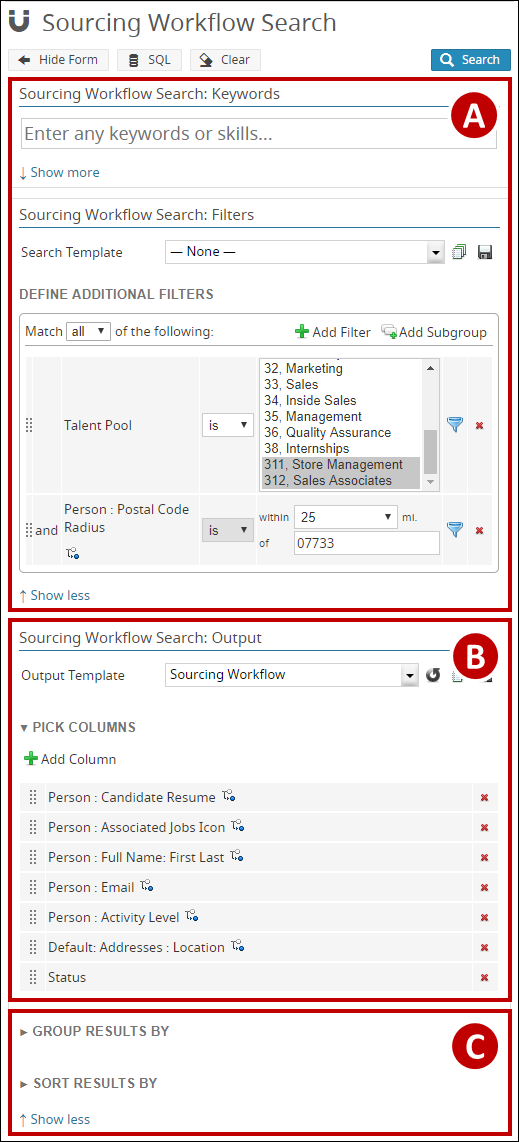
A. Keywords and Filters: Who are you reporting about?
To search for candidates who expressed interest in retail positions, add a filter for Talent Pool. To find candidates within a certain radius of your new store, add a filter for Postal Code Radius.
-
Select Add Filter and add Talent Pool. The selection path is Fields (Workflow) Tab > Talent Pool.
-
Select the appropriate talent pools for the area of interest desired (Store Management and Sales Associates, in this example) from the list to the right of the added filter.
-
Select Add Filter and add Postal Code Radius. The selection path is Fields (Workflow) Tab > Person > Contact Tab > Postal Code Radius.
-
Select the desired distance range from the dropdown to the right of the added filter. Then, enter the postal code of the new store location.
-
Tip: To search using a Canadian postal code, when using Postal Code Radius make sure to use only the first part of the code such as "A0A" in order to receive results as the Postal Code Radius filter will not recognize spaces such as "A0A 1A1". To search for a specific code, make sure to use the Postal Code filter instead of the Postal Code Radius filter.
B. Columns: What do you want to know about these candidates?
To view a candidate's resume without leaving the search results, add a column for Candidate Resume. To see if a candidate has applied to any jobs, add the Associated Jobs icon.
- Select Add Column and add Associated Jobs Icon and Candidate Resume. The selection paths are Candidate Icons > Associated Jobs Icon and Candidate Icons > Candidate Resume.
C. Group Results By and Sort Results By: How would you like this information organized?
No specific group-bys or sort-bys are required for a successful search. Add any group-bys or sort-bys as needed for your report.

