Overview
This article describes a number of areas on the iCIMS Applicant Tracking career site where text or settings can be configured either by a user admin or iCIMS Technical Support team. Because many of these areas are not yet configurable by a user admin, it's often helpful for clients to create a document detailing exactly what text they would like and where. By referencing the sections listed in this article, it may help reduce back-and-forth between an iCIMS customer and iCIMS Technical Support team.
General steps for accessing user-admin-accessible settings, as well as depictions of what these settings control on the career site, can be found below. Please note that this article is
not an exhaustive list of all settings that can be configured by user admins or iCIMS Technical Support; rather, it highlights some of the most commonly requested changes.
Some of the career site pages that can be updated include the following:
- Introduction Page: Welcomes candidates when they reach the career site. The settings for this page include the page title and text, as well as the job search section title and the default zip radius for job searches using the zip code as a filter.
- Job Listings Page: Allows candidates to search for and view open positions. The settings for this page include the page title and text, as well as the labels for the Sort By text functionality.
- Job Detail Page: Allows candidates to review details for a job and apply to it. The settings for this page include the labels for the Apply Online, Refer a Friend, Social Connect buttons.
- Login Page: Allows new users to create a profile and allows existing users to log into their dashboard. The settings on this page include application options, the order of the login page sections, and labels for items throughout the login page.
- Basic Profile Page: Allows a candidate to submit basic information on a short form to create a profile. The settings for this page include the page title and text, as well as the text for the Submit Profile button.
- Main Page (as known as the Candidate Profile step of the application): Allows a candidate to upload their resume and fill out essential profile information. User admins can determine which fields are present on the page.
- Dashboard Page: Allows candidates to update their profiles, apply for jobs, and check the status of their job applications and referrals after they have logged in. The settings for this page include the page title and text, as well as labels for items on the page.
- Past Job Recruiting Workflows Page: Allows candidates to view their past resume submissions. The settings for this page include the page title and text, whether candidates can withdraw applications or not, and labels for items throughout the page.
General Steps to Update Career Site Pages and Settings
This section of the article provides an introduction to the areas of System Configuration related to career sites. If you are interested in learning about configuration capabilities for specific career site pages, skip to the
Introduction Page section of this article or refer to the list of links above.
Most career site settings are available in one of two places in System Configuration:
- Admin > System Configuration > Applicant Tracking > Portal:
- General: This section includes many of the labels and messages that a candidate might encounter, especially those that display on more than one page (e.g., application step labels, Save button text, Log Back In messages, etc.). Mobile-specific settings are also in this section.
- Pages: This section includes page-specific titles and messages for specific pages in the application process (e.g., Introduction Page, Job Detail Page, Login Page, Profile Pages, etc.)
- Notifications: This section includes settings related to automated email notifications that can be sent to candidates (e.g., profile registration, incomplete job application, finished job application, password reset, etc.)
- Admin > System Configuration > Career Portals:
- Portal Settings: This section includes career site indexing and password settings.
- User Group Settings: This section includes settings that allow specific user groups to post jobs to career sites.
Tips:
- Many career site settings can be updated on a per-site basis by selecting the career site from the user group dropdown before updating a setting.
- For settings that control site messaging, when a specific career site has been selected, a View Portal selector allows the user admin to view the current saved career site experience for a candidate on a desktop or mobile device.
- Some career site settings can only be updated by iCIMS Technical Support. In the page-specific sections of the article below, the most commonly-updated settings that can only be updated by iCIMS Technical Support have been identified.
Specific Career Site Pages and Common Text/Setting Updates
The sections below describe common areas of text or settings that organizations typically want to configure. Each section contains a labeled image of an Applicant Tracking career site and information about whether a user admin can update a given setting, or whether iCIMS Technical Support is required to make a change. As mentioned above, this information is
not comprehensive but highlights only the most commonly requested changes.
Introduction Page
The Introduction Page is typically the first page that candidates see when accessing the career site, whether they are coming from your main company career page or through a direct link. The primary function of the Introduction Page is for candidates to begin searching for available jobs, so it is unlikely that a candidate that is coming from a job board or job aggregator will see this page.
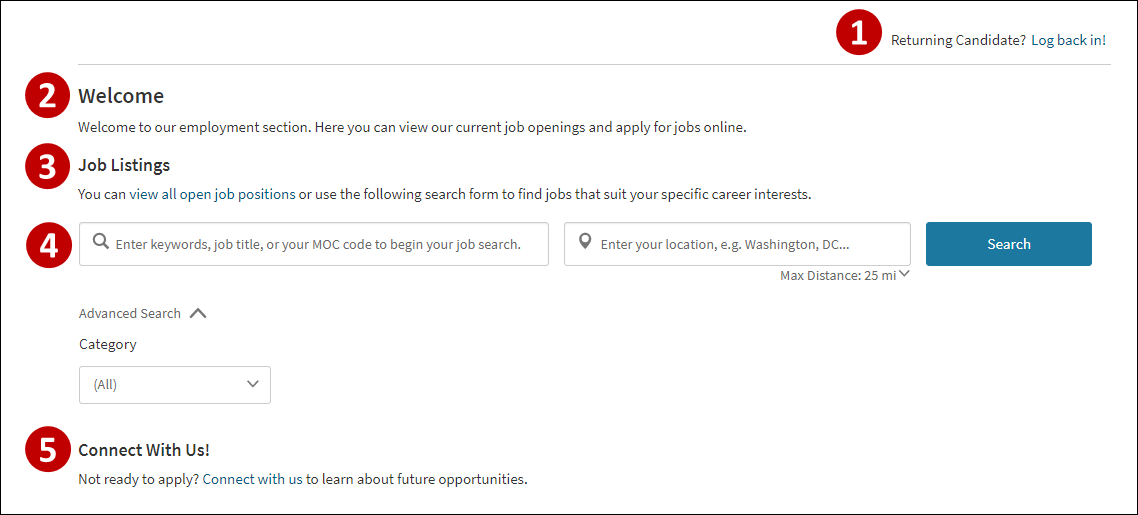
- Returning Candidate section: The text & link label within this section can be updated by a user admin in System Configuration. To update, search System Configuration for "Message: Returning Candidate" and "Link: Log back in".
- Welcome section: The header and text within this section can be updated by a user admin in System Configuration. To update, navigate to Applicant Tracking > Portal > Pages and modify the Page Title and Page Message settings within the Introduction Page section. An additional sentence can also be added to the end of this section by iCIMS Technical Support; it would display beneath any welcome videos or other messaging added by the user admin.
Notes:
- The page title and message that display on search engines (and in a browser tab, if applicable) can be set using the SEO Page Title and Meta Description setting.
- Images and videos can also be displayed within the Page Message section by using the Insert Image or Insert Video buttons on the Page Message field's toolbar.
- Job Listings: The title of the Job Listings section can be modified by a user admin by searching System Configuration for "Job Search Section Title". iCIMS Technical Support can assist in updating the language in the Job Listings section, which typically includes a link to view all open positions, and sometimes includes additional instructions.
- Search Form: The default search form includes a keyword search bar and an advanced search filter section. The Search button and the names and availability of advanced search filters can be updated with assistance from iCIMS Technical Support.
- Connect With Us! section: This section is only available if your organization uses iCIMS Connect. The header and messaging can be updated with assistance from iCIMS Technical Support.
Tip: The order of the Connect With Us! and Job Listings sections can be updated by a user admin in System Configuration. To update, search System Configuration for "Order of Intro Sections".
Job Listings Page
The candidate reaches the Job Listings Page by searching through the available positions on a career site. On this page, they can continue to refine their search or access the details for a specific job.
- Job Listings section: This section contains the main page title and instructions. A user admin can provide text here to explain what a candidate is looking at and what they can do from this page. To update, navigate to Applicant Tracking > Portals > Pages and modify the Page Title and Page Message settings within the Job Listings Page section.
- Note: The page title and message that display on search engines (and in a browser tab, if applicable) can be set using the SEO Page Title and Meta Description setting.
- Another Search section: The heading ("Use this form to perform another job search") and optional instruction text can be updated with assistance from iCIMS Technical Support. The Advanced Search (and the Close Advanced Search link) can be edited by a user admin. To update, navigate to Applicant Tracking > Portals > Pages and modify the Link: Advanced Search and Link: Close Advanced Search settings within the Introduction Page section. For information on configuring the search form, refer to the previous section of this article.
- Search Results header: The header above the job search results can be updated with assistance from iCIMS Technical Support.
- Sort By dropdown: A user admin can update the Sort By dropdown default text (i.e, “Sort By…”). To update, navigate to Admin > System Configuration > Applicant Tracking > Portals > Pages and modify the Label: Sort Results Text setting within the Job Listings Page section. The Sort By dropdown options are determined based on the fields and display names set in the Job Card section of Postable Fields (Admin > System Configuration > Career Portals > Configure > Portal Settings > Configure Postable Fields). The display name for a field can be updated with assistance from iCIMS Technical Support. The (Ascending) and (Descending) text is determined by the following two settings, available via Admin > System Configuration > Applicant Tracking > Portals > Pages:
- Label: Sort Dropdown Ascending Text
- Label: Sort Dropdown Descending Text
- Job Listing Job Cards: Job cards contain information pulled from fields within iCIMS Applicant Tracking. The information displayed and the position of the information on the card can be modified by a user admin. The job card can be managed via Admin > System Configuration > Career Portals > Configure > Portal Settings > Configure Postable Fields > Job Card. The display name for a field on the job card can be updated with assistance from iCIMS Technical Support.
- Candidate Job Recommendations section: This section is only available for organizations with iCIMS Connect and must be enabled by iCIMS Technical Support. The header and text can be updated with assistance from iCIMS Technical Support. (For more information about Candidate Job Recommendations, see Candidate Job Recommendations Setup Guide.)
Job Detail Page
Candidates arrive on the Job Detail Page after running a search and clicking on a job from the Job Listings Page, or they can arrive here directly from a job board or aggregator that the job was posted to. For example, if the job was posted to an external job board, candidates using that board will most likely first arrive on either the Job Detail Page or the Login Page (shown next). Consequently, it's critical to ensure that candidates have all the information they need on this page.
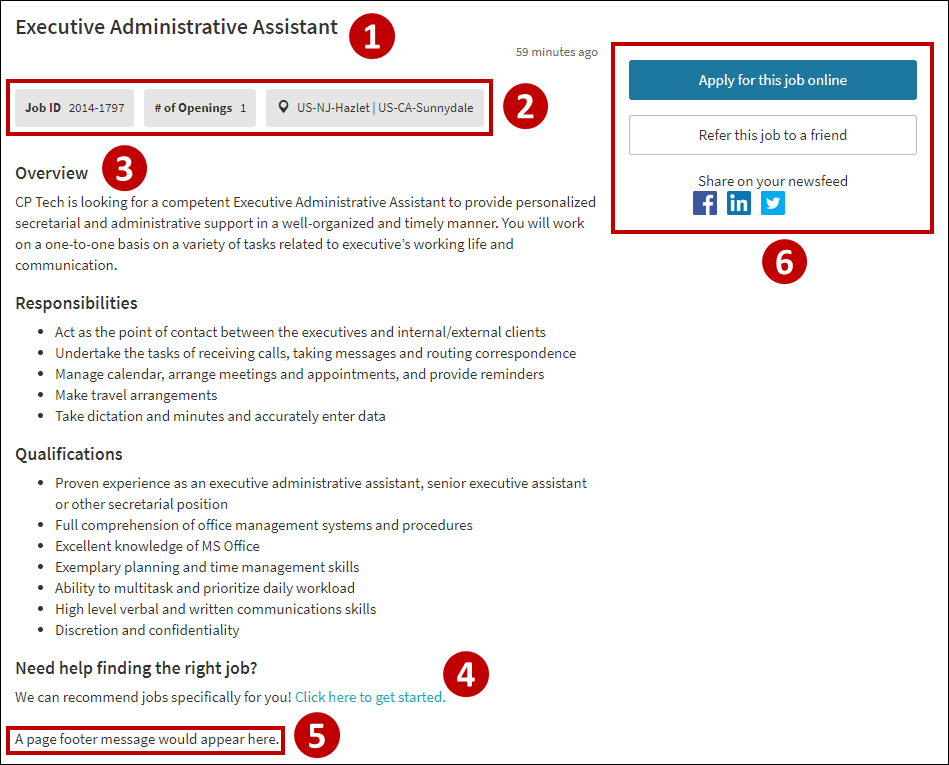
- Job Title: The job's title is controlled by the corresponding Job Profile within iCIMS Applicant Tracking.
- Job Header: This information is pulled from fields within iCIMS Applicant Tracking. A user admin can decide which fields from the Job Profile to display in this section by navigating to Admin > Portals > Recruit - Postable Fields and selecting Job Header from the Section dropdown.
- Job Description: The job description is pulled from fields within iCIMS Applicant Tracking. A user admin can decide which fields from the Job Profile to display in this section by navigating to Admin > Portals > Recruit - Postable Fields and selecting Job Description from the Section dropdown. (By default, the Job Profile Overview, Responsibility, and Qualifications sections are displayed.)
- Candidate Job Recommendations section: This section is only available for organizations with iCIMS Connect and requires iCIMS Technical Support team to enable. The header and text can be updated with assistance from iCIMS Technical Support.
- Page Footer: A text footer can be added to the bottom of the Job Detail Page by iCIMS Technical Support team if desired.
- Apply & Share Buttons: The labels for the apply and refer buttons can be configured by a user admin in System Configuration. To update, search System Configuration for "Link: Apply Online" and "Link: Refer a Friend". A user admin can also modify the 'Share on your newsfeed' option by searching System Configuration for "Label: Broadcast via Social Network". iCIMS Technical Support can hide the Social Media widget, if desired.
Login/Sign Up and Basic Profile Pages
The first step to applying for a job is the email step. Candidates that reach this page may have come from a job search or from the Job Detail Page, or it's possible they have read through the job description on an external job board, which has sent them directly to this step.
Note: If your career site has candidate-facing privacy policy messaging configured to display, notification and/or consent messaging display at this step. For information about privacy policy configurations, review the following article:
Understanding How the iCIMS Talent Platform Can Support Privacy Policy ComplianceThis step asks candidates to enter their email; candidates with existing profiles will then be asked to login in; new candidates will be prompted to create their profile.
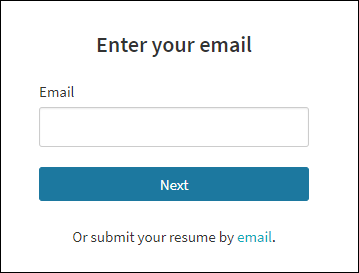
- Enter Your Email header: A user admin can update the header of this step by searching System Configuration for "Header: Enter your email".
- Next button: A user admin can modify this button text by searching System Configuration for "Button: Enter your email".
- Submit resume by email: A user admin can update or remove the submit resume by email text by searching System Configuration for "Message: Submit resume by email ". To remove the option, simply remove the text from this setting and Save.
After providing their email, existing candidates are brought to a login page. New candidates are brought to the profile creation step (also called the basic profile page) outlined below.
- Instructions section: A user admin can edit both the Basic Information title and the instructions. To update the title, search System Configuration for "Label: Basic Profile Step". For the instructions, navigate to Applicant Tracking > Portal > Pages and edit the Page Message setting in the Basic Profile Page section.
Tip: The text for the information icon can be updated with assistance from iCIMS Technical Support.
- Build/ Create your Profile sections: The headers, instructional text and submit button can all be updated by a user admin. To update, navigate to Applicant Tracking > Portal > Pages and edit the corresponding settings within the Basic Profile Page section.
- Social Network buttons: The available social networks can be updated with assistance from iCIMS Technical Support.
- Resume Upload options: A user admin can configure the available upload options by navigating to Applicant Tracking > Portal > General and modifying the Allow Google Drive, Allow Dropbox, and Allow OneDrive options.
Main Page (or Candidate Profile Page)
The main page or candidate profile step allows candidates to upload their resume and to provide additional information desired by your organization.
User admins can provide instructions for the page and configure the ability to proceed without uploading a resume via Applicant Tracking > Portal > Pages > Candidate Profile Page.
User admins can add fields to this page by the steps below:
- Navigate to Admin > System Configuration.
- From the left-side navigation, select System. Then, select Person.
- Click the Portal (Recruit – Candidate) tab.
- In the User Group dropdown, select a career site or, to configure this page for all sites, select Career Portals.
- Finally, select the Main Page tab.
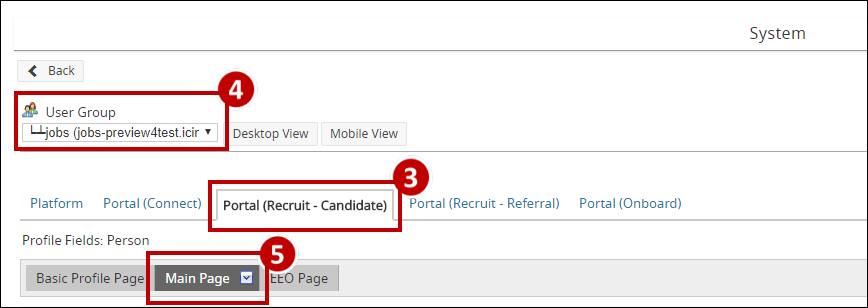
- Scroll down to the section labeled Enter your information.
- Unhide any fields that you would like added to the career site, and require them if desired. When all changes you would like to make are complete, select Save.
To remove fields from the main page, follow steps 1-5 above, and instead hide any field in any section that you no longer want to display on the career site.
Dashboard Page
The Dashboard Page is the candidate's center for activity once they've logged in. A candidate arrives at the Dashboard Page after logging in before applying for a position
or after creating their profile and completing an application. A variety of sections can be configured on this page.
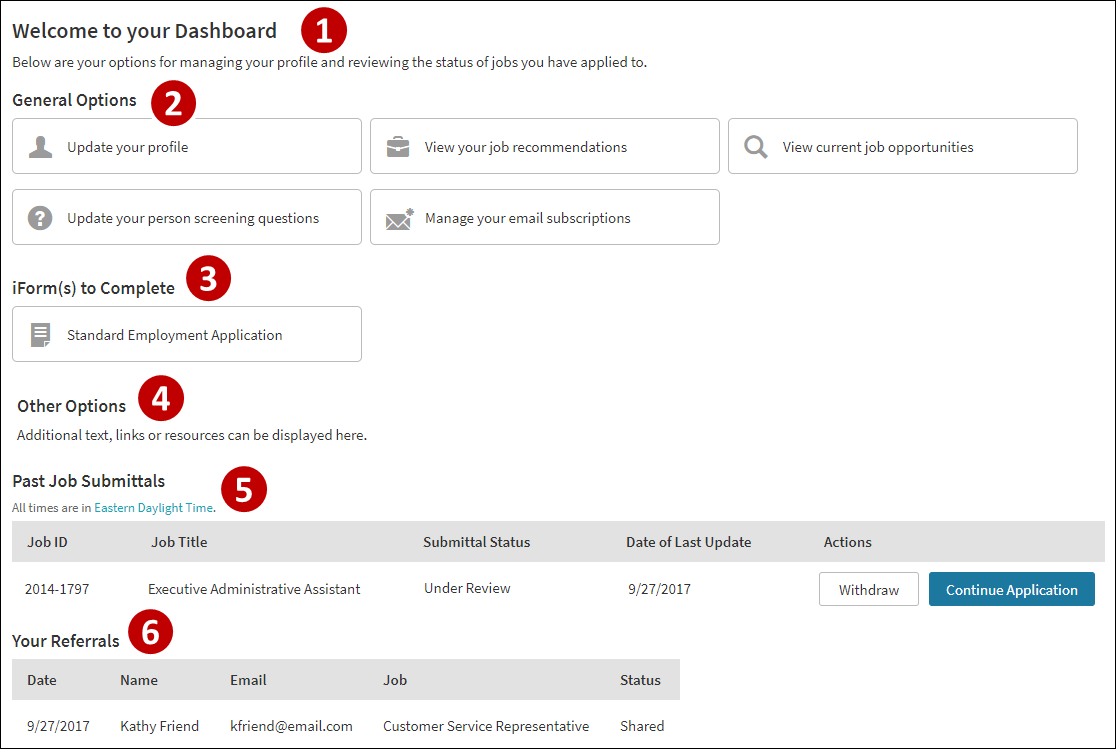
- Welcome section: The page title and messaging can be configured by a user admin in System Configuration. To update, navigate to Applicant Tracking > Portals > Pages and modify the Page Title and Page Message settings within the Dashboard Page section.
- General Options section: The title, additional instructions, and available buttons can all be updated with assistance from iCIMS Technical Support.
- iForms section: The iForm section is optional and can be enabled by iCIMS Technical Support. This section can be configured to display iForm requests sent to a candidate and/or a specific iForm(s) that is always available, even without a request. This is often beneficial as it may be easier to drive candidates to log in to your career site rather than to log in to an iForm directly. The section title and instructions can be updated with assistance from iCIMS Technical Support.
- Other Options section: Other Options is an optional generic section that doesn't have any specific actions built into it. iCIMS Technical Support team can enable the section and configure the title and text. This section can include additional instructions, links or other resources.
- Past Job Submittals section:
- Your Referrals section: A user admin can enable/disable this section as well as rename the columns by navigating to Applicant Tracking > Portals > Pages and modifying the referral settings within the Dashboard Page section.
User Admin Curriculum
The iCIMS Knowledge Base includes additional resources to prepare user admins to work with the iCIMS Talent Cloud. These resources have been compiled in the following article: User Admin Curriculum

