Overview
iCIMS Text Engagement (formerly TextRecruit) users with Google Chrome or Mozilla Firefox can install and use an extension within their browser to engage directly with candidates as they come across them anywhere online. The extension automatically detects mobile numbers on websites, allowing users to easily create candidates in iCIMS Text Engagement. Within the extension, users can also manage candidates’ campaigns and access their own inboxes and templates to conveniently message candidates without having to switch tabs in their browser.
All candidates, contacts, messages, campaigns, response rates, and opt-outs will continue to be tracked in the user’s iCIMS Text Engagement account while using the extension.
This article is composed of the following sections:
Note: The instructions and images below describe the experience with the
TextRecruit Extension in Google Chrome. However, the installation and use of the
TextRecruit Everywhere Extension in Mozilla Firefox is nearly identical.
Installing the Extension
The steps below outline how a user can add the Text Engagement extension to their browser.
- Navigate to the Chrome Web Store and search for the TextRecruit Extension. From the results, locate the extension, then click the blue Add to Chrome button.
- Note: The extension is also available in the Firefox browser, and users can follow similar steps to add the TextRecruit Everywhere Extension via the Firefox Add-ons store.
- A prompt displays asking the user to grant the extension the necessary permissions. To agree to the permissions and install the extension, click Add extension. Then, a new Text Engagement icon displays in your browser menu and a confirmation message pops up.
- Click outside of the confirmation message popup to close it. Review the Accessing the Extension section of this article for next steps on accessing the extension and logging in to your Text Engagement account for the extension.
Accessing the Extension
The steps below outline how a user can access and log in to their browser extension.
- Select the Text Engagement browser icon (A) in your browser window to open the extension. The login page then displays.
- Note: Select the extension pin (B) to open or close the extension at your convenience. Hovering over the extension pin allows a user to drag and drop its location up or down the side of the extension.
- Enter the Email and Password fields with your Text Engagement account’s associated email address and password. Select Login to log in to the extension.
- Note: You will be prompted to log in to the extension each time your browser cookies/cache clears.
Notes:
- To log out of the extension, select the Settings icon at the bottom of the extension, then click Sign Out.
- To edit or remove the extension’s browser permissions, right-click on the Text Engagement browser icon and select Manage extensions. The browser’s menu then displays with further configurations for the extension (e.g., options to disable or remove the extension and other browser-specific settings.)
- When resetting your password in either the browser extension or the mobile app, customers whose organizations do not use Universal Login must indicate the region where your organization’s Text engagement data is hosted. While most data is hosted in the US, organizations hosted in the EU should ensure their users know which region to select, especially if they do not typically access Text Engagement through the web app.
Adding Candidates via the Extension
The steps below outline how a user can add candidates from any website.
- Log in to the extension. Review the Accessing the Extension section of this article for instructions on logging in.
- By default, all phone numbers on any website in the browser are detected by Text Engagement and display as a green link, as shown in the image below. Click on the green phone number for the extension to automatically open the New Candidate form on the Home tab and populate the number into the required Phone Number field.
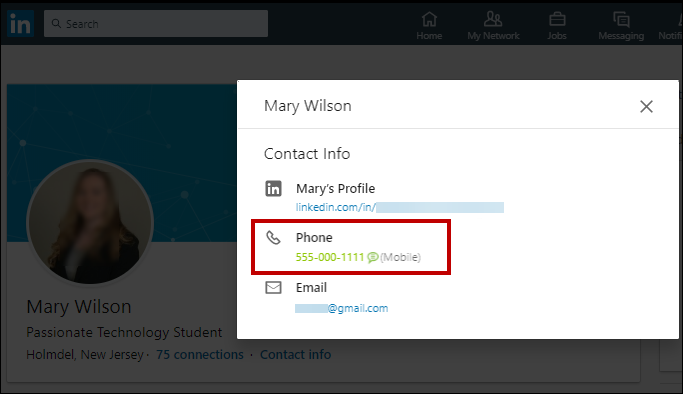 An image of the extension's highlighting feature
- Note:
- If the candidate has an existing Text Engagement profile, clicking the highlighted phone number will automatically display the candidate’s existing profile on the Candidates tab of the extension, displaying any previous conversation history and campaigns. For more information on the Candidates tab, review the Messaging Candidates within the Extension section of this article.
- To disable number highlighting, click the highlighting toggle in the top right of the extension. A white toggle indicates that highlighting is enabled, and gray indicates that highlighting is disabled. When number highlighting is disabled, users must manually enter the required Phone Number field for each candidate. For more information on number detection and highlighting settings, see the Understanding Web Extension Settings section of this article.
 An image of the highlighting toggle
- The extension will populate the First Name and Last Name fields, if possible. Review or enter this information in the required First Name and Last Name fields. Update the default communication channel (e.g., SMS, WhatsApp), if applicable.
- Click Save to add the candidate. Then, the candidate’s new profile displays on the Candidates tab.
Note: A flag automatically displays next to the
Phone Number field once a number has been entered, corresponding to the country of the provided number. Additionally, either a green check mark displays next to the
Phone Number field to indicate that the provided number is an active mobile number, or a yellow caution sign displays next to the
Phone Number field to indicate that the provided number is an inactive mobile number.
Messaging Candidates within the Extension
Messaging candidates from the extension is similar to messaging candidates from Text Engagement, as described in the
iCIMS Text Engagement: Responding to Candidate Messages article. Users can type and send messages to candidates from the following areas of the extension.
- Inbox tab: Displays conversations with candidates that the user has directly engaged with in a list that is searchable by name or phone number. Clicking on the candidate’s name from the list displays their conversation history, from which the user can type and send a new message to the candidate to continue their conversation.
- Note: Unread conversations display with notifications in blue on the Inbox tab and a blue dot next to the corresponding conversation in the list.
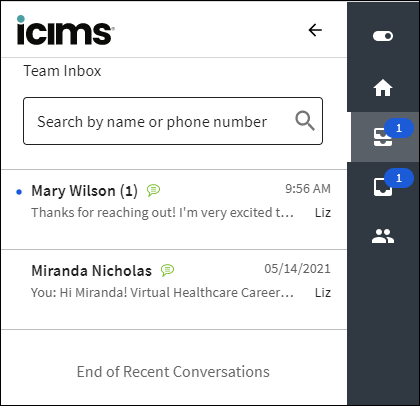 In the image above, the user has one direct unread message from candidate Mary Wilson.
- Candidates tab: Lists all candidates in the system, searchable by name or phone number. Clicking a candidate’s name from the list opens their profile; the user can then view the candidate’s conversation history and send them a new message.
Notes: All users can access premade message templates from Text Engagement to message candidates within the extension; users can filter templates by name or keywords from the Message Templates icon. Users are unable to save new templates within the extension.
Adding Candidates to Campaigns within the Extension
Text Engagement users can add candidates to new or existing campaigns within the browser extension via the Inbox and Candidates tabs. To view and manage a candidate's campaigns, click the arrow within the Campaigns section of their extension profile to display their Campaigns list.
The arrow users can click to display the candidate campaigns list
Note: For more information on managing Text Engagement campaigns, review the
iCIMS Text Engagement: Creating a Campaign article.
In addition to viewing the candidate Campaigns list, an Add to Campaign icon is available to add a candidate to an existing or new campaign.
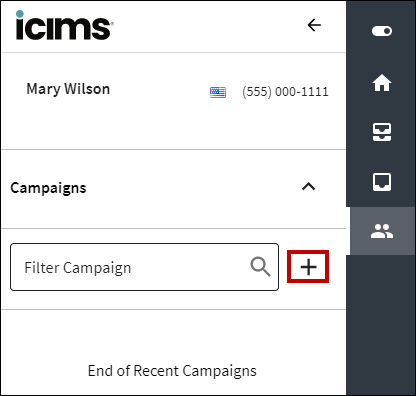 The Add to Campaign icon
Information on individually adding candidates to campaigns in the extension is provided in the following sections:
:
- Individual candidates can also be removed from campaigns from the same candidate Campaigns list within the extension. To automatically remove a candidate from any campaign(s) they have been added to, hover over the campaign name in their list and click the remove icon (A in the screenshot below).
- To add or remove multiple candidates from campaigns simultaneously, visit the campaign overview page in the Text Engagement web extension. To navigate to a particular campaign overview from the extension, hover over the campaign name in the candidate Campaigns list and click the open web application icon (B in the screenshot below); this launches a new window and displays the applicable campaign overview page when logged in to the web application.
Adding Candidates to Existing Campaigns within the Extension
The following steps outline how a user can add a candidate to an existing campaign within the extension.
- Click the Candidates tab. A list of candidates then displays.
- Click the name of the individual candidate to add to the campaign. Then, their profile and conversation history displays.
- Click the arrow to the right of the Campaigns section; any campaigns for that candidate display in the campaigns list and can be filtered via the Filter Campaign search field.
- Click the Add to a Campaign (plus) icon; tab options display to add the candidate to an existing campaign or a new campaign.
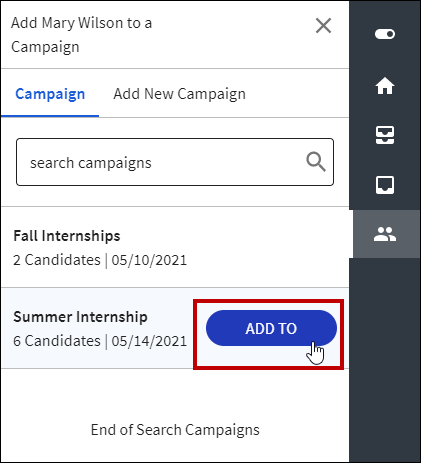
- From the Campaign tab, search for the existing campaign via the Search Campaigns field; then, once the desired campaign displays, hover over its name. The Add To button displays.
- Click the Add To button to automatically add the candidate to the existing campaign; the applicable candidate's campaigns list automatically displays with the new campaign.
Adding Candidates to New Campaigns within the Extension
The following steps outline how a user can add a candidate to a new campaign within the extension.
- Click the Candidates tab. A list of candidates then displays.
- Click the name of the individual candidate to add to the campaign. Then, their profile and conversation history displays.
- Click the arrow to the right of the Campaigns section; any campaigns for that candidate display in the campaigns list and can be filtered via the Filter Campaign search field.
- Click the Add to a Campaign (plus) icon; tab options display to add the candidate to an existing campaign or a new campaign.
- Click the Add New Campaign tab.
- From the Add New Campaign tab, enter a name for the new campaign in the Campaign Name field (required). Optionally, enter the Job Code or URL fields for the new campaign.
- Click Save to add the campaign and automatically add the candidate to the campaign; the applicable candidate's campaigns list automatically displays with the new campaign.
Understanding Web Extension Settings
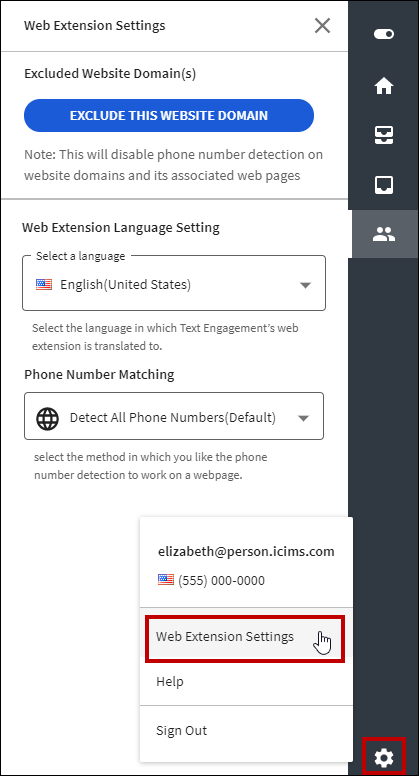
Users can update number detection and highlighting preferences from the Web Extension Settings section of the browser extension. These settings are accessible via the Settings (gear) icon in the bottom right of the Text Engagement browser extension and are set on a per-user basis. The extension settings allow users to exclude specific website domains from phone number detection and green number highlighting and/or to select the types of phone numbers that the browser extension detects by location, as well as configure their instance of the extension's user interface language.
By default, all website domains are included in phone number detection and highlighting for all phone numbers.
Excluded Website Domain(s)
The steps below outline how a user can disable phone number detection and highlighting for a specific website domain.
- From your browser, navigate to the website domain that you wish to disable Text Engagement phone number detection for. Then, navigate to the Text Engagement extension in the same browser tab.
- From the browser extension, click the Settings tab in the bottom right. Then, click Web Extension Settings to launch the Web Extension Settings page.
- From the Web Extension Settings page, click Exclude This Website Domain to exclude the website’s domain from number detection and highlighting. The domain is added to the list of excluded domains in the Excluded Website Domain(s) section.
Notes:
- Once a website domain is disabled, the highlighting toggle in the upper right corner of the extension becomes disabled on that website.
- Excluded domains display in a list in the Excluded Website Domain(s) section. To re-enable phone number detection and highlighting for a domain that has been excluded, click the Reinclude button next to the domain name.
- Excluded website domains can only be configured on a per-user basis.
- When number highlighting is disabled, users must manually enter the required Phone Number field for each candidate.
Web Extension Language Setting
Text Engagement users can select their preferred language for the browser extension user interface text (e.g., tab names, icon hover text) via the
Web Extension Language Setting options; this setting does not apply to the candidate conversation history and does not alter the language used in messages to and from the candidate. By default, the browser extension text language is English. To update this setting, select an available language; the browser extension user interface updates to that language automatically.
Phone Number Matching
Text Engagement users can select their preferred phone number detection method from the Phone Number Matching setting in the browser extension. By default, the browser extension attempts to detect phone numbers for all available countries. iCIMS recommends updating this setting to only detect possible phone numbers for a specific country by selecting that country from the list of options.

