Overview
iCIMS Text Engagement offers multiple methods of adding candidates to the system. Once a candidate is added, users can begin reaching out to them individually or as part of a campaign.
The steps outlined in this article describe how a user can manually add individual candidates or upload a file to import multiple candidates at once.
Manually Adding a Single Candidate
To manually add a single candidate to the Text Engagement system via the Text Engagement web application, follow the steps below.
- Select the Candidates tab from the sidebar menu, then select Add Candidate on the top right of the Candidates page.
- On the Add Candidates popup, select Select beside the Single Candidate option.
- Enter the required candidate information: first name, last name, and cell #. If desired, enter their current job title.
- Note: Ensure candidate information is properly formatted (e.g., name is not in all caps). When using mail merge variables in messages (e.g., first name), candidate information populates exactly as formatted on the profile.
- Select Save to add the new candidate to your system.
Importing Candidates from iCIMS ATS
To add candidates to the Text Engagement web app directly from your organization’s iCIMS ATS, a manager or customer admin must first connect your Text Engagement user account to your iCIMS ATS user account by completing the following steps.
- In the Text Engagement web app, select the Users tab from the sidebar menu, then find and select the desired user’s Username. Their user information displays.
- Within the User Summary panel, review their ATS Person ID information. If an ID is listed in the middle column, their accounts are already connected. If None is listed, select Add in the rightmost column of that row. The Add ATS Person ID popup displays.
- Enter their iCIMS ATS ID number into the text field and select Save. A confirmation popup appears.
- Note: A user’s ID number is listed in their Dynamic Global (New iCIMS) or Person (Classic iCIMS) profile just below their name.
Once your Text Engagement account includes your iCIMS ATS ID, add a candidate to the Text Engagement system from your iCIMS ATS by completing the steps below.
- In the Text Engagement web app, select the Candidates tab from the sidebar menu, then select Add Candidate on the top right of the Candidates page.
- On the Add Candidates popup, select Select beside the iCIMS ATS option. A list of recently added candidates displays.
- Select the checkboxes next to one or more candidates to import. If desired, use the Filter option to search for specific candidates.
- Select Add # Candidates (where # is the number of candidates selected.) A confirmation popup displays.
Importing Candidates via File Upload
Multiple candidates can be added to the Text Engagement system at once by uploading a file containing candidate contact information. Information on creating the candidate file and uploading it to the system is provided in the following sections.
Creating the Candidate File
Before following the steps outlined in the Uploading the Candidate File section, prepare a candidate file that meets the following criteria.
The file must be one of the following file types:
The file may contain the following columns:
- First name (required)
- Last name (required)
- Phone number (required)
- Job title
- Tags
Notes:
- Ensure candidate information in the file is properly formatted (e.g., name is not in all caps). When using mail merge variables in messages (e.g., first name), candidate information displays in the message exactly as formatted on the profile.
- Phone numbers may be in any format that includes a valid number of characters, such as (xxx)xxx-xxxx or xxxxxxxxxx.
- International phone numbers must include a plus (+) sign and the appropriate country code; otherwise, the phone number is flagged as invalid once the candidate is imported.
- Multiple Tags columns can be used, if needed. Information in these columns is added to candidate profiles as tags. Tags allow users to easily find and sort candidates within the system. For more information on tags, review the iCIMS Text Engagement: Adding and Managing Tags article.
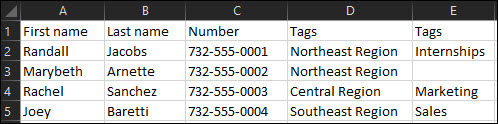 An example .XLSX file ready for upload
 Uploading the Candidate File
To import candidates into the system via file upload, follow the steps below.
- Select the Candidates tab from the sidebar menu, then select Add Candidate on the top right of the Candidates page.
- On the Add Candidates popup, select Select beside the File Upload option.
- On the Upload From File popup, select Select File, then choose the file to upload. The file then automatically processes.
- The system attempts to map the columns in the file to their corresponding Text Engagement fields. In the mapping preview, the column name from the file is listed in parenthesis below the suggested Text Engagement field. If a mapping is not detected for a given column, it is labeled as Unmapped.
- Note: Unmapped columns can be manually assigned a mapping in step 5, if desired. If a mapping is not assigned, the column will be excluded from the import.
Review the mapping preview, then take one of the following actions:
- If the mapping is correct, continue to step 6.
- If the mapping is incorrect or contains any unmapped columns, select No, Remap and continue to step 5.
- To update a mapping, select the dropdown in the appropriate column and select the desired field. Repeat as needed for each incorrect or unmapped column. When finished, select Remap.
- Note: For more information on the full list of mapping options, contact iCIMS Technical Support.
- Once the columns are mapped correctly, select Yes, Import to import the file. The file then processes, and the candidates are added to the system.
Notes:
- The site may need to be refreshed before imported candidates appear within the system.
- If a candidate within the uploaded file has a phone number that matches an existing candidate profile, the information from the file will update the existing profile. Phone numbers cannot be updated via import.

