Overview
To improve the consistency of an organization’s hiring processes, user admins can set up workflow entrance criteria for specific recruiting workflow statuses in iCIMS. Once entrance criteria have been configured, candidates cannot be moved into a particular status until they meet the specific criteria. iCIMS also offers tools for ensuring specific workflows within iCIMS Connect (Legacy CRM) and Onboarding.
This article covers setting up consistent workflow within the following products:
Setting up Entrance Criteria for a Recruiting Workflow Status
This section includes:
Creating and Managing Entrance Criteria for a Recruiting Workflow Status
User admins can configure entrance criteria for specific recruiting workflow statuses within System Configuration.
- Navigate to Admin > System Configuration > Applicant Tracking > Workflow > Recruiting Workflow Bins and Statuses. Select Edit to launch the Recruiting Workflow Bins and Statuses popup.
- Locate the status that you would like to add entrance criteria to by expanding the bin and clicking the status.
- Locate the Entrance Criteria Filter field and click Create/Edit Entrance Criteria to launch a Recruiting Workflow Search Form popup.
- Add any desired filters using the Filters section of the form. Review the example scenarios below for additional information on building popular entrance criteria filters for a recruiting workflow status.
- The system displays an error message to users who attempt to move a candidate to a status for which they do not meet the prerequisites. Review the Entrance Criteria section of the form to set custom messaging for users if any filter used as entrance criteria is hidden from that specific user group.
- Notes:
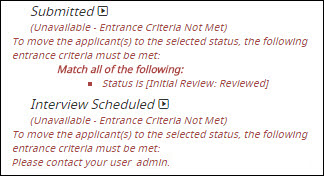
- By default, the names of all filters will be visible to any user group in the system-generated error message, even if the filter is hidden from that user (e.g., in the Submitted example above). The error list indicates all entrance criteria and does not indicate which criteria have not been met.
- To hide the system generated message, enter text into the Error Message (Unavailable Status) field (e.g., Please contact your user admin), then select the Hide System-Generated Message checkbox (e.g., in the Interview Scheduled example above).
- To display the names of all filters and the custom error message, enter text into the Error Message (Unavailable Status) field and leave the Hide System-Generated Message checkbox unchecked. This displays the default error message, the custom error message, and the list of filters to the user.
- If necessary, the default error message (To move the applicant(s) to the selected status, the following entrance criteria must be met:) can be updated by iCIMS Technical Support. The order for messaging and the Unavailable and Match all/any of the following text cannot be updated.
- To save the entrance criteria without creating a template, proceed to step 7. To save entrance criteria and messaging setting for future use, click the Save Search Template icon and complete a title and description for the template.
- Notes:
- Entrance criteria templates do not display in other recruiting workflow search forms; similarly, other search templates are not available as entrance criteria templates.
- If an entrance criteria template is overwritten, the changes to the template are applied to any recruiting workflow status using that template.
- Output templates are not saved with entrance criteria templates, as the system does not evaluate output selections in determining whether candidates meet entrance criteria.
- Deleting an entrance criteria template cannot be undone and removes the entrance criteria from any recruiting workflow statuses.
- Click Save on the Recruiting Workflow Search popup, then Save on the Recruiting Workflow Bins and Statuses popup to save the entrance criteria.
Notes:
- For organizations with workflows that vary by user group, entrance criteria can be set on a user group basis by first selecting a group from the User Group drop-down on the Recruiting Workflow Bins and Statuses popup, then selecting Create/Edit Entrance Criteria.
- To remove all entrance criteria from a status, select the user group for which that entrance criteria was applied, then select the Reset to default value button beside the Entrance Criteria Filter for that status on the Recruiting Workflow Bins and Statuses popup, then select Save.
- Removing an entrance criteria for one user group (e.g., Global) does not change any alternate entrance criteria specifically set for subgroups (e.g., Recruiter).
- When entrance criteria are added to a recruiting workflow status, the time it takes to process the entrance criteria is added to any future status change of this type. If the entrance criteria processes slowly, this may cause the status change and the overall system to run slowly. To test the time the process may take, use the Search button to preview results for the criteria set before saving the entrance criteria.
Example Entrance Criteria Scenarios
The steps below describe different examples of entrance criteria that can be set up to improve efficiency at your organization. Steps to set up other recruiting workflow status entrance criteria unique to your organization are similar.
Note: The offer scenarios described below apply to the offer process in both iCIMS Offer Management and iCIMS ATS.
Scenario A: You want to ensure candidates who applied for a job at your organization cannot be moved into an Initial Review: Reviewed status unless they have completed an employment application iForm and have a resume attached to their profile.
- Click Admin on the menu bar, and then click System Configuration.
- Select Applicant Tracking from the left navigation pane, and then select Workflow from list of options to the right.
- Select Edit next to Recruiting Workflow Bins and Statuses to launch the bins and statuses popup.
- From the current list of workflow bins, click the expand icon by the Initial Review bin. Then select Reviewed from the list of expanded statuses.
- On the right side of the window beside the Entrance Criteria Filter field, click Create Entrance Criteria (or Edit Entrance Criteria, if any entrance criteria have been previously configured for this status) to make edits to the entrance criteria for the selected status. A Recruiting Workflow Search Form popup will display.
- To add a completed employment application iForm and an attached resume as the entrance criteria for this status, add the following filters:
- Select Add Filter and add AT: Standard Employment Application: Form Status. The selection path is Person File > Person > Person iForms > AT: Standard Employment Application > Form > Form Status. Select Add Selected .
- Select Completed from the list to the right of the added filter.
- Select Add Filter and add Person: Has Resume. The selection path is Person File > Person > Reporting & Advanced Options - General > Has Resume. Select Add Selected .
- Verify that Yes is selected from the list to the right of the added filter.

- Note: The completion of any public-answer Recruiting Workflow or Person iForm can be used as entrance criteria. Private-answer iForms are not available for use with entrance criteria, as multiple version may be completed for one candidate. For more info on iForm answer types and why some are considered private, check out the Answer Types section of the Introduction to iForms article.
- Click Save in the Recruiting Workflow Search Form popup. The popup will close automatically.
- Then, click Save in the Recruiting Workflow Bins and Statuses popup to finalize your changes.
Note: The system will not save changes made to the entrance criteria for a status until the user clicks
Save on the Recruiting Workflow Bins and Statuses popup.
Tip: Setting up multiple entrance criteria for a single Recruiting Workflow status cannot ensure users move candidates through statuses or complete entrance criteria in a particular order. To ensure the proper order of statuses is followed, entrance criteria should be set up for each essential workflow status.
For example, if a candidate must be placed in both Initial Review: Reviewed and Offer: Offer Accepted in order to be placed in Hired: Hired, the order of these statuses cannot be specified. (In this case, the entrance criteria
Ever In Initial Review: Reviewed and
Ever In Offer: Offer Accepted are applied, but are not ordered). As long as the candidate has been placed in both statuses at some point in the candidate's Recruiting Workflow history for this job, the system will allow the candidate to be placed in Hired: Hired. To force users to place the candidate into Initial Review: Reviewed prior to placing them into Offer: Offer Accepted, the user admin should set up entrance criteria with the filter
Ever In Initial Review: Reviewed for the Offer: Offer Accepted status to ensure the correct order of statuses is followed.
Scenario B: You want to ensure that users at your organization can only move candidates into the Offer: Launch Offer Approval status if the candidate has ever been in either the Hiring Manager Review: Interview Completed status or the Hiring Manager Review: Offer Requested status.
Note: Entrance criteria support
Ever In (Any) and
Ever In (All) search filters allow the user admin to require that candidates have been in one or more selected statuses prior to being moved to a specific status. These search filters are only available for use with entrance criteria.
- Ever in (Any) requires that a candidate has been in at least one of the specified statuses at some point during the hiring process.
- Ever in (All) requires that a candidate has been in all specified statuses at some point during the hiring process.
Steps:
- Click Admin on the menu bar, and then click System Configuration.
- Select Applicant Tracking from the left navigation pane, and then select Workflow from list of options to the right.
- Select Edit next to Recruiting Workflow Bins and Statuses to launch the bins and statuses popup.
- From the current list of workflow bins, click the black expand icon by the Hiring Manager Review bin. Then select Submitted from the list of expanded statuses.
- On the right side of the window beside the Entrance Criteria Filter field, click Create Entrance Criteria (or Edit Entrance Criteria, if any entrance criteria have been previously configured for this status) to make edits to the entrance criteria for this status. A Recruiting Workflow Search Form popup will display.
- To add ever in Hiring Manager Review: Interview Completed status or Hiring Manager Review: Offer Requested as the entrance criteria for this status, add the following filters:
- Select Add Filter and select Ever in (Any). The selection path is General > Ever in (Any). Select Add Selected.
- Verify that the drop-down is set to Is, then select Hiring Manager Review: Interview Completed and Hiring Manager Review: Offer Requested from the list of statuses.

- Click Save in the Recruiting Workflow Search Form popup. The popup will close automatically.
- Then, click Save in the Recruiting Workflow Bins and Statuses list to finalize your changes.
Note: The system will not save changes made to the entrance criteria for a status until the user clicks
Save on the Recruiting Workflow Bins and Statuses popup.
Scenario C: You want to ensure that recruiters at your organization can only move candidates into the Offer: Launch Offer Approval status after specified fields on the Offer Details tab have been filled out. You do not want to impact whether other users (e.g., user admins) can move the candidate without completing the tab.
- Click Admin on the menu bar, and then click System Configuration.
- Select Applicant Tracking from the left navigation pane, and then select Workflow from list of options to the right.
- Select Edit next to Recruiting Workflow Bins and Statuses to launch the bins and statuses popup.
- Set the User Group drop-down to your recruiter user group (e.g., Applicant Tracking User)
- From the current list of workflow bins, click the black expand icon by the Offer bin. Then select Launch Offer Approval from the list of expanded statuses.
- On the right side of the window beside the Entrance Criteria Filter field, click Create Entrance Criteria (or Edit Entrance Criteria, if any entrance criteria have been previously configured for this status) to make edits to the entrance criteria for this status. A Recruiting Workflow Search Form popup will display.
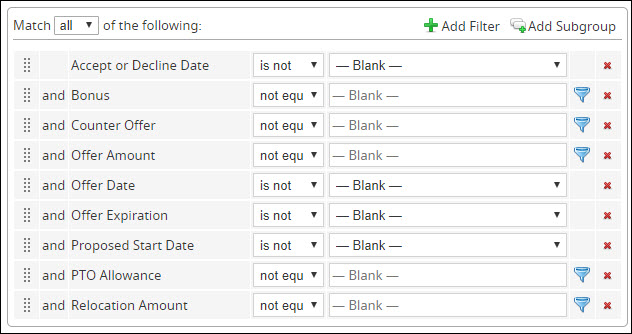
- To add completed Offer Details fields as the entrance criteria for this status, add the following filters:
- Select Add Filter and expand the Offer Details tab. Select all of the relevant fields within this list. Select Add Selected .
- Once the filters have been added to the search form, set each filter to is not or not equal to – Blank –.
- Click Save in the Recruiting Workflow Search Form popup. The popup will close automatically.
- Then, click Save in the Recruiting Workflow Bins and Statuses list to finalize your changes.
Note: The system will not save changes made to the entrance criteria for a status until the user clicks
Save on the Recruiting Workflow Bins and Statuses popup.
Exceptions to Entrance Criteria
- Imports: Imports will ignore any entrance criteria and place the applicant in the indicated status.
- Initial Submission Status: The initial status that an applicant is placed in (whether via applying on an ATS career site, via vendor submission, or via the Submit to Workflow button) will ignore any entrance criteria requirements.
- Recruiting Workflow History Window: This feature is available for user admins by request. The recruiting workflow history window allows users to change the status of an applicant regardless of entrance criteria dependencies.
Setting up Forced Workflow for Sourcing and Onboarding Workflow Statuses
The process for setting up rules for consistent workflows functions differently for onboarding and sourcing workflows. The steps for setting up these types of forced workflows are outlined below.
Sourcing Workflows
- Select Admin on the menu bar, then select System Configuration.
- Select Connect on the left sidebar. Then, select Sourcing Workflow from the list of options to the right.
- Select Fields (Workflow), then locate Status from the list of fields.
- Select the Action icon to the right the Status row and choose Edit Field Properties. Select Edit on the popup.
- Review available statuses. Select the appropriate status to modify by clicking the status name.
- On the right side of the window, click [No Selection] (or any linked status name, if forced statuses have been previously selected) beside Forced Status List to make edits to the forced status list for the selected status.
- Choose the appropriate status(es) from the list, and then click Select.
- Review the updated information beside Forced Status List, which will include the newly-selected items. Click Save to finalize all changes.
Note: For candidates with multiple sourcing workflows, when one workflow is updated to Hired, all other workflows are also automatically updated to Hired to indicate the candidate has already been placed in a position. This automatic update ignores any forced workflow configurations.
Onboarding Workflows
- Select Admin on the menu bar, then select System Configuration.
- Select Preboard on the left sidebar. Then, select Workflow from the list of options to the right.
- Select Edit next to Onboard Workflow Statuses.
- Review available bins and statuses. Select the appropriate status to modify by clicking the status name.
- On the right side of the window, click [No Selection] (or any linked status name, if forced statuses have been previously selected) beside Forced Status List to make edits to the forced status list for the selected status.
- Select the appropriate status(es) from the list, and then click Select.
- Review the updated information beside Forced Status List, which will include the newly-selected items. Click Save to finalize all changes.
Notes:
- Some onboarding workflow statuses are automatically updated for new hires as they complete tasks, so enforcing a forced workflow may not be necessary.
- These steps reflect setting up forced workflow for statuses within iCIMS Onboarding (e.g., Ready to Onboard, Onboard in Progress, etc.). To set the order a candidate or other individual must complete onboarding tasks, refer to Creating Onboarding Workflow Tasks and Onboarding Workflow Task Dependencies.
User Admin Curriculum
The iCIMS Knowledge Base includes additional resources to prepare user admins to work with the iCIMS. These resources have been compiled in the following article:
User Admin Curriculum
