Overview
iCIMS Candidate Relationship Management (CRM) is a tool that allows you to manage an organized database of candidates and nurture those individuals through frequent, targeted communications.
iCIMS Candidate Experience Management (CXM) combines the functionality of traditional candidate relationship management technology with AI-enhanced marketing automation capabilities to assess candidate engagement and automate campaigns.
Through CXM's and CRM's email campaign functionality, you can message select groups of candidates at set intervals, sharing information like company news and events to keep them engaged until the right job becomes available.
For information on automated campaigns, review the Creating and Sending Automated Campaigns in iCIMS Candidate Experience Management (CXM) article. For information on sending individual emails through CXM or CRM, review the Creating Emails and Email Templates in iCIMS Candidate Experience Management (CXM) and iCIMS Candidate Relationship Management (CRM) article.
This article includes the following sections to assist you with email campaigns in iCIMS Candidate Experience Management (CXM) and iCIMS Candidate Relationship Management (CRM):
About the Email Search Page
Campaign functionality in CXM and CRM allows you to create and schedule bulk emails for specific pipelines in your system. This is done through the Campaigns tab on the Email Search page. (Note: Automated campaigns in CXM are managed through the Automated Campaigns tab; for more information, review the Creating and Sending Automated Campaigns in iCIMS Candidate Experience Management (CXM) article.) To access this tab, select the Email Search (envelope) icon in the vertical navigation menu on the left and then select Campaigns at the top.

The Campaigns tab lists all of your organization's active campaigns. Each campaign includes the following information:
- Campaign Name: The name of the individual campaign. Selecting a campaign name from the table opens more information about that campaign, including the individual emails that are part of that campaign and the pipeline(s) assigned to receive those emails.
- Sharing: The designation of public or private. Unlike a public campaign, a private campaign is not intended to be shared with external recipients.
- Subscribers (Pipelines): The total number of recipients for the campaign who are subscribed to receive mass emails, along with the number of pipelines assigned to that campaign. For more on pipelines, review the article Setting Up Pipelines in iCIMS Candidate Experience Management (CXM) and iCIMS Candidate Relationship Management (CRM).
- Start Date: The date the campaign is scheduled to begin.
- End Date: The date the campaign is scheduled to stop sending emails.
- Emails: The number of active email messages associated with the campaign. (Campaign emails that are deactivated are not included in this count.)
- Delivered: The number of subscribers who have been sent emails for the campaign.
- Opened: The number of subscribers who have opened emails for the campaign.
Note: There are two other tabs on the Email Search page: One-Off Emails enables you to track all individual (non-campaign) emails sent through the system, and Automated Campaigns enables you to create and track campaigns using conditional logic. For more information, review the Creating Emails and Email Templates in iCIMS Candidate Experience Management (CXM) and iCIMS Candidate Relationship Management (CRM) and Creating and Sending Automated Campaigns in iCIMS Candidate Experience Management (CXM) articles.
Tip: You have the option to send one-off bulk emails without setting up a campaign, by manually selecting candidates from the Search page and selecting Email. These emails will then be viewable on the One-Off Emails tab. Keep in mind that bulk messages from the Search page do not take into account whether candidates are subscribed to mass emails.
Searching for Email Campaigns
On the Campaigns tab, you can search for any campaign you have access to in the table. Select the magnifying glass at the top (next to the Campaigns header) or on the right border to open the Search Campaigns panel, which includes a few different search options:
- Search by Name: As you type in this field, the system automatically filters results in the table with campaigns matching that name.
- Primary Filters: Two filters are available to narrow your results:
- Public/Private: A dropdown to only display campaigns that are public or private.
- Select Pipeline in Campaign: A search field to select pipelines in your system and only display campaigns attached to those pipelines.
- Include Archive: A toggle to display archived campaigns in addition to active campaigns.
- Date Filters: The following date filters are available:
- Start Date From to Start Date To: Boxes to select specific dates and display campaigns that start within that time span.
- End Date From to End Date To: Boxes to select specific dates and display campaigns that end within that time span.
Once you enter or change anything in this panel, the table updates with only those campaigns matching your search.
Creating New Campaigns
Create a new email campaign by selecting the + Create Campaign button at the bottom right of the Campaigns tab. The Create Campaign page displays, including the following fields:
- Campaign Name: A text field to input the name of your new campaign. (Campaign names must be unique.)
- Reply To Email Address: A text field to input the email address you want email replies to go to.
- Select Pipelines: A dropdown to select pipelines to receive emails for this new campaign. Every campaign must have at least one pipeline assigned to it; you can add more pipelines after the campaign is created and continue editing up until the campaign’s start date.
- Enable Dynamic Enrollment: A toggle to set whether the campaign runs continuously. If enabled, new candidates are added to the campaign as they are added to the associated pipelines. If disabled, the campaign runs only once with the candidates already in the associated pipelines.
- Start Date to End Date: Date boxes to determine when the new campaign should begin and end.
- Notes:
- The start date must be today or later. At minimum, there is a one-day delay between the start date and when your first email would go out. For more information, review the Scheduling Emails for Your Campaign section below.
- The end date, which is optional, must be at least one day after the campaign starts. Emails will not be delivered after the end date has passed, even if no emails have gone out yet.
- Send Time: A field to enter or select a time for the campaign's emails to be sent.
- Public Campaign/Private Campaign: Radio buttons to designate the campaign as either public or private.
- Note: When you select Private Campaign, an Add Recruiter field opens underneath, where you select the specific recruiters you want to share the campaign with.
Once you select Save, the campaign displays in the table on the Campaigns tab.
Tip: You also have the option to create an email campaign for a specific pipeline while on that pipeline's dedicated page. Select the Actions button at the top right of that page and select Create Campaign from this Pipeline. The Add Campaign window opens with the same fields outlined above. For more on pipelines, review the article Setting Up Pipelines in iCIMS Candidate Experience Management (CXM) and iCIMS Candidate Relationship Management (CRM).
Reviewing and Editing Campaigns
Select a campaign from the table on the Campaigns tab to open the dedicated page for that campaign. This page includes two tabs at the top:
- Emails: A table of all emails for that campaign, along with statistics for each one (e.g., opens, clicks). The Emails tab opens by default when opening a campaign. From this tab, you can:
- Open an email by selecting its name in the table.
- Add an email to the campaign, as described in the Adding Emails to Your Campaign section below.
- Change the Delay for an email. The Delay determines how many days the system should wait to send that email after the start date. For more information, review the Scheduling Emails for Your Campaign section below.
- Delete an email by selecting the Delete link in its row in the table.
- Subscribed Pipelines: A table of pipelines in your system assigned to that campaign. For more information, review the Reviewing Pipelines Attached to Your Campaign section below.
There is also an Actions button at the top right of the page, with the following options:
- Edit Campaign: To update the details of your campaign (e.g., name, start/end date, subscribed pipelines) and share/unshare the campaign with other recruiters (if the campaign is private).
- Note: Campaigns can be edited up until the campaign start date and time. Once a campaign has begun, it can no longer be edited.
- Duplicate Campaign: To create a duplicate of the campaign. For more information, review the Duplicating Campaigns section below.
- Archive Campaign: To archive the campaign. For more information, review the Archiving Campaigns section below.
Adding Emails to Your Campaign
After creating your campaign, add email messages to it by following the steps below:
- On the Campaigns tab, open the appropriate campaign from the table by selecting its campaign name.
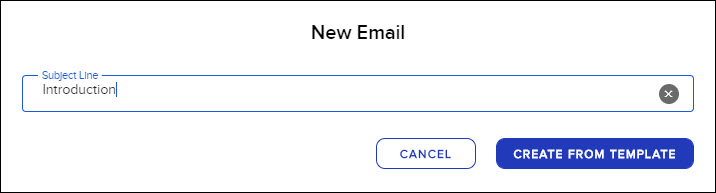
- On the dedicated page for your campaign, select the Add Email (circular +) button at the bottom right.
- In the New Email popup that opens, enter a subject for your email and select Create from Template. (Note: You must use an email template to create any new email for a campaign. For more information, review the article Creating Emails and Email Templates in iCIMS Candidate Experience Management (CXM) and iCIMS Candidate Relationship Management (CRM).)
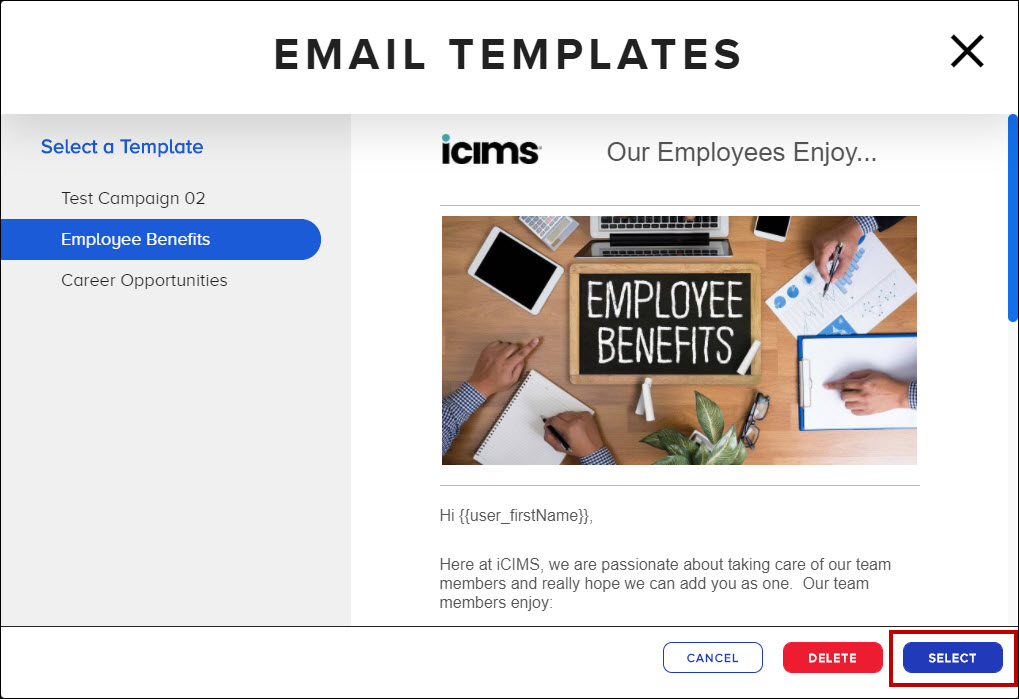
- On the Email Templates page, select a template from the menu on the left. The content of that template displays in the large blank space on the right.
- If this is the template you want to use, select Select at the bottom.
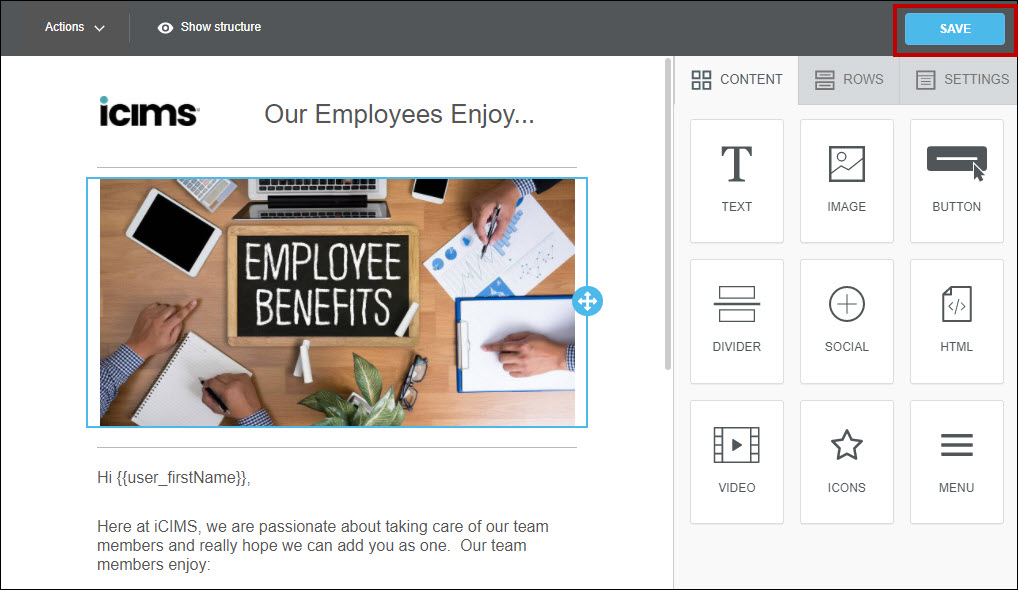
- This opens the system's WYSIWYG (What You See Is What You Get) editor. Edit the content and format the structure of the email, as necessary. (For more on email branding, review the article Creating Emails and Email Templates in iCIMS Candidate Experience Management (CXM) and iCIMS Candidate Relationship Management (CRM).)
- When finished, select the Save button in the top right corner of the editor. Your email will then appear in the table on the dedicated page for your campaign.
- In the row for your email, set the number of Delay days (in the Delay column). This determines when the email is sent after the start date. For more information, review the Scheduling Emails for Your Campaign section below.
- Create additional emails, as necessary, by selecting the circular + button on the dedicated campaign page and repeating the steps above.
Scheduling Emails for Your Campaign
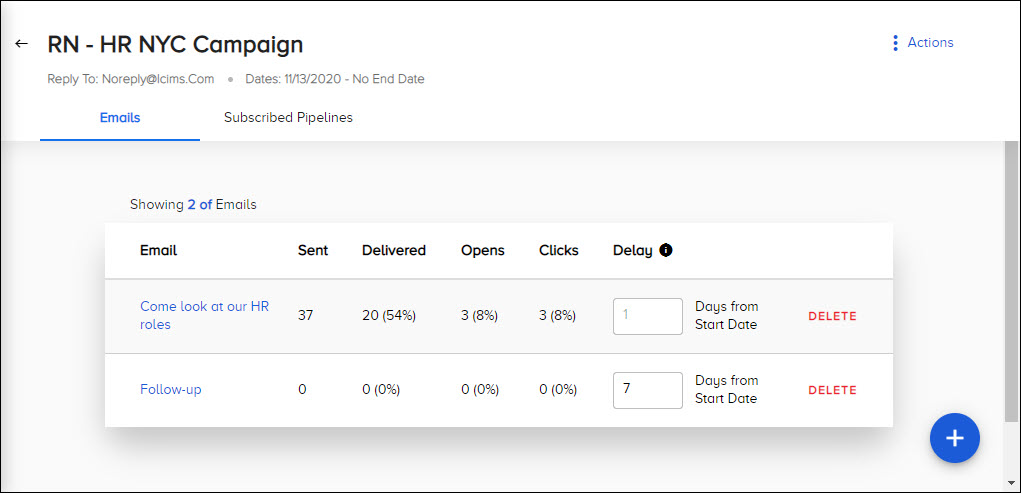
The system sends out campaign emails at set intervals as defined by your selected start date and the number of Delay days assigned to each email on the Emails tab of your dedicated campaign page.
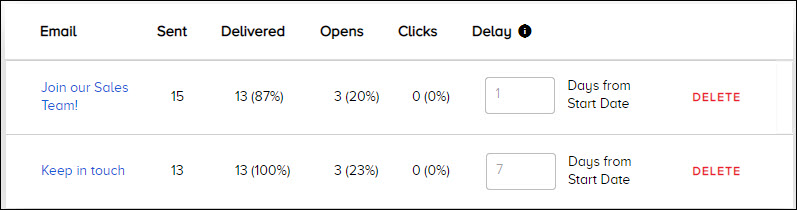
For example, in the screenshot above, assume your campaign had a start date of April 22. Since the Delay for your first email was set for one day (which is the minimum), that email went out the following day on April 23. Your second email had a Delay of seven days, so that email went out seven days after the start date on April 29.
The Delay for an email can be edited in the table anytime until the email is sent, at which point the Delay is locked and cannot be changed. Each email must have a different Delay number, since only one email for a campaign can be sent per day. (If emails in a campaign have matching Delay days, an error message displays at the bottom.)
Notes:
- All campaign emails are sent at the time designated in the Send Time field (available when creating or editing the campaign). If no time is selected, the system will send emails at the default time of 11:00 a.m. Eastern Standard Time (10:00 a.m. Eastern Daylight Time).
- For each campaign, the system automatically orders emails by Delay, with the lowest number of days on top.
- If the Dynamic Campaign Enrollment toggle is enabled, candidates who join the campaign after it has started are sent the emails they missed in the same order using the same number of Delay days. For instance, a campaign started on November 1 and includes three emails with a Delay of 1 day, 2 days, and 3 days, respectively (meaning the emails went out on November 2, 3, and 4). If a new candidate joins the campaign on November 11, that person will receive those three emails on the same schedule: November 12, 13, and 14. (If the Dynamic Campaign Enrollment toggle is disabled, no new candidates are added to the campaign once it starts.)
Tip: If you would like the ability to send out your next scheduled email that same day, bypassing the Delay set for it, submit a case to iCIMS Technical Support to add an option for Send Next Email to the Actions button on dedicated campaign pages.
Setting Conditions for Campaign Emails
You can set up each email to only go out to candidates who completed a certain action on the previous email in that campaign. In the table on the Emails tab, use the Condition dropdown to apply one of these actions to a specific email:
- None (Default): The email is sent to all recipients, regardless of condition.
- Not Opened: The email is only sent to candidates who did not open the previous campaign email.
- Opened: The email is only sent to candidates who opened the previous campaign email.
- Clicked: The email is only sent to candidates who clicked a link in the previous campaign email.
Notes:
- At this time, the primary purpose of this Condition functionality is to funnel candidates rather than create separate branches (or segments) of candidates.
- This functionality does not affect the order or delay of campaign emails—only who receives each email.
Editing and Evaluating Campaign Emails
On the Emails tab of a dedicated campaign page, select the name of any email to open the Email Detail page for that message. The Email Detail page includes two tabs:
- Edit Email: To make changes to the content and subject line of that individual email.
- Email Analytics: To view analytics for that email, including delivery and open dates for each recipient.
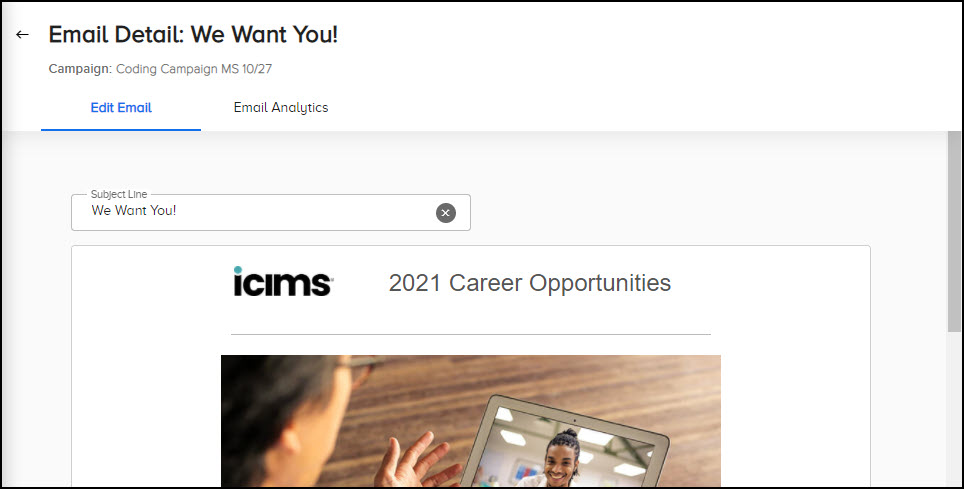
Accessing and Updating Email Content
The Edit Email tab allows you to view and edit the content of your message. You can edit the subject line from this tab, but to make changes to the email content, you will need to select Edit at the bottom.
This opens the system's WYSIWYG editor, where you can alter the formatting of your email, add new content, and make style changes like font and color. For more information, review the article Creating Emails and Email Templates in iCIMS Candidate Experience Management (CXM) and iCIMS Candidate Relationship Management (CRM).
Tip: Select Send Test from the bottom of the Edit Email tab to send a test email to yourself.
Reviewing Email Analytics
Campaign analytics are available for each email of a campaign through the Email Analytics tab. The analytics here are organized in table format and outline the email activity of each candidate who was sent the email. The table includes the following columns:
- Candidate: The name of the email recipient. Selecting the candidate's name takes you to their Candidate profile in the system.
- Sent: The date and time the email was sent to the recipient.
- Delivered: The date and time the email was delivered to the recipient.
- Open: The date and time the candidate opened the email.
- Clicked: The date and time the candidate clicked a link in the email.
- Bounced: The date and time the email hard-bounced (i.e., it did not and will not get delivered to the candidate). This is often caused by an invalid email address.
Note: A column will be blank if there is no data (e.g., a candidate never opened the email).
Filtering Email Analytics
On the Email Analytics tab, select the magnifying glass at the top or on the right border to open the Search Email Analytics panel. In this panel, the following date filters are available to narrow down the results in the table:
- Queued
- Sent
- Opened
- Clicked
- Bounced
Select a start and/or end date for any of these filters; the system will only display recipients with analytics matching those dates.
Reviewing Pipelines Attached to Your Campaign
You can add or edit pipelines associated with a campaign from the Edit Campaign page up until the start date for a campaign. You can also review the pipelines associated with a campaign on the campaign’s Subscribed Pipelines tab.
The Subscribed Pipelines tab includes a table of all pipelines associated with your campaign. The table on this tab also includes these columns:
- Name: The name of the pipeline. Selecting the name opens the dedicated page for that pipeline, where you can run a search for particular candidates and take action on them, if desired. For more on search capabilities in CXM and CRM, review the article Searching for Candidates in iCIMS Candidate Experience Management (CXM) and iCIMS Candidate Relationship Management (CRM).
- Subscribed Members: The number of candidates in that pipeline who are subscribed to receive recruitment emails.
- Total Members: The total number of candidates in that pipeline (regardless of whether they have subscribed to receive recruitment emails).
- Dynamic Status: The designation of standard or dynamic. Standard pipelines are populated manually by recruiters, while dynamic pipelines use a saved search to find candidates.
- Sharing: The designation of public or private. Public pipelines are shared with all recruiters in your system, while private pipelines are only accessible by select recruiters.
- Pipeline Owner: The name of the person who created the pipeline.
Tip: You can determine how many campaigns an individual pipeline is subscribed to by selecting View Associated Campaigns from the Actions button of its dedicated pipeline page. To learn more, review the article Setting Up Pipelines in iCIMS Candidate Experience Management (CXM) and iCIMS Candidate Relationship Management (CRM).
Search for any pipeline in the table by selecting the magnifying glass at the top or on the right border. This opens the Search Pipelines panel, which includes the following search options:
- Search by Name: As you type in this field, the system automatically filters results in the table with pipelines matching that name.
- Primary Filters: Three filters are available to narrow your results:
- Pipeline Type: A dropdown to only display pipelines that are public or private.
- Dynamic Status: A dropdown to only display pipelines that are standard or dynamic.
- Pipeline Owner: A search field to select an email address and only display pipelines with that address as its owner.
- Show Favorite Pipelines Only: A toggle to only display favorite pipelines.
- Date Filters: Boxes to select specific dates and display pipelines that were created within that time span.
Duplicating Campaigns
You have the option to duplicate your campaign; this allows you to create a new campaign similar to that existing campaign, without having to start from scratch.
To duplicate a campaign, open its dedicated page from the Campaigns tab and select Duplicate Campaign from the Actions button at the top right. When selecting this option, a Duplicate Campaign window opens with the same fields as on the Add Campaign window; many of these fields are automatically filled in with information from the existing campaign. Edit these fields as necessary.
After entering the new campaign's name and confirming all information in this window, select Save. Your duplicate campaign will then be accessible from the table on the Campaigns tab. You can edit it and add/schedule emails to it, as normal.
Tip: The Duplicate Campaign window has a Duplicate Associated Campaign Emails toggle at the bottom, which is off by default. To carry over your existing campaign's emails to the duplicate campaign, make sure to enable this toggle.
Archiving Campaigns
An archived campaign is one that no longer sends emails; either the end date has passed or the campaign was ended manually.
To manually archive a campaign, open its dedicated page from the Campaigns tab and select Archive Campaign from the Actions button at the top right. This stops the campaign's emails from sending and sets its end date to yesterday.
Note: Once a campaign is archived, the Archive Campaign option is renamed Unarchive Campaign. Select this option to unarchive the campaign.
Tip: On the Campaigns tab, view archived campaigns in the table by opening the Search Campaigns panel and enabling the Include Archived toggle.

