Overview
iCIMS' Applicant Tracking (formerly Recruit) allows users to track a company's job openings as well as the candidates who apply to the company’s jobs. The steps presented when creating a job are configurable, so your experience may differ from the steps below. A red asterisk (
*) beside a field within Applicant Tracking indicates that it is required.
Adding a New Job or Requisition
- Select Create from the menu bar, and select Job from the dropdown menu.
- Complete all the applicable fields in the General Information, Assignment, Compensation, Requirements, and Skills sections. If desired, information can be prepopulated from a saved job template or manually entered. When all desired fields have been completed, click Next to continue. For more information about available fields within these sections, please refer to the Introduction to the Job Profile: Job Detail Tab and Job Creation Process article.
Tip: Within the Skills section of the Job profile or Create New Job wizard, users will have the opportunity to add a desired skillset, if merited. To add a desired skillset for this job, click New on the right side of the Skills section of the Job profile or Create New Job wizard. Select the Edit/Show List Picker icon to the right of the Skill field in the Create New Skillset Entry popup, then select the desired skill from the available options and click Select. Set the desired skill level (optional) within the Skill Level dropdown, then click OK.
- Enter the Overview, Responsibilities, and Qualifications on the Job Description screen. If the job has been created from a job template, this information may already be populated. Make edits as necessary, and click the Finish button to continue. For more information about available fields within these sections, please refer to the Introduction to the Job Profile: Job Description Tab and Job Creation Process article.
- Use the Edit Approval List screen to request approvals for the job by entering an approver’s name in the dropdown next to Add Approvers. This dropdown will suggest approvers as soon as two letters of an approver’s name have been typed. Click an approver's name to add that person to the list. (To progress without adding approvers at this time, click Save if available and disregard steps 5-7. Do not click Save & Begin Approval.)
- Repeat step 4 to add additional approvers as needed. (For additional information about job approvals, review the Understanding and Initiating the Job Approval Process article.)
- Optionally, click the Edit Default Message link to modify the email that will be sent to all selected approvers using the Compose Email window.
- Select Save & Begin Approval, and then OK to send the approval request to the applicable recipients.
Tips:
- Many fields with dropdown lists (such as Department, Hire Type, etc.) are type-to-search, allowing the user to quickly filter results to find the desired option.
- Free-text fields accompanied by a What You See Is What You Get (WYSIWYG) editor (such as Overview, Responsibilities, and Qualifications on the Job Description screen) support a number of formatting options and features for users. Users may paste text from Microsoft Word directly into the textbox (without having to click a Paste From Word button). Note that the formatting controls available may vary slightly among browsers.
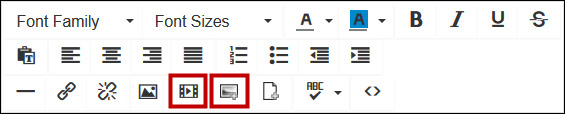
- To include a video in a job description field, select the Insert/Edit Video icon. Provide the URL for the video in the Source field of the Insert/Edit Video popup window. (Optionally, enter desired information in additional fields; a valid Source URL should be the only required criterion to successfully insert a video.) Click OK.
- To include an image in a job description field, select the Insert Image from File Library icon. Then, select the image(s) you would like to add from the available list in the Use Library Image popup window (or click Choose File in this window and select a file from your computer to upload, then click Upload to Library to add the image to the File Library). Click the Add Image(s) button.
Additional Resources: Working with Jobs
The iCIMS Knowledge Base includes additional resources on job creation and management.
Click here to access related resources.

