Overview
iCIMS Text Engagement offers multiple methods of adding users to the system. Users can only be added by Text Engagement managers and customer admins via the Text Engagement web application. Once a user is added, they can begin using the system in their assigned role. The available roles are as follows:
- User: Users have standard access to Text Engagement, which includes creating candidates, managing campaigns, and messaging candidates.
- Reporter: In addition to standard access, reporters can also run various standard reports and metrics within the system.
- Manager: In addition to standard access, managers also have access to reporting and user management. Managers can further configure account-wide settings and preferences.
- Customer Admin: In addition to manager access, customer admins can also purge candidates.
- Note: Customer admins can only be added by iCIMS staff. To add a customer admin or update an existing user to this role, submit a case to iCIMS Technical Support.
The steps outlined in this article describe how a manager can add users to Text Engagement. This article also includes a section on the actions available to manage existing users.
Note: Additional options may be available to configure users (e.g., enabling SMS-only senders, assigning users to teams, etc.). Contact iCIMS Technical Support if you are trying to update a user permission that is not available in this article.
Adding Users to Text Engagement
There are two different sets of processes for adding users to Text Engagement depending on whether your organization has integrated Text Engagement with iCIMS Applicant Tracking (ATS) or not. The steps of each process are outlined in the sections below.
Note: If you are not sure whether your organization has the iCIMS ATS integration or not, select the Users tab from the Text Engagement web application sidebar. If the Add a User and Import Users buttons display in the upper right, your organization does not have the iCIMS ATS integration. If no buttons display in the upper right, your organization does have the iCIMS ATS integration.
Adding a User in the Text Engagement Web Application
In the Text Engagement Web Application, managers can add users either individually or in bulk. The details of each process are outlined in the sections below.
Manually Adding a Single User
To manually add a single user to the Text Engagement system via the web application, follow the steps below.
-
Select the Users tab from the sidebar menu, then select the Add A User button on the top right.
-
On the Add User popup, enter the required user information:
- First name
- Last name
- Email address
- Note: The email address entered is automatically used as the Username and cannot be changed. The email provided here is used for the user’s login.
- Desired area code
-
Select the Role dropdown to assign one of the following Text Engagement roles:
- User (default): Users have standard access to Text Engagement, which includes creating candidates, managing campaigns, and messaging candidates.
- Manager: In addition to standard access, managers also have access to reporting and user management. Managers can further configure account-wide settings and preferences.
- Notes:
- The reporter role is not available from the Add User popup; however, once a user is created, the manager can convert them to the reporter role. In addition to standard access, reporters can also run various standard reports and metrics within the system.
- The customer admin role is not available from the Add User popup. In addition to manager access, customer admins can also purge candidates. Customer admins can only be added by iCIMS staff. To add a customer admin or update an existing user to this role, submit a case to iCIMS Technical Support.
-
Select Save to add the new user to your system and an invitation email is sent, if selected.
- Notes:
- The Send Invitation Email option is enabled by default. It is recommended to send the invitation email to alert the user that their Text Engagement account is ready and to prompt them to create a password and log into the system.
- The new user is automatically assigned a license, if any license seats are available.
Once the user has been added, the user overview page displays. Managers can review user information and reports and take action on the user account as desired from this page. For more information, review the Managing Users section of this article.
Importing Multiple Users via File Upload
Multiple users can be added to the Text Engagement system at once by uploading a file containing user contact information via the web application. Additionally, users can be added to or moved between teams via file upload. Information on creating the user file and uploading it to the system is provided in the following sections.
Creating the User File
Before following the steps outlined in the Uploading the User File section, prepare a user file that meets the following criteria.
Notes:
- If your organization already has Text Engagement users, you can download a Users Report and edit it rather than creating a new one from scratch. In that case, iCIMS recommends only keeping changed and new users in the file to upload to avoid accidental changes. For more information on reports in Text Engagement, review the iCIMS Text Engagement: Generating and Understanding Reports article.
- For organizations with teams, downloading a user report also enables you to check team names.
The file must be one of the following file types:
The file may contain the following columns:
- First name (required)
- Last name (required)
- Email address (required)
- Desired area code (optional)
- Note: The user is assigned a license (phone number) automatically when a desired area code is provided, if any license seats are available.
- Role (optional)
- Note: Imported users are assigned the user role when a role is not provided in the import file.
- Country code (optional)
- Team name (optional)
- Team ID (optional)
Notes:
- If a user is already assigned to a team and you upload a new import file with the Team Name and Team ID fields blank, the user remains assigned to their current team.
- If a user is assigned to one team and you upload a new import file that lists them on a different team, the user is moved from their previous team to the team listed in the file import.
- If a user is assigned to a team by both Team Name and Team ID and the two fields conflict, the user is assigned to the team corresponding to Team ID. To assign a user based on Team Name only, leave the Team ID field blank.
- To remove a user from a team without assigning them to a new team, enter remove as the Team ID. (This is not case sensitive.)
- A team must already exist in order to assign users to it via file upload. If a new import file lists a Team Name or Team ID that does not currently exist, users remain on their current teams and no new team is created.
An example .XLSX file ready for upload
Uploading the User File
To import users into the Text Engagement system via file upload in the web application, follow the steps below.
-
Select the Users tab from the sidebar menu, then select the Import Users button on the top right.
-
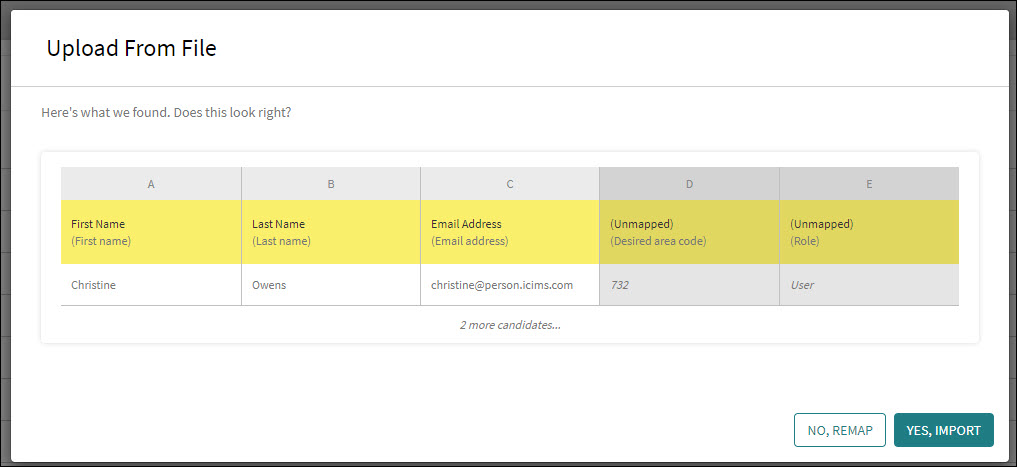
On the Upload From File popup, select Select File, then choose the file to upload. The file then automatically processes and a preview displays with the file columns mapped to corresponding Text Engagement fields. (The column name from the file displays in parentheses below the suggested Text Engagement field.)
-
Review the preview, then take one of the following actions:
- If a file column has not mapped to the correct Text Engagement field or if the column displays as Unmapped, select No, Remap and continue to step 4.
- If a corresponding field is not detected for a given column, it is labeled as Unmapped. Unmapped columns will be excluded from the import if not remapped, as explained in the next step.
- If all file columns have mapped to the correct Text Engagement fields, skip to step 5.
- To update a mapping, select the dropdown in the appropriate column and select the desired field. Repeat as needed for each incorrect or unmapped column. When finished, select Remap.

- Once the columns are mapped correctly, select Yes, Import to import the file. The file then processes, and the users are added to the system.
Once the users have been imported, they display on the Users page. Select the name of any of the applicable users to visit their user overview page and manage their profile information. For more information, review the Managing Users section of this article.
Adding a Text Engagement User through the iCIMS ATS Integration (Universal Login)
To manually add a single user to the Text Engagement system when your organization has Universal Login, add them to iCIMS ATS as either a full access or partial access user. The processes for these two options are listed in the sections below:
Notes:
- Both options provide the user the same access to Text Engagement; only ATS access is impacted.
- In rare circumstances, there may be another Text Engagement user whose data conflicts with that of the new user. In that case, the new user’s name is set to a series of numbers. Submit a case to iCIMS Technical Support for help resolving this issue.
- To remove a user who has left your organization from Text Engagement, regardless of whether their iCIMS ATS access has been removed, you must revoke access from within Text Engagement. For more information on how to do this, review the Managing Users section below.
Adding a Text Engagement User via a Full Access ATS User
- Add the user to iCIMS ATS as a full access user. For more information on adding users to iCIMS ATS, review the Creating New Users with System Access article. For the definition of a full access user, review the Common Definitions of User Licenses and Login Groups in iCIMS Applicant Tracking and Similar Products article.
- Wait for iCIMS ATS and Text Engagement to sync user lists. (This happens every 20 minutes.) Once the two user lists have synced, the new user displays in the Text Engagement web application with a username matching their email address.
- If needed, assign the new user a license in the Text Engagement web application. You can also convert their role to Reporter or Manager instead of User. For more information on assigning licenses and converting roles in Text Engagement, review the Managing Users section below.
Adding a Text Engagement User via a Partial Access ATS User
If your organization needs to add a user to Text Engagement without giving them full access to iCIMS ATS, leverage the Synchronize to Text Engagement field.
The Synchronize to Text Engagement field is hidden by default. To unhide this field, a user admin can follow the steps below.
- Navigate to Admin > System Configuration.
- Enter Synchronize to Text Engagement into the Search bar at the top left and select the matching result.
- Select the down arrow next to User Group in the top left and select your organization's User Admin user group from the list of options. Uncheck the checkbox next to Synchronize to Text Engagement under Hidden to unhide the setting for your organization's User Admins. Repeat this step for both the Admin and Text Engagement user groups.
To manually add a single user to the Text Engagement system by adding them as a partial access iCIMS ATS user, follow the steps below.
- Add the user to iCIMS ATS without granting them full access privileges.
- From the Person profile, select the Login tab, then select Edit.
- Select the down arrow under Synchronize to Text Engagement and select Always to automatically create a Text Engagement profile for the user at the next sync.
- Note: If your organization does not desire a Text Engagement user to be created for the selected ATS user, select Never under Synchronize to Text Engagement. A Text Engagement user is not created for the selected ATS user until this setting is updated.
Managing Users
The user overview page includes a User Summary section with key account information (e.g., licensed phone number and password/login history), the number of contacts the user has utilized in the current cycle, as well as various reports specific to the user (e.g., Unique Candidate Communications). Additionally, a number of account actions (e.g., converting roles and initiating password resets) are available from the user overview page. To access the user overview page, select the Users tab from the sidebar menu, then select the name of the applicable user.
Notes:
- The user overview page reports are the same reports available on the user's dashboard; for more information on the types of reports available, review the iCIMS Text Engagement: Introduction to the Dashboard article.
- Some functionality may vary depending on whether your organization has a subscription to iCIMS Applicant Tracking (ATS) that is integrated with your organization’s Text Engagement system. In those cases, links to the relevant alternative are provided.
This section outlines the actions available to manage system users from the user overview page. Only Text Engagement managers and customer admins can perform the actions described in this section.
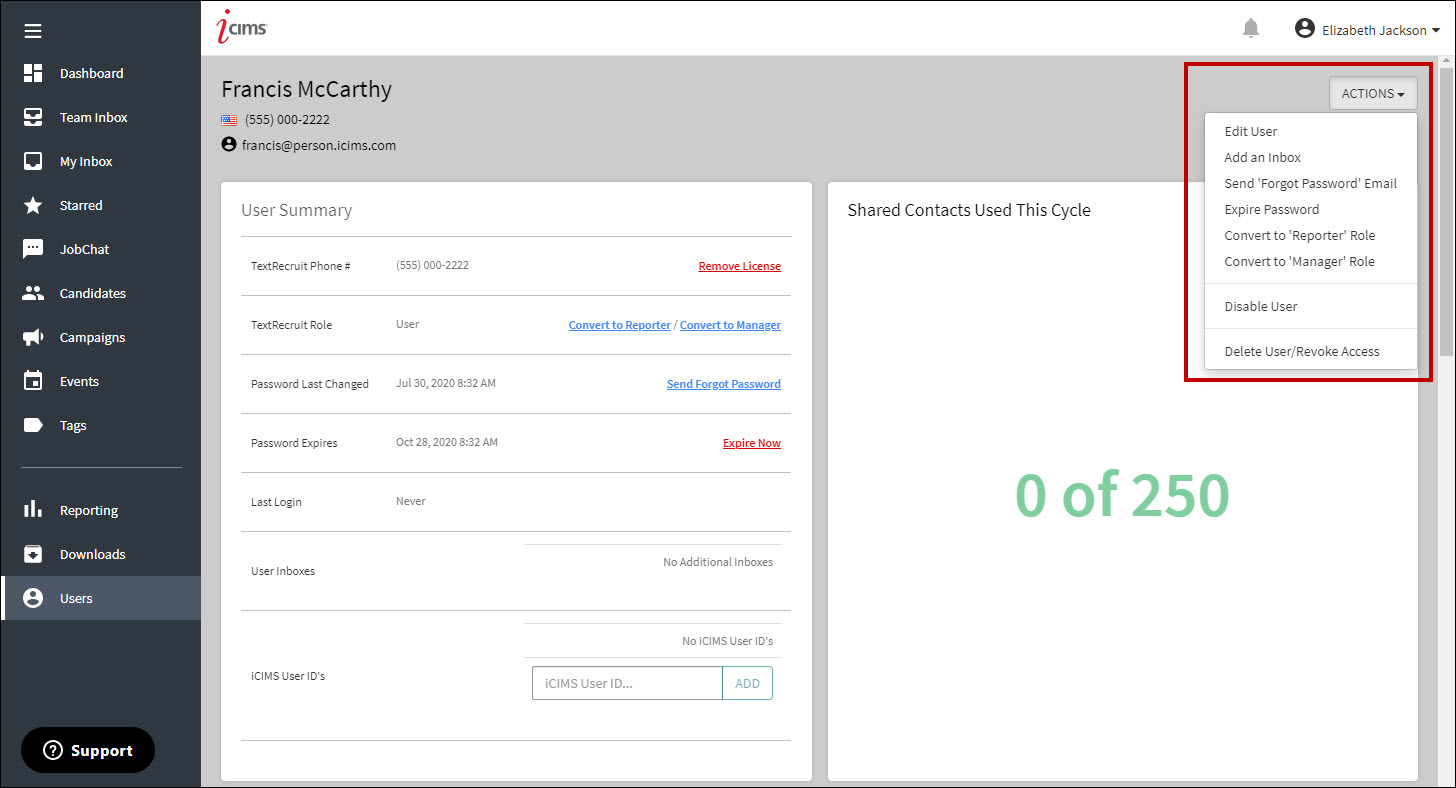
The following actions can be performed from the Actions dropdown in the top right of a user’s overview page, as shown in the image above.
- Edit User: Edit the user’s first and last name, as applicable; the user’s email address and username cannot be edited.
- Add an Inbox: Add another user’s inbox for the user to easily access and view from their own sidebar by entering the other user's username and a name for the inbox. An inbox can be removed by hovering over the inbox in the User Inboxes area of the User Summary, then seelcting the remove icon that displays.
- Note: Enter the username (email address) of the user whose inbox you wish to grant the user access to in the Source Username field, and enter the text you wish to display on the user’s sidebar for this additional inbox in the Inbox Name field, as shown in the images below.
An example of adding an inbox for a user in Text Engagement.
An example of an additional inbox on the user's sidebar.
- Send ‘Forgot Password’ Email: Send a password reset email to the user’s email address. This action is also available from the User Summary section.
- Expire Password: Require the user to change their password upon their next login to Text Engagement. This action is also available from the User Summary section.
- Convert to ‘User’ Role: Update a reporter or manager's role to the user role. This action is also available from the User Summary section.
- Convert to ‘Reporter’ Role: Update a user or manager's role to the reporter role. This action is also available from the User Summary section.
- Convert to ‘Manager’ Role: Update a user or reporter’s role to the manager role. This action is also available from the User Summary section.
- Disable User: Temporarily disable a user from logging into Text Engagement. The setting name changes to Enable User when the user is disabled and allows a manager to re-enable the user so that the user can log into Text Engagement again.
- Delete User/Revoke Access: Permanently delete a user from Text Engagement and revoke access to sending or receiving messages.
- Notes:
- When a user with a license is deleted, their license is released and a seat is automatically added to the number of license seats available to be assigned.
- Once a user account has been deleted, the deleted username (email address) cannot be added again in the future.
Additionally, managers can perform the following actions from the user overview page User Summary section:
- Remove or assign a license
- Notes:
- Manually added users are automatically assigned a license when a license seat is available. Imported users are only assigned a license when the desired area code is provided in an import column.
- Select Assign License and enter a desired area code for the user to assign a license. This automatically detracts a seat from the number of license seats available to be assigned.
- Select Remove License to remove a license. This automatically adds a seat to the number of license seats available to be assigned.
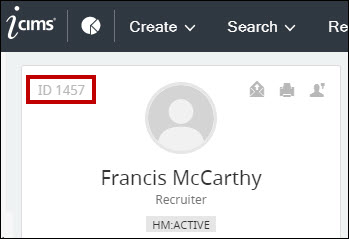
- Add or remove iCIMS user ID’s
- Note: The iCIMS User ID’s section is used to map an iCIMS Applicant Tracking (ATS) user’s System ID (i.e., the ID number found on the top left of their Person profile card in iCIMS ATS) with their Text Engagement user account. This is only used when iCIMS ATS is connected to your Text Engagement instance.
An example of a system ID in iCIMS ATS.

An example of mapping an iCIMS ATS system ID in Text Engagement.

