Overview
Simplified Candidate Search, part of the iCIMS Hiring Suite, is a smarter, faster alternative to the traditional Candidate search. By inputting just a job title, keyword, or skill—and location, too, if desired—you can find qualified candidates who already have profiles in your system. The search enables you to quickly access and evaluate candidates' information and then submit them to any appropriate jobs and talent pools.
Launching a Search
There are two main ways to launch the Simplified Candidate Search feature:
- By clicking Find Qualified Candidates.at the top of the Search menu.
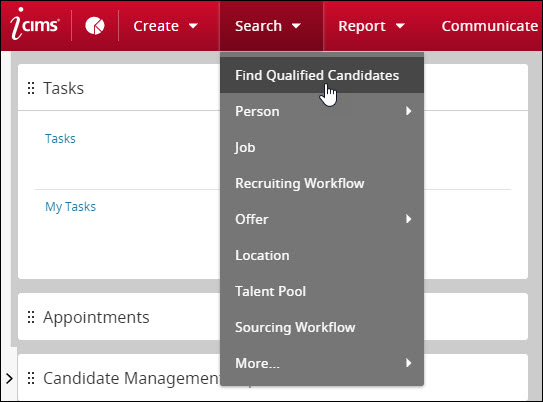
- By clicking the Find Qualified Candidates.button from the People tab of an individual Job or Talent Pool profile.
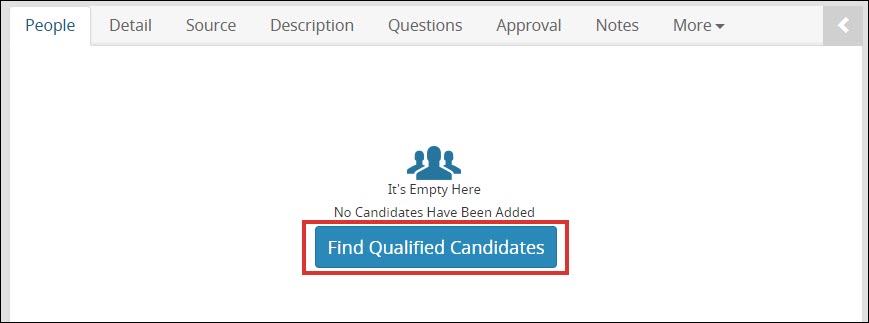
- On profiles that have candidates listed on the People tab, the Find Qualified Candidates button displays above the row of groupings, next to the Filters button.

- On profiles that do not have any candidates, the Find Qualified Candidates button displays in the middle of the open white space on the tab.
Tip: If you are sourcing for a certain job or talent pool, launch your search from that individual profile. This allows you to submit candidates directly to that job or talent pool. See Taking Action on Candidates below for more information.
Using Search Fields
Clicking Find Qualified Candidates from the menu bar or from a Job or Talent Pool profile launches a white horizontal bar at the top, completely covering the menu bar. This white bar includes two separate search fields:

- In the field to the left, enter a job title, keyword, or skill.
- In the field to the right, enter a city, state, and/or postal code.
As this is a full-screen overlay, all other items on the screen are grayed out when a search is opened. Once the search is run, results display underneath the white bar.
At any time, close out the search by clicking the X at the far right of the white bar or by clicking any grayed-out area of the screen.
Notes:
- You must enter a job title, keyword, or skill; you cannot search by location alone.
- Boolean logic can be utilized for this search, allowing you to combine keywords with operators such as AND and OR. For more information, see Introduction to Boolean Search.
- If desired, after entering search criteria in either field, clear that field by clicking the X that displays to the right of the field.
- Location search results will only display with a postal code if you search with a postal code.
Tip: Be careful not to limit your search with a specific postal code, especially for an area like New York City that has multiple postal codes.
Using Autosuggestions
Once you start typing in the keyword field, various autosuggestions may display underneath. An autosuggestion displays only if there is at least one matching search result. You may select one of these suggestions or input your own search term.
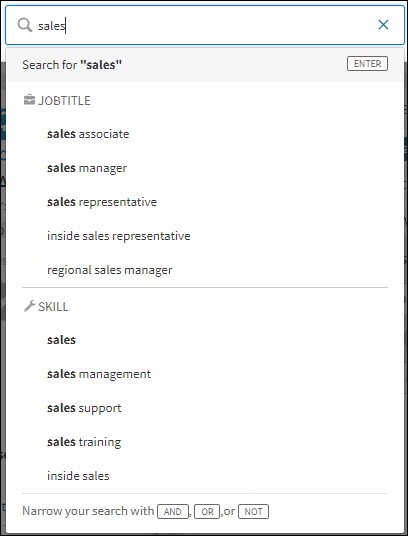
Autosuggestions also display when typing in the location field. You must select an auto-suggested location to proceed with the search.
Evaluating Search Results
After a search is initiated, detailed results display, taking up most of the screen. Included at the top is the title of the job you are sourcing for, as well as the total number of candidates that match the specific search criteria (e.g., "38 results for Sales in Holmdel, NJ").
Additionally, there is a dropdown at the top that allows you to sort the results. Sorting options include:
- Relevance (the default)
- Job Title
- Person Updated Date
- Distance (only available if searching by location)
Viewing Result Cards
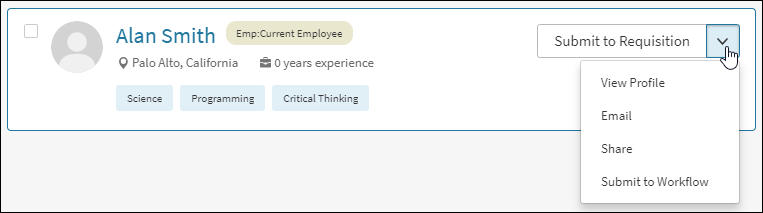
Each candidate that displays in search results has their own block of information. All information here is read-only.
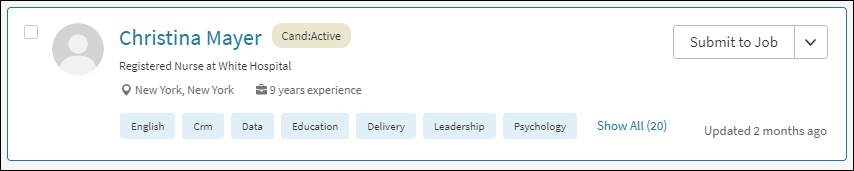
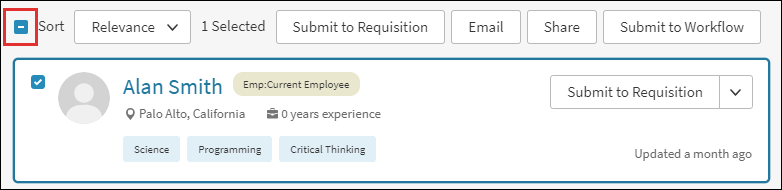
Each result card includes:
- Their profile picture (or a generic silhouette if the candidate has no picture)
- Their full name
- Their person folder, e.g., Cand:Active (included within a tan pill)
- Their current job title and place of employment
- Their location (represented by an inverted-drop icon)
- Their school (represented by a graduation cap icon)
- The number of years' experience they have (represented by a briefcase icon)
- Job titles, keywords, and/or skills that apply to them (included within blue blocks)
- The date or time this person was last updated in the system
Notes:
- Result cards include a bulk-selection checkbox on the left, as well as a primary action button and action dropdown on the right. For more information, see Taking Action on Candidates below.
- If certain information (e.g., education) is not available for a candidate, it will not display in their result card.
- Only the first seven keywords/skills are shown for each candidate. Clicking the Show All link reveals the remaining blue blocks for that candidate. (The total number of keywords/skills are included in parentheses within the Show All link.)
- One page of search results includes eight candidates. The Load More button at the bottom adds eight more result cards each time it is clicked.

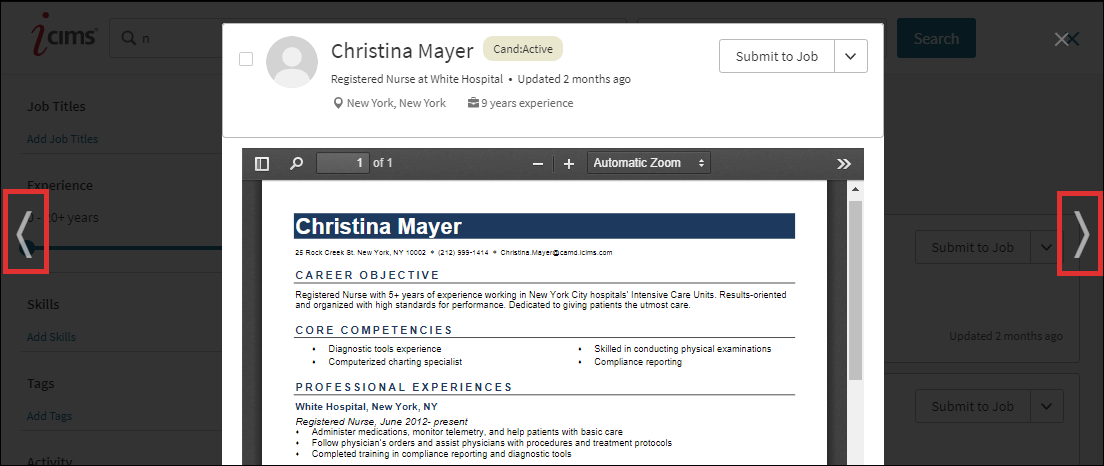
Viewing Resumes
View a candidate's resume by clicking their name within their result card. This brings up the resume viewer, which opens as a full-screen overlay. Information from their result card is included at the top, with options available underneath to zoom, download, and print the document.

Notes:
- If there is no resume in the system for the selected candidate, a message will display indicating that no resume is available.
- Take action on a candidate directly from the resume viewer by either clicking the primary action button at the top right (e.g., Submit to Job) or selecting an option from the dropdown arrow next to that button. See Taking Action on Candidates below for more information on the actions available.
Paging through Resumes
With the resume viewer open, quickly access the resumes of other candidates from that search by clicking the arrows at the far left and right of the screen. Clicking the left arrow, for instance, immediately brings up the resume from the previous candidate listed in the search results.
Notes:
- If you toggle to a candidate with no resume, the resume section will display a message indicating that no resume is available.
- Clicking the right arrow loads the resume of the next candidate in the search results, even if their result card is not currently displayed. In this case, the system automatically loads the resumes of the next eight candidates, essentially providing the same function as the Load More button. Once you close the resume viewer, the result cards of all newly loaded candidates now display in the list of search results.
- If you are on the very last resume of all candidates from that search, clicking the right arrow wraps back to the resume of the first candidate listed.
- The resume viewer includes a bulk-selection checkbox to the left of their profile picture (or circular silhouette). While paging through resumes, you can check this box for multiple candidates; those candidates will then be selected on the search results page once the resume viewer is closed. To learn about the bulk actions that can be applied, see Taking Action on Candidates below.
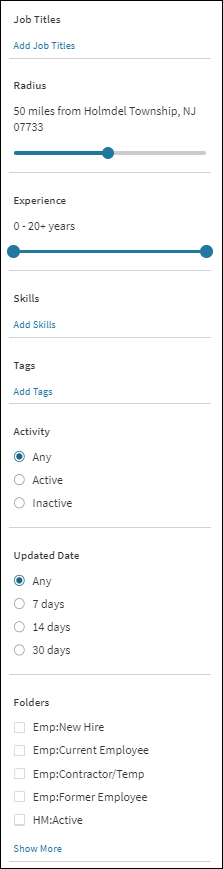
Incorporating Facets
On the left side of the search results page is a vertical panel of facets, which allow you to further narrow your search. Among the available facets are:
- Job Titles: To find candidates with specific titles.
- Experience: To find candidates with a specific range of experience (between 0 and 20+ years).
- Skills: To find candidates who possess specific skills.
- Tags: To find candidates with certain defined attributes. For more on tags, see Candidate Tagging.
- Activity: To differentiate between candidates that are currently active and inactive on a job (based on the Active on a Job filter and the Days Until Candidate Is Considered Inactive setting in System Configuration).
- Note: The Activity facet selects from all Person profiles in the system and is unrelated to their person folder.
- Updated Date: To find candidates whose profile has been updated within a certain time frame.
- Folders: To find candidates with certain person folders.
- Note: The only search locks supported by Simplified Candidate Search are based on person folder.
When searching by location, a facet for Radius also displays. This facet allows you to find candidates within a certain distance from the location entered. (The default is a 50-mile radius.) Radius displays in either miles or kilometers, depending on how distance is measured in your organization's system.
Taking Action on Candidates
You can take action on any candidate listed in search results. The following actions are available:
-
Submit to Job (or Submit to Requisition): Adds this person immediately to the People tab of the Job profile where the search was launched. By default, the submitted candidate is placed into the Recruiter Submitted status. This option is unavailable when launching the search from the menu bar or from a Talent Pool profile, since that search is not tied to a specific job.
- Note: The Submit to Job action is disabled for candidates who are already associated with the job.
- View Profile: Opens this person's full Candidate profile.
- Note: A Back button will display to take you back to the search results.
- Share: Opens an email to share this person's information with someone else.
- Email: Opens an email to contact this person directly.
- Submit to Workflow: Opens a window to add this person to other workflows, including any sourcing workflows (talent pools) and recruiting workflows (jobs).
- Submit to Talent Pool: Adds this person immediately to the People tab of the Talent Pool profile where the search was launched. This option is unavailable when launching the search from the menu bar or from a Job profile, since that search is not tied to a specific talent pool.
- Note: The Submit to Talent Pool action is disabled for candidates who are already associated with the talent pool.
These actions can be applied to candidates individually or in bulk, as described in the sections below.
Performing Individual Actions
Each result card includes a primary action button, allowing you to initiate an action on that candidate in just once click. The action displayed within this button depends on how the search was launched:
- When the search is launched from a Job profile, Submit to Job displays as the primary action.
- When the search is launched from the menu bar, Submit to Workflow displays as the primary action.
- When the search is launched from a Talent Pool profile, Submit to Talent Pool displays as the primary action.
The other actions are accessible by clicking the dropdown arrow next to the button on the candidate's result card.
Tip: The action button and dropdown also display at the top of the resume viewer, allowing you to take action on a candidate while viewing their resume.
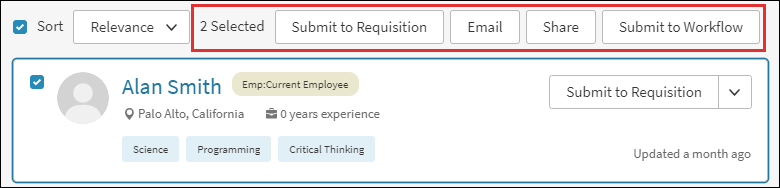
Performing Bulk Actions
You can also apply an action to multiple candidates at once. Candidates can be selected for action by clicking the checkbox at the far left of their result card.

As soon as a box is checked, an action toolbar displays at the top of the page (to right of the sorting dropdown). This toolbar includes the number of candidates selected, as well as buttons for particular actions depending on how the search was launched:
- When the search is launched from a Job profile, bulk actions display for Submit to Job, Email, Share, and Submit to Workflow.
- When the search is launched from the menu bar, bulk actions display for Email, Share, and Submit to Workflow.
- When the search is launched from a Talent Pool profile, bulk actions display for Submit to Talent Pool, Email, Share, and Submit to Workflow.
Once all desired candidates have been selected, click the appropriate button from the toolbar to apply that action.
Notes:
- There is no bulk action for View Profile.
- When a candidate's box is checked, their entire result block becomes outlined in dark blue.
- You will get an error message if you attempt to bulk-submit any candidates to a job who have already been submitted to that job.
- To use the Share action, no more than 50 candidates can be selected. To use Submit to Job, Email, Submit to Workflow, or Submit to Talent Pool, no more than 500 candidates can be selected.
- After selecting multiple candidates, if you choose a different sorting option or change a facet, all candidates will be deselected.
- If you complete the Submit to Workflow action and return to the results page, all candidates selected for that action will remain selected. If completing Submit to Job, Email, Share, or Submit to Talent Pool, those candidates will no longer be selected.
- If you cancel a bulk action for Email or Share before completing it (by clicking the Cancel button or clicking out of the modal), all candidates will remain selected on the results page.
Tip: The bulk-selection checkbox also displays at the top of the resume viewer, allowing you to select multiple candidates while paging through resumes. All candidates selected from the viewer are automatically selected on the search results page once the viewer is closed.
Selecting All Candidates
Clicking the single checkbox at the top of the page (to the left of the sorting dropdown) quickly selects/deselects all candidates currently visible in the search results. The checkbox turns blue when at least one candidate is selected.
Note: If you click the Load More button at the bottom of the search results, the new result cards that display will not be selected. You would have to click the top checkbox again or manually select those additional candidates.
When all candidates on the page are selected, the checkbox displays a checkmark icon.

When a partial set of candidates are selected, the checkbox displays a dash icon.
Configuring Simplified Candidate Search
Simplified Candidates Search is available for full access user groups and can be configured on a per-user-group basis. To enable or disable this feature, contact iCIMS Technical Support.
Additional Resources
Want to see Simplified Candidate Search in action? Check out this video Learning Clip: Finding Candidates Using Simplified Candidate Search.

