Note: This article pertains to the iCIMS Applicant Tracking (ATS) Interview Scheduling feature. If you are using legacy interview management or legacy interview scheduling instead of or in addition to Interview Scheduling, review the Understanding Interviews in iCIMS Applicant Tracking article for lists of applicable resources.
If you are not sure which interview tool(s) you are using, ask your user admin or complete the following tests:
- Select Library from the main menu bar. If the Interview Scheduling Center option displays, you are using Interview Scheduling.
- Locate a test candidate via a Recruiting Workflow search and select the Schedule Interview button. If a window displays with four interview types (video interview, phone screen, onsite interview, and custom interview), you are using legacy interview management; if a window displays with the heading Schedule Interview - [Candidate Name] or Schedule Appointment - [Candidate Name], you are using legacy interview scheduling.
|
Overview
As part of iCIMS Applicant Tracking (ATS), the Interview Scheduling feature empowers organizations to streamline their interview process through greater automation and enhanced calendar synchronization. This feature allows users to create standard interview types, set individual availability preferences, quickly schedule interviews, invite candidates individually or in batches to self-schedule their interviews, and send multilingual email and text notifications. The Interview Scheduling feature supports single interviews, as well as multi-person and multi-meeting interviews. Bi-directional calendar integrations with Microsoft or Google make it simpler for interviewers to update and keep track of scheduled interviews, or you can use the built-in application calendar option. Automation, quick scheduling, candidate self-scheduling, and integrations with Zoom, Microsoft Teams, and Google Meet help streamline recruiters’ work.
In addition to being a complete scheduling feature on its own, Interview Scheduling is compatible with previous scheduling tools in iCIMS ATS (i.e., legacy interview scheduling experience and legacy interview management), allowing organizations to transition organically. Interview Scheduling is compatible with manual calendar scheduling and iCIMS Text Engagement, allowing organizations using ATS with a Text Engagement Subscription to invite candidates to interview via SMS/text.
Interview Scheduling also allows users to search, to build custom reports, and to create dashboard reports, charts, and exports with relevant data from this feature within ATS.
To enable Interview Scheduling in iCIMS ATS, your organization's user admin can submit a case to iCIMS Technical Support.
For more information on configuring Interview Scheduling, user admins can review the Configuring Interview Scheduling article.
For frequently asked questions and answers about Interview Scheduling, review the Interview Scheduling FAQ article.
Details on scheduling an interview through candidate self-scheduling and quick scheduling, rescheduling or canceling an interview, and reporting on interview details are provided in the following sections:
Scheduling an Interview with Candidate Self-Scheduling
With Interview Scheduling, recruiters can invite candidates to self-schedule their interviews. This candidate self-scheduling process is divided into three steps:
- The recruiter invites the candidate to schedule an interview.
- The candidate schedules an interview.
- Both the interviewer(s) and the candidate receive notifications of the scheduled interview (from which they can then cancel or reschedule if needed).
Inviting Candidates to Interview: The Recruiter Experience
Once Interview Scheduling has been enabled by iCIMS Technical Support and configured by user admins, users can invite candidates individually or in batches to self-schedule interviews using the steps outlined below:
- Determine whether you are inviting an individual candidate or a batch of candidates to self-schedule.
- To invite an individual candidate, navigate to the desired candidate’s Application profile (or Recruiting Workflow profile in classic iCIMS) for the relevant job application.
- To invite multiple candidates at once, navigate to the desired Job profile Candidates tab and select the applicable candidates. (Alternatively, perform a Recruiting Workflow search and select applicable candidates associated to the same job.)
- Note: Up to 100 candidates can be invited to self-schedule interviews in a single batch.
- Select Advance and select the status configured with the Invite Candidate to Interview auto-launch action. The Schedule Interview page displays.
- Note: During setup, one or more of your organization’s Recruiting Workflow statuses have been configured with this auto-launch action. If you are unsure which status to select, contact your user admin for assistance.
Inviting an individual candidate to self-schedule
Inviting a batch of candidates to self-schedule
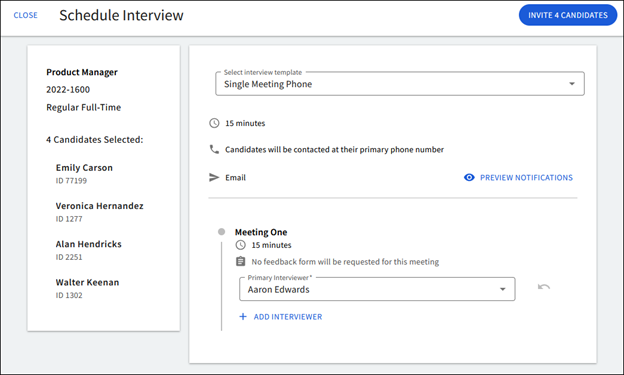
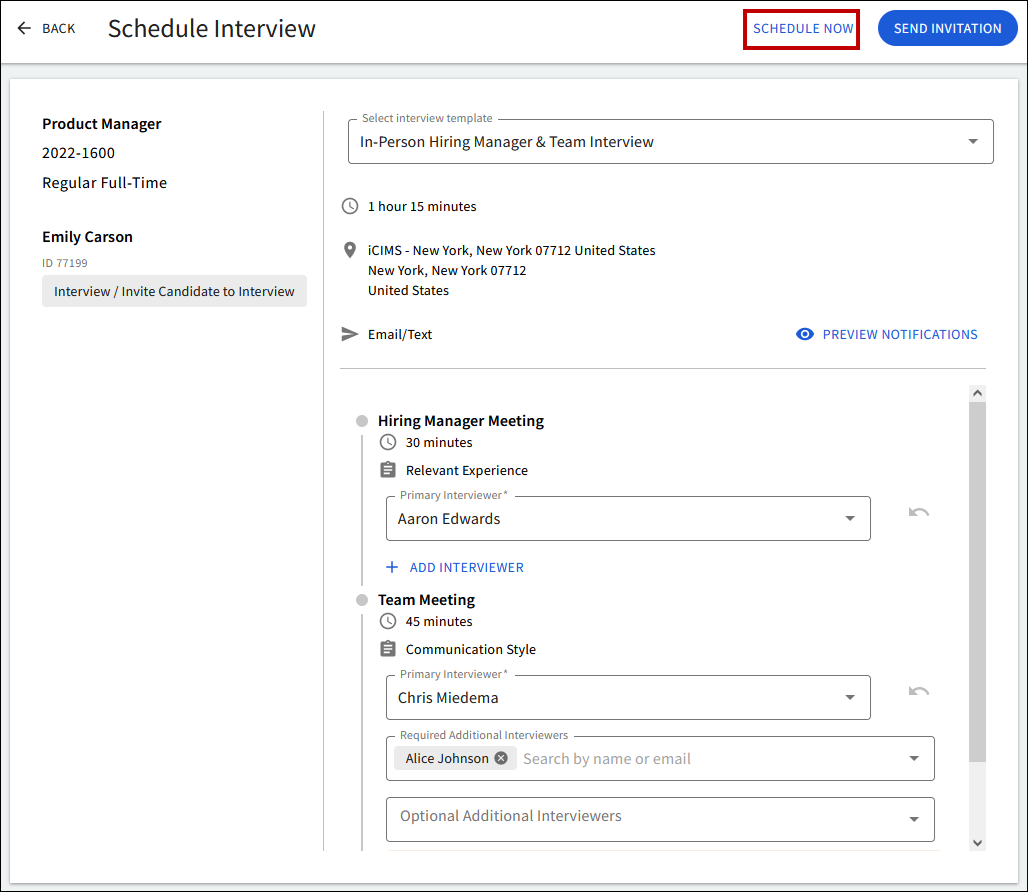
- From the Select Interview Template dropdown menu, select the applicable interview template or type to search. Details associated with the template display.
- Duration: The interview duration is prepopulated.
- Location, Video Conferencing Service, or Phone Number: Review the following details based on the template selected.
-
In-Person Interview Location: When you select an in-person interview template, default job location is prepopulated. If multiple locations are associated to the job, a dropdown may display. Edit if desired.
- Video Interview Conferencing Service: When you select a video interview template, the default video conferencing service is prepopulated. If your organization has set up multiple video conferencing services, a dropdown may display. Edit if desired.
- When a video interview template is selected, an error message displays if the primary interviewer does not have the video conferencing service (e.g., Microsoft Teams, Google Meet, Zoom) enabled on their connected account or if the primary interviewer has an application calendar rather than a connected external calendar. If this error message displays, change your primary interviewer to someone who does have the desired connected service or contact your user admin. The user admin should direct your organization’s IT admin to the Connecting Calendars and/or Connecting Zoom sections of the Configuring Interview Scheduling article.
- Phone Interview Number: When you select a phone interview template, the candidate’s phone number prepopulates based on the phone number in their Global Person profile (or Person profile in classic iCIMS).
-
- Communication Method: The communication method for interviewers and candidates is prepopulated with Email or Email/Text as applicable to your organization. When Email/Text displays, the candidate will receive both email and text notifications. (Note: Interviewers only receive email notifications and candidates who have opted out of texts will not receive text notifications.)
- Optional: To preview and edit certain individual notifications sent to the candidate and/or interviewers, if desired, select Preview Notifications. The Preview Notifications window displays.
- Notes:
- Preview Notifications does not display when there is an error message regarding the interviewer. For more information on resolving this error, review step 5 below.
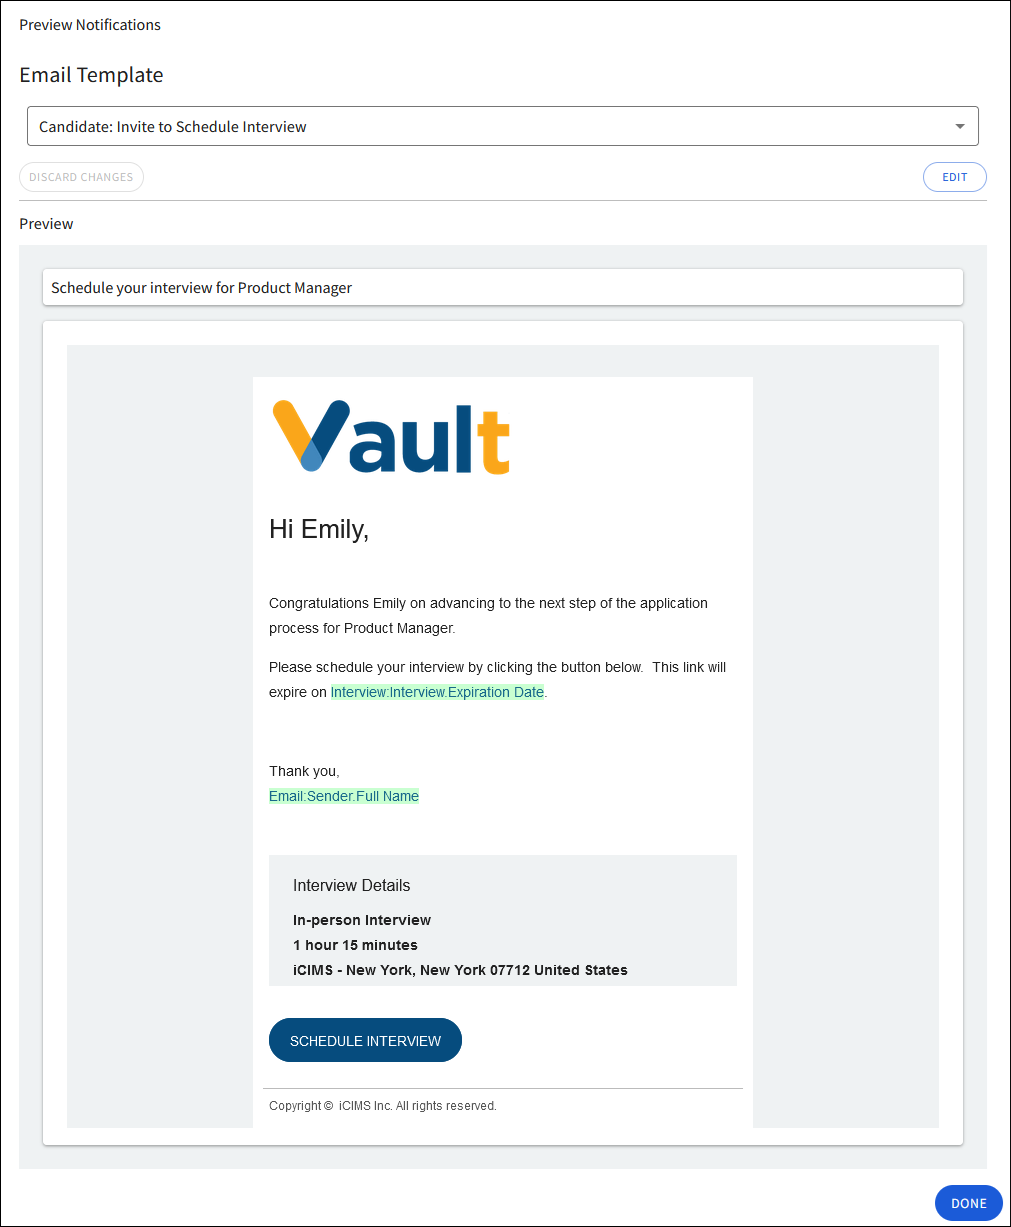
- To edit, select the applicable notification from the dropdown menu, then select Edit. The body of the notification displays with the ability to edit the content of the individual notification, add variables, add hyperlinks, and add attachments.
- Notes:
- If an interview has multiple interviewers or multiple meetings, the variables related to the primary interviewer of the first meeting display when previewing an interviewer notification. Any edits apply to all interviewers of all meetings.
- If a batch of candidates is selected, the first candidate in the list displays when previewing a candidate notification. Any edits apply to all candidates.
- Only the notification sent to the interview’s candidate(s)/interviewer(s) is edited; the base notification template remains unchanged.
- Optional: To add the applicable candidate's resume in an individual email notification to interviewers, place your cursor in the desired area of the email body. Then from the menu bar, select Add Variable > Interview > Candidate > Resume Link. The resume link variable displays in the body.
- Notes:
- Resume links are not available to include in text message notifications.
- Candidate resumes are not contained within the File Library. In order to attach a candidate resume to an email, the resume must be linked within a notification using the above variable option.
- Resume links do not require authentication and are accessible to users outside ATS; however, links automatically expire after 90 days (not configurable).
- Optional: To add hyperlinks in an individual email notification to interviewers or candidates, place your cursor in the desired area of the email body. Then from the menu bar, select Insert/Edit Link. The Insert/Edit Link window displays.
- Input the URL, Text to Display, and Title as desired. From the Open Link In dropdown, select the applicable menu option. Select Save. The hyperlink displays in the email body.
- Note: Hyperlinks are not available to include in text message notifications.
- Optional: To add attachments from the File Library that display as links in an individual email notification to interviewers or candidates, place your cursor in the desired area of the email body. Then from the menu bar, select Add Attachment. The File Library displays.
- Review and select the applicable file(s). If desired, update the display title(s). Select Add. The attachment link(s) display in the body.
- Notes:
- Attachments are not available to include in text message notifications. Files can only be attached to an email notification from the File Library. For more information, review the Adding Files to the File Library article.
- Attachments from the File Library do not expire and are shared company-wide. To preserve files and keep records of information sent to candidates, it is not recommended to replace or overwrite files in the File Library. New versions may be uploaded and appropriately named or versioned to update the File Library.

- Select Save. The preview displays.
- To undo your edits, if applicable, select Discard Changes.
- Select another notification to edit, if desired, or if completed, select Done.
- Review the interview’s meeting details. Multiple meetings may display based on the template.
- Duration: The duration of each meeting is prepopulated by default.
- Interview Feedback Form: If an interview feedback form is pre-associated with an interview template, the title displays.
- If an interview feedback form is not pre-associated with an interview template, the following text displays: No feedback form will be requested for this meeting.
- Interview feedback forms are pre-associated to interview templates by the user admin and cannot be added, removed, or changed when scheduling an interview. For help with interview feedback forms, contact your user admin.
- Once an interview is scheduled, if a feedback form was pre-associated with the interview template, each interviewer receives an email four hours before the interview with a unique link to the interview feedback form to complete after the interview.
- For more information on completing interview feedback forms, interviewers can refer to the Responding to & Submitting Interview Feedback Requests article.
- Primary Interviewer: Review the Primary Interviewer field(s). Edit if applicable.
- If the selected template includes a default interviewer role, the name of the user associated with that role displays.
- If there is no default interviewer associated with the template, no user associated with that role, or you need to assign a different interviewer, select the applicable interviewer from the dropdown or type to search.
- To revert to the original default interviewer, select the back arrow next to the interviewer's name.
- If an interviewer's calendar isn't synced and they do not have an application calendar, a message displays that calendar synchronization is automatically occurring. If an error displays, select another interviewer or contact your organization's user admin. If standalone scheduling is enabled, the option to create an application calendar also displays. Select the Create Calendar button, then select Confirm on the confirmation popup.
- For a video interview, the primary interviewer must have a synced calendar with the desired video service enabled, not an application calendar.
- Add Interviewer. To optionally add more interviewers to a meeting, select Add Interviewer.
- Two fields display: Required Additional Interviewers and Optional Additional Interviewers.
- Select the applicable interviewer(s) from the dropdown or type to search.
- For video interviews, additional interviewers do not need to have synced calendars with the desired video service enabled; this requirement only applies to the primary interviewer.
- Select Send Invitation or Invite [#] Candidate. A confirmation message displays when the email is sent, and the interview appears as Pending on the Activity tab of the candidate’s Application profile (or Recruiting Workflow profile in classic iCIMS).
Self-Scheduling an Interview: The Candidate Experience
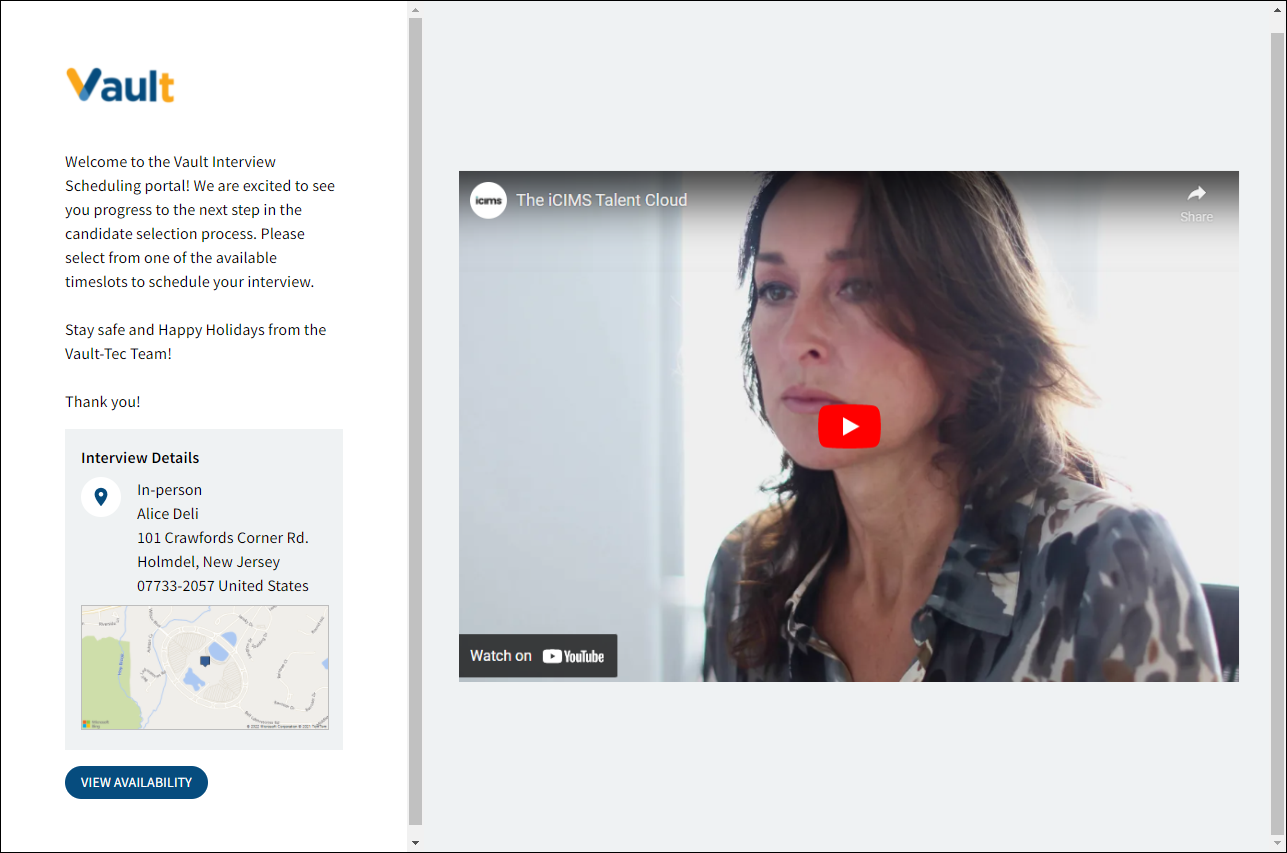
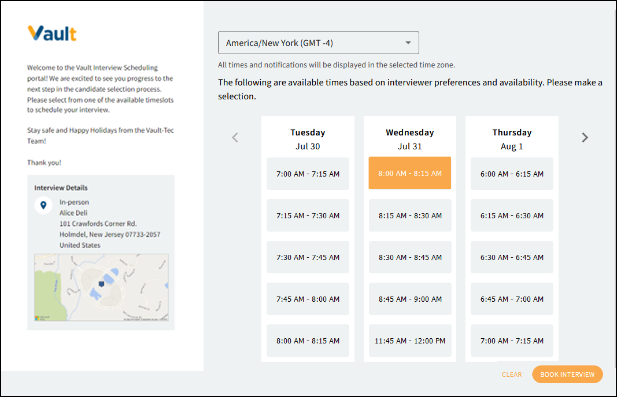
Once the candidate receives their invitation to self-schedule an interview, they follow the link within the email to visit the Candidate Interview Scheduling page. The Candidate Interview Scheduling page contains your organization’s welcome message, any image or video your organization included, the interview details, and the View Availability button.
When the candidate selects the View Availability button, the right side of the page displays available interview time slots based on the interviewer’s availability and the interview template’s settings for interview length and how far in advance the candidate can schedule the interview. A dropdown menu above the available days allows the candidate to change listings from their browser’s current time zone setting to another time zone if desired. (Note: The time zone that is set when the candidate schedules the interview is saved to the interview and used in all notifications (emails, text reminders, and the .ics invitation) regardless of the ATS or browser time zone settings of any attendees. This ensures that notifications display the same start time and time zone to all attendees. In cases where a recipient’s time zone is different than the selected time zone, when the interview invitation is saved to a recipient’s calendar, the interview displays on their calendar according to the calendar’s time zone preference.)
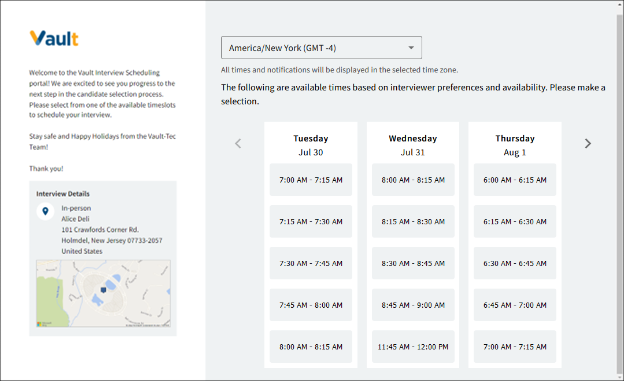
The candidate selects a time slot and then selects Book Interview Time.
A confirmation message displays.
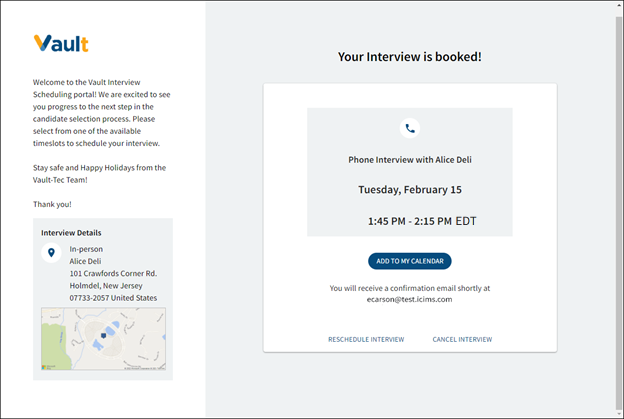
The confirmation message contains the following:
- The details of the interview, including the set time zone of the interview.
- A note that a confirmation email has been sent to the candidate’s email address.
- A button to add the interview to the candidate’s calendar.
- Buttons to cancel or reschedule the interview.
Note: If the candidate does not schedule an interview within 48 hours, they automatically receive an email reminding them to do so.
Scheduling an Interview with Quick Scheduling
In addition to inviting candidates to self-schedule an interview with Interview Scheduling, recruiters also have the option to quickly schedule an interview between an individual candidate and interviewer(s) themselves based on the interviewer's available timeslots, including same day timeslots, if applicable. As with inviting a candidate to self-schedule, recruiters can schedule phone, video, or in-person single interviews or multi-person and multi-meeting interviews.
Quick Scheduling an Interview: The Recruiter Experience
Recruiters can schedule interviews using the steps outlined below:
- Follow steps 1-5 in the Inviting a Candidate to Interview: The Recruiter Experience section of this article.
- Select Schedule Now. A list of timeslots displays based on interviewer availability preferences.
- Optional: Review the default time zone and update if desired using the dropdown. (The time zone that is set is saved to the interview and used in all notifications (emails, text reminders, and the .ics invitation) regardless of the ATS or browser time zone settings of any attendees. This ensures that notifications display the same start time and time zone to all attendees. In cases where a recipient’s time zone is different than the selected time zone, when the interview invitation is saved to a recipient’s calendar, the interview displays on their calendar according to the calendar’s time zone preference.)
- Select the desired date and time for the interview.
- Note: If the scrollbar does not display, zoom out of the browser.
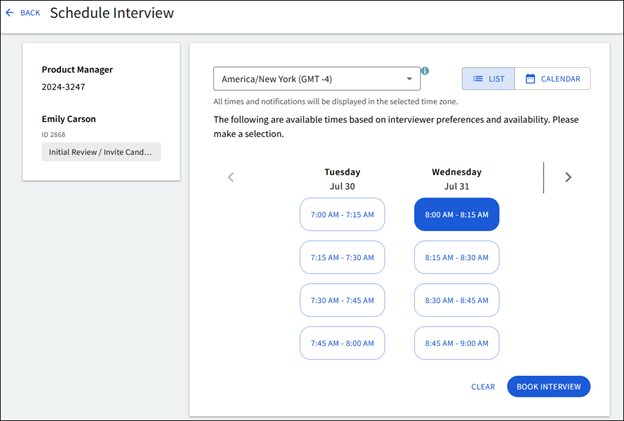
- Optional: If there are no available timeslots, or none that work for the candidate, select Calendar. A calendar displays, with the option to review by week or day, enabling you to break up a multi-meeting interview or to schedule over other calendar events. Select a time on the calendar to create an interview slot. For a multi-meeting interview, you can then drag and drop individual meetings as needed. You can also modify the duration of an interview by resizing the meeting block.
- Notes:
- iCIMS recommends confirming interviewer availability before scheduling over other events.
- If you navigate away from the calendar view before booking the interview, any selected timeslots are not saved.
- Select Clear to clear selected meeting times and start over.
- Select List to return to the standard timeslot selection display.
- Select Book Interview. A confirmation message displays. The interview appears as Scheduled on the Activity tab of the candidate’s Application profile (or Recruiting Workflow profile in classic iCIMS) and is listed in the Interview Scheduling Center.
Confirming the Interview: Notifications and Calendar Events
Once the interview is scheduled by the candidate or the recruiter, the following events occur automatically:
- The interview is added to the interviewer’s calendar.
- Both the candidate and the interviewer are sent confirmation emails. If applicable to your organization, candidates may also receive a confirmation text message. (Note: Candidates who have opted out of texts will not receive interview text notifications.)
- In the Activity tab of the candidate’s Application profile (or Recruiting Workflow profile in classic iCIMS), the interview status displays as Scheduled.
- The interview is added to the listings in the Interview Scheduling Center.
The candidate and the interviewer also receive automatic email reminders 24 hours before the interview is scheduled to take place and similar notifications if either party cancels or reschedules the interview.
Reviewing, Rescheduling, and Canceling Interviews
Once an invitation is sent to candidates to self-schedule or an interview is scheduled by a recruiter, there are several ways to review, reschedule, or cancel the interview.
Detailed information about these options is provided in the sections below:
Reviewing Interview Information
The user can review interview information in several areas of the system: the Interview Scheduling Center dashboard, the Activity tab of an Application profile (or Recruiting Workflow profile in classic iCIMS), the Overview tab of a Job profile, an interviewer’s or candidate’s calendar event for the interview, and an interviewer’s or candidate’s confirmation email for the interview.
The Interview Scheduling Center
Information about scheduled interviews, canceled interviews, and sent invitations is listed in the Interview Scheduling Center (Library > Interview Scheduling Center).

The top panel includes:
- Upcoming Interviews: interviews scheduled for the next seven days.
- Pending Interviews: invitations sent during the previous seven days.
- Canceled Interviews: interviews canceled by the candidate, recruiter, or interviewer during the past seven days.
- View Batch Invites: invitations sent to batches of candidates at once to self-schedule.
A more detailed list of upcoming interviews displays in the panel below.
Note: These listings reflect interviews and invitations for all of your organization’s recruiters and interviewers, not just the user viewing them.
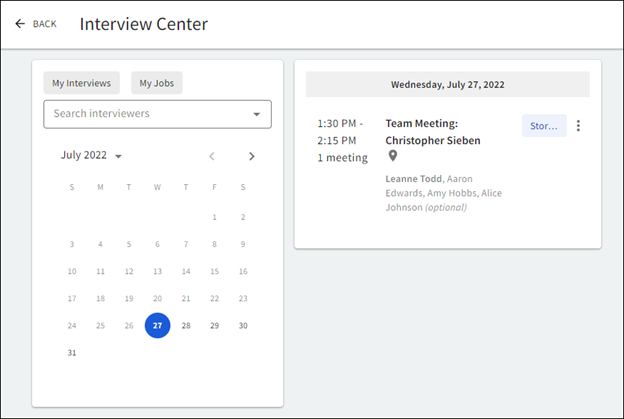
Upcoming Interviews
Select Upcoming Interviews for a more detailed look at all upcoming interviews across the organization. A calendar displays containing day-by-day interview listings. This calendar page also includes the My Interviews button, which allows the user to filter by only their interviews.
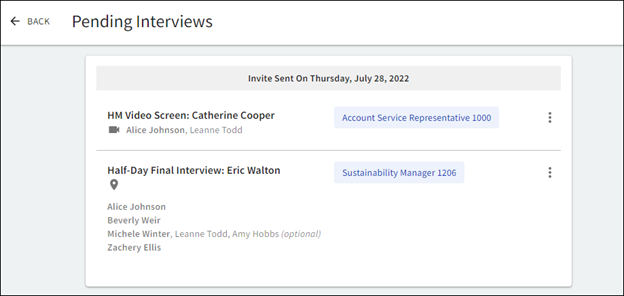
Pending Interviews
From the main Interview Scheduling Center dashboard, users can also get a more detailed list of interview invitations sent across the organization by selecting the Pending Interviews box. A list of invitations with date sent and candidate, job, and template names displays.
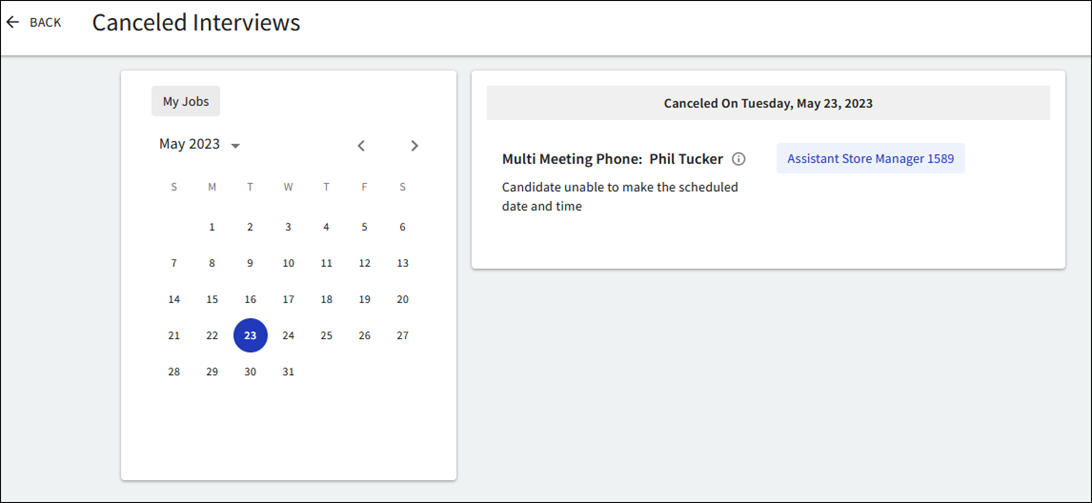
Canceled Interviews
Select Canceled Interviews for a more detailed look at all canceled interviews across the organization. A calendar displays containing day-by-day canceled interview listings. This calendar page also includes the My Jobs button, which allows the user to filter by only their associated jobs.
Batch Invites
Select Batch Invites for a detailed look at all invitations sent to batches of candidates to self-schedule.
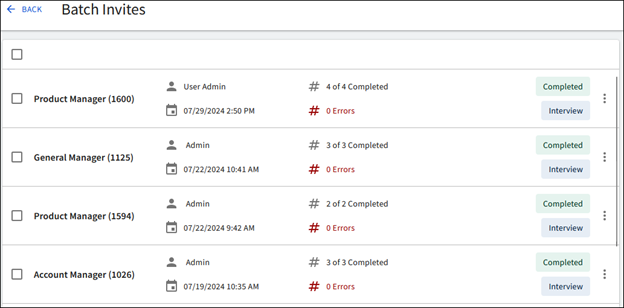
Reviewing the Batch Invite List
A list of batch invitations display with the following information:
- Job title (e.g., Product Manager)
- Submitted by username (e.g., User Admin)
- Submitted date and time (e.g. 7/29/2024 2:50 PM)
- Number of invitations sent (e.g., 4 of 4 Completed)
- Number of sending errors (e.g., 0 Errors)
- Batch status
- Pending: The Pending status displays when the batch was initiated and invitations are in progress of being sent.
- Completed: The Completed status displays when all invitations have attempted to send, including those with sending errors.
- Canceled: The Canceled status displays when the batch is canceled. A batch can be canceled only while it's in the pending status by selecting either the menu icon or the checkbox next to the batch then selecting Cancel Batch. Once canceled, any invitations not yet sent will not be sent. Any user with access to batch invitations can cancel a batch.
- Batch category (e.g., Interview)
Reviewing Batch Details
Select a batch invitation from the list to review more details.

The following batch invitation details display:
- Job title (e.g., Product Manager)
- Interview template title (e.g., Single Meeting Phone)
- Batch category (e.g., Interview)
- Number of sending errors (e.g., 0 Errors)
- Submitted by username (e.g., User Admin)
- Submitted date and time (e.g. 7/29/2024 2:50 PM)
- Candidate name (e.g., Emily Carson)
- Candidate status
- Pending: The Pending status displays when the candidate’s invitation is in progress of being sent.
- Completed: The Completed status displays when the candidate’s invitation is sent.
- Canceled: The Canceled status displays when the batch is canceled prior to the candidate’s invitation being sent. Individual invitations cannot be canceled while in the pending status.
- Failed: The Failed status displays when an error is encountered when attempting up to three times to send the candidate’s invitation.
- Candidate processed (e.g., 7/29/2024 2:50 PM)
The Activity Tab
The Activity tab of an Application profile (or Recruiting Workflow profile in classic iCIMS) includes records of a candidate's sent invitations, scheduled interviews, completed interviews, and canceled interviews.
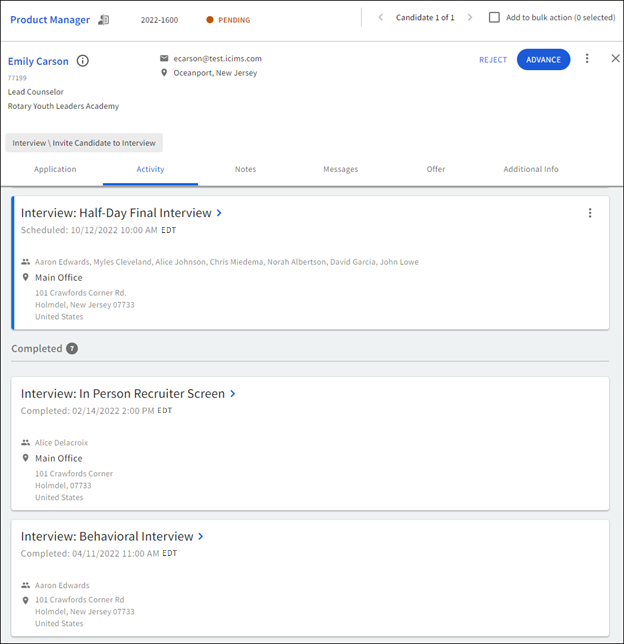
Entries are listed in reverse chronological order and display in either the In Progress section or Completed section.
- Sent invitations are listed as Pending, while scheduled interviews and quick-scheduled interviews are listed as Scheduled. Both are considered In Progress.
- Once an interview takes place or is canceled it moves to Completed.
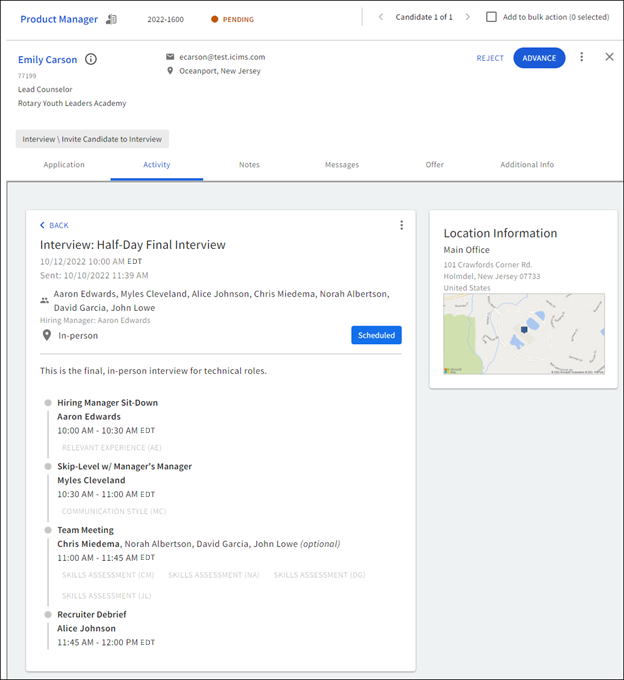
- Basic information about each interview or invitation is listed directly on the tab; select the applicable entry for more details, including meeting links for video interviews and links to the interview's submitted interview feedback forms.
The Overview Tab
The Overview tab of a Job profile displays a dashboard containing information segmented into widgets. Widgets display in different configurations based on the job's status (pending approval, approved, or closed). The following widgets with interview details display on the dashboard: the Interview widget and the Interview Scheduling widget.
The Interview Widget
From the dashboard, the Interview widget lists the number of candidates within the Interview hiring stage of the job. Select the Interview widget to review the list of candidates currently in the Interview hiring stage. Select candidates individually or in batches to advance or reject as desired without having to navigate to the Candidates tab.
The following details display in the Interview widget:
- Candidate name
- Job title
-
Company
- Source
- Distance from job
- Application date
- Last updated
- Hiring stage
- Candidate status
The Interview Scheduling Widget
From the dashboard, the Interview Scheduling widget displays tallies of the job’s upcoming interviews in the next 30 days, pending interview invitations within the last 30 days, and canceled interviews within the last 30 days The widget only displays when the job is in an approved or closed status; it does not display when in the pending approval status. Users with access to the Job profile can review the widget.
Select Batch Invites for a detailed look at invitations sent to batches of candidates to self-schedule. Only batch invitations associated with the job display. For more information, review the Batch Invites subsection of this article.
The Calendar Event
In addition to the interview time and location, the candidate’s calendar event includes the interview template title as the event name and lists the associated job as the organizer for the event.
The interviewer’s calendar event is similar to the candidate’s but lists the interviewer as the event owner. It also includes direct links to the associated Global Person profile (or Person profile in classic iCIMS) and Job profile. If an interview is rescheduled, the calendar event is updated to reflect the new timing. If either the candidate or the primary interviewer declines the calendar event, the interview is cancelled.
The Confirmation Email
The candidate’s confirmation email includes the date, time, time zone, and location, video conferencing link, or phone number for the interview, as well as the interviewer’s name. It also includes a link to return to the confirmation message from the Candidate Interview Scheduling page.
If applicable to your organization, the candidate may also receive a confirmation text message.
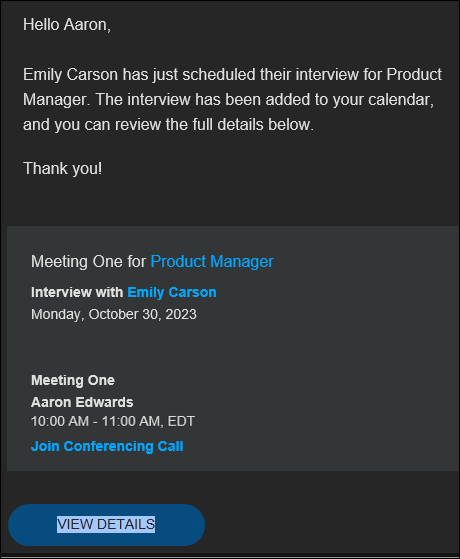
The interviewer’s confirmation email includes the date, time, time zone, and location, video conferencing link, or phone number for the interview, as well as the candidate’s name. It also includes a View Details link, which directs the interviewer to the Interviewer Scheduling Management page. Interviewers can access all interview details on this dedicated page. Depending on the type of interview and whether standalone scheduling is enabled, the meeting invitation may be attached to the confirmation email or may be separately written directly onto the interviewer’s calendar.
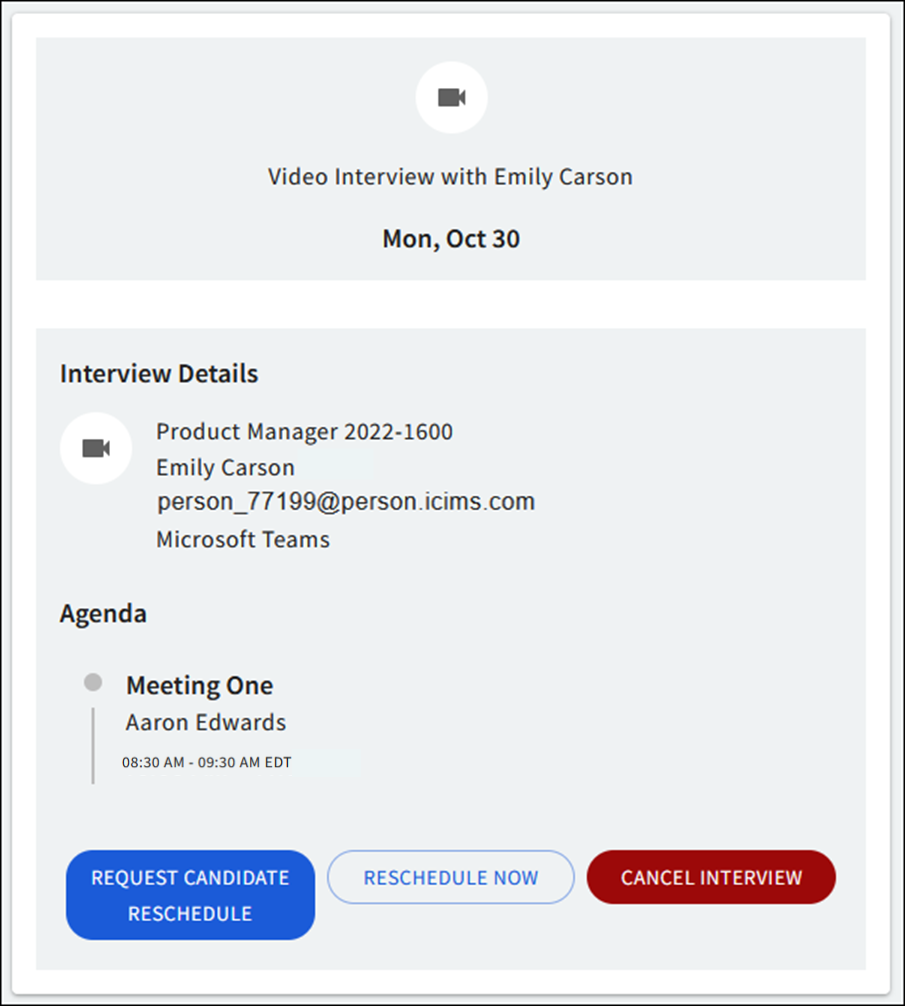
From the Interviewer Scheduling Management page, interviewers can also choose to access interview feedback forms, request the candidate reschedule, reschedule the interview themselves, or cancel the interview, as described in the Rescheduling or Canceling an Interview section below.
Rescheduling or Canceling an Interview
Candidates
Once an interview is scheduled, candidates can reschedule or cancel by selecting the appropriate button in the on-screen confirmation message on the Candidate Interview Scheduling page. They can also return to those options via the link from their confirmation email (or text message, if applicable).
Candidates are prompted to select one of the following reasons for canceling (Note: these reasons are not configurable).
- No longer interested in this position
- Applied to this position in error
- Unable to make the scheduled date and time
- Other
The cancellation reason then displays with the interview details in the Canceled Interviews section of the Interview Scheduling Center and the Activity tab of an Application profile (or Recruiting Workflow profile in classic iCIMS).
Note: Once the booked interview time is less than 24 hours away, candidates do not have the option to reschedule or cancel from the Candidate Interview Scheduling page. Instead, a note on the page instructs the candidate to contact their recruiter directly.
Recruiters and Interviewers
Within the ATS, recruiters and interviewers can reschedule, request the candidate to reschedule, or cancel an interview from the candidate’s Activity tab or within the Interview Scheduling Center (Library > Interview Scheduling Center) by selecting the menu icon within the upper-right corner of an interview listing and selecting Reschedule Interview, Request Candidate Reschedule, or Cancel Interview, as applicable.
Recruiters and interviewers are prompted to select one of the following reasons for canceling (Note: these reasons are not configurable).
- No longer under consideration for this position
- Interviewer unable to make the scheduled date and time
- Candidate unable to make the scheduled date and time
- Interview created in error
- Other
The cancellation reason then displays with the interview details in the Canceled Interviews section of the Interview Scheduling Center and the Activity tab of an Application profile (or Recruiting Workflow profile in classic iCIMS).
Interviewers can also reschedule or cancel interviews without needing to access the ATS via their interview confirmation email. By selecting the View Details link, interviewers are directed to the Interviewer Scheduling Management page. From here, interviewers can, as applicable, request the candidate to reschedule, reschedule the interview themselves, or cancel the interview.
Additionally, an interviewer can reschedule or cancel an interview within their linked calendar by editing the interview event.
Reporting on Interview Details
Users with access to the Recruiting Workflow search functionality in ATS can search, build custom reports, and create dashboard reports, charts, and exports with relevant Interview Scheduling data.
Notes:
- Active use of Interview Scheduling is required to generate data.
- Access to certain Interview Scheduling data is dependent on existing user group configurations.
- Interview data may only be available from the initial release of this functionality (Fall Release 2023).
- It may take up to five minutes after scheduling for this data to populate in a search.
For information on searching an reporting, review the Introduction to Searching & Reporting article.
Interview Data
The following list includes Interview Scheduling data points available for reporting purposes and details the support for filtering, sorting, and grouping. From a Recruiting Workflow search, each of these data points is available from Add Column > Reporting & Advanced Options - Interview Scheduling:
-
Interview ID: The unique identifier assigned to the interview
-
Interview Meeting ID: The unique identifier assigned to the specific meeting in the interview
-
Interview Meeting Title: The name of the meeting entered when scheduling the interview
-
Interview Status: The current status of the interview
-
Meeting Type: The selected venue of the meeting
-
Location: The conference line or geographic location of the meeting
-
Start Date & Time: The timestamp of the scheduled beginning of the meeting
-
End Date & Time: The timestamp of the scheduled ending of the meeting
-
Primary Interviewer: The name and details of the person that is the main interviewer for the meeting
-
Required Additional Interviewers: The name(s) of any additional people that are listed as required interviewers of the meeting
-
Optional Additional Interviewers: The name(s) of any additional people that are listed as optional interviewers of the meeting

