Content | Overview
iCIMS Offer Management provides organizations with an efficient tool to manage their offer letters through documented and automated processes. Sending offer letters to candidates in a streamlined manner with Offer Management allows organizations to save time and effort, hire top talent quickly, and provide a positive start to the new hire experience. Within Offer Management, users first create and manage clauses within the Offer Center Clauses tab, described in the Creating and Managing Clauses in iCIMS Offer Management Knowledge Base article. Users embed clauses in offer templates within the Offer Center Templates tab, described in the Creating and Managing Offer Templates in iCIMS Offer Management Knowledge Base article. Then, users leverage those templates to send individual offers for approval and to candidates through the Offer Wizard. Users can review the status of existing offers in the Offer Center Offers tab or on individual Recruiting Workflow profiles. Customers who leverage iCIMS Applicant Tracking to manage the offer process and who do not have Offer Management can review the Sending an Offer Letter to a Candidate Knowledge Base article to learn more about alternative methods for managing offers within their system. Customers who are interested in adding Offer Management to their iCIMS Subscription should contact their Account Manager. This article provides instructions for sending individual offers through the Offer Wizard, as well as an introduction to the various approval and delivery options, offer statuses, ways to take action on those offers, and managing offer access. The article is composed of the following sections:
Access Notes:
- The Offer Wizard is accessible to user admins by default. Recruiters and other relevant users may access the Offer Wizard through standard configurations. Certain functionality within the Offer Wizard requires specific access entitlements; if a user group only has partial access to this feature, some of the actions or other functionality may not be available.
- User admins have access to view and edit their own and others’ offers within the Offer Center Offers tab and on candidates’ Recruiting Workflow profiles. By default, recruiters and other non-user-admin users may only view candidate offers that they have created. User access controls can be configured to allow an offer letter owner to grant view or edit access to selected users or user groups to an individual offer letter. To learn more about this functionality, refer to the Managing Offer Access section of this article.
Creating an Offer in the Offer Wizard
To create an offer, launch the Offer Wizard by moving the candidate into a status associated with the Offer Wizard auto-launch action. The Offer Wizard takes the user through three steps to select an offer template, prepare the offer, and review and send the offer for approval and to the candidate. (Only one offer for one candidate at a time can be created in the Offer Wizard.) The iCIMS Implementation Manager and/or your organization’s user admin configures the status(es) associated with the Offer Wizard auto-launch action as part of the setup of this feature. For any questions about specific statuses, reach out to the primary user admin for your organization. To assist with simple management of standardized offer approvals before launching the Offer Wizard, the user admin can set the offer approval list for a specific job on the Job profile Detail tab using the Offer Approval List field.
- Navigate to the candidate’s Recruiting Workflow profile. Review the Offer Details tab and ensure that the relevant fields have been completed, as these fields will populate in the offer letter.
- Move the candidate into your organization’s designated offer status. The Offer Wizard will display.
- Preview an offer template in the first step of the Offer Wizard by selecting a template from the list view. A thumbnail of the offer template displays in the right-side panel. Selecting the magnifying glass on the thumbnail displays a read-only popup of the full offer template.
- Tip: Users have the option to select the grid view icon near the top right of the page to view thumbnails of all available templates.
- Select the applicable offer template.
- Tips:
- The template may be located by searching for its title or description within the search bar or by using the dropdown to the right of the search bar to filter by category. The dropdown filter options include All, My Templates, Uncategorized, and any customer-specific categories.
- If an organization has configured offer templates to be associated with certain jobs or job templates, by default only relevant offer templates display, rather than all available offer templates. Depending on your organization's configurations, a View All Templates button may display above the templates. This button allows users to shift between all templates and associated templates. If you do not have access to a template you require, contact your organization’s user admin for assistance.
- Select Next. The Prepare Offer page displays.
- Review the text, images, and formatting of the populated draft in the Offer Studio document editor. Review the sidebar which lists the offer letter’s clauses, fields, and variables for accuracy and to ensure content is populated:
- Clauses: A clause displays within a perforated blue box when hovering the cursor over the text in the Offer Studio document editor. A clause’s title and option are also listed in the sidebar. Review the offer letter for clauses that must be selected and require action.
- Action Required: If only a clause’s title displays in the body of the offer letter and the sidebar, indicating an option has not been selected, select a clause option in the sidebar. Once selected, the populated clause option content displays in the body of the offer letter. An offer letter should not be sent if clause options have not been selected in the sidebar.
- A selectable clause option is editable if a padlock icon does not display within the perforated blue box. A padlock icon indicates that the content of the selected clause option cannot be altered.
A clause option that was selected from the sidebar and embedded in the offer letter.
- If clause option content is editable and changes are made, the revisions are automatically saved as a new clause option in the offer letter. The revised clause option displays as the original option title with an asterisk. For example, the user selects the Editorial Dept clause option under the Introduction clause and edits the content of the option within the body of the offer letter. The revised clause option is automatically saved as Editorial Dept* in the option dropdown menu. (The revised clause option is not saved elsewhere.)
A clause option that was edited in the body of the offer letter is automatically saved in the sidebar.
- No Action Required: If a clause option is read-only, the content is embedded in the body of the offer letter within a perforated blue box with a padlock icon. In the sidebar, the read-only clause option is preselected and grayed out.
- While a read-only clause option is not editable, fields (described below) that are embedded within a clause option are editable in the sidebar.
A read-only clause option that is automatically embedded in the offer letter and requires no action. The clause option cannot be changed in the sidebar and the content cannot be edited.
-
To add a clause to the offer letter, place the cursor where the clause should display in the body of the offer letter, and in the toolbar, select Insert, then Insert Clause. An Insert Clause popup displays. Search for and select a clause option, then select Insert Clause. For more information on clauses, review the Creating and Managing Clauses in iCIMS Offer Management Knowledge Base article.
-
Fields: If any fields display in blue in the body of the offer letter, indicating they are unresolved, action is required. Update the value of the field in the sidebar. When resolved, fields display the populated value in bold black text. An offer letter should not be sent until unresolved fields are populated.
- Notes:
- Fields support two-way sync between iCIMS Offer Management and iCIMS Applicant Tracking. An update made to a field in the offer letter automatically syncs to the corresponding field in the system profile. For example, an update made to the Offer Amount field in the offer letter is reflected in the associated Recruiting Workflow profile Offer Details tab.
-
If the user updates a field in the offer letter that the user does not have access to in the corresponding profile, this field is updated in the offer letter only; it is not updated in the profile. Only updates made to fields that the user has access to are synced to profiles. After extending the offer, the confirmation page lists the unsaved field names and values, which should be sent to your organization’s user admin.
- To add fields from the Job, Recruiting Workflow, or Person profiles to the offer letter, place the cursor where the field should display in the body of the offer letter, and in the toolbar, select Insert, then Insert Field. A Select Field popup displays to search for and insert desired fields.
- A user can only insert fields that the user has access to on corresponding profiles.
- Field validation is supported in the sidebar for the following field types: text, text area, single select dropdown, date, number/decimal, and salary/currency. For example, only a numerical value will validate in the Offer Amount field.
- Variables: If any variables display in green in the offer letter, indicating they are unresolved, action is required. Populate the value in the respective profile field to resolve the variable in the offer letter. When resolved, variables display the populated value in bold black text. If you do not have access to the field in the profile, contact your organization’s user admin. An offer letter should not be sent until unresolved variables are populated.
- Notes:
- Variables do not support two-way sync between Offer Management and Applicant Tracking and are read-only.
- To add variables to the offer letter, place the cursor where the variable should display in the body of the offer letter, and in the toolbar, select Insert, then Insert Variable. A variable picker displays to search for and insert the desired variables.
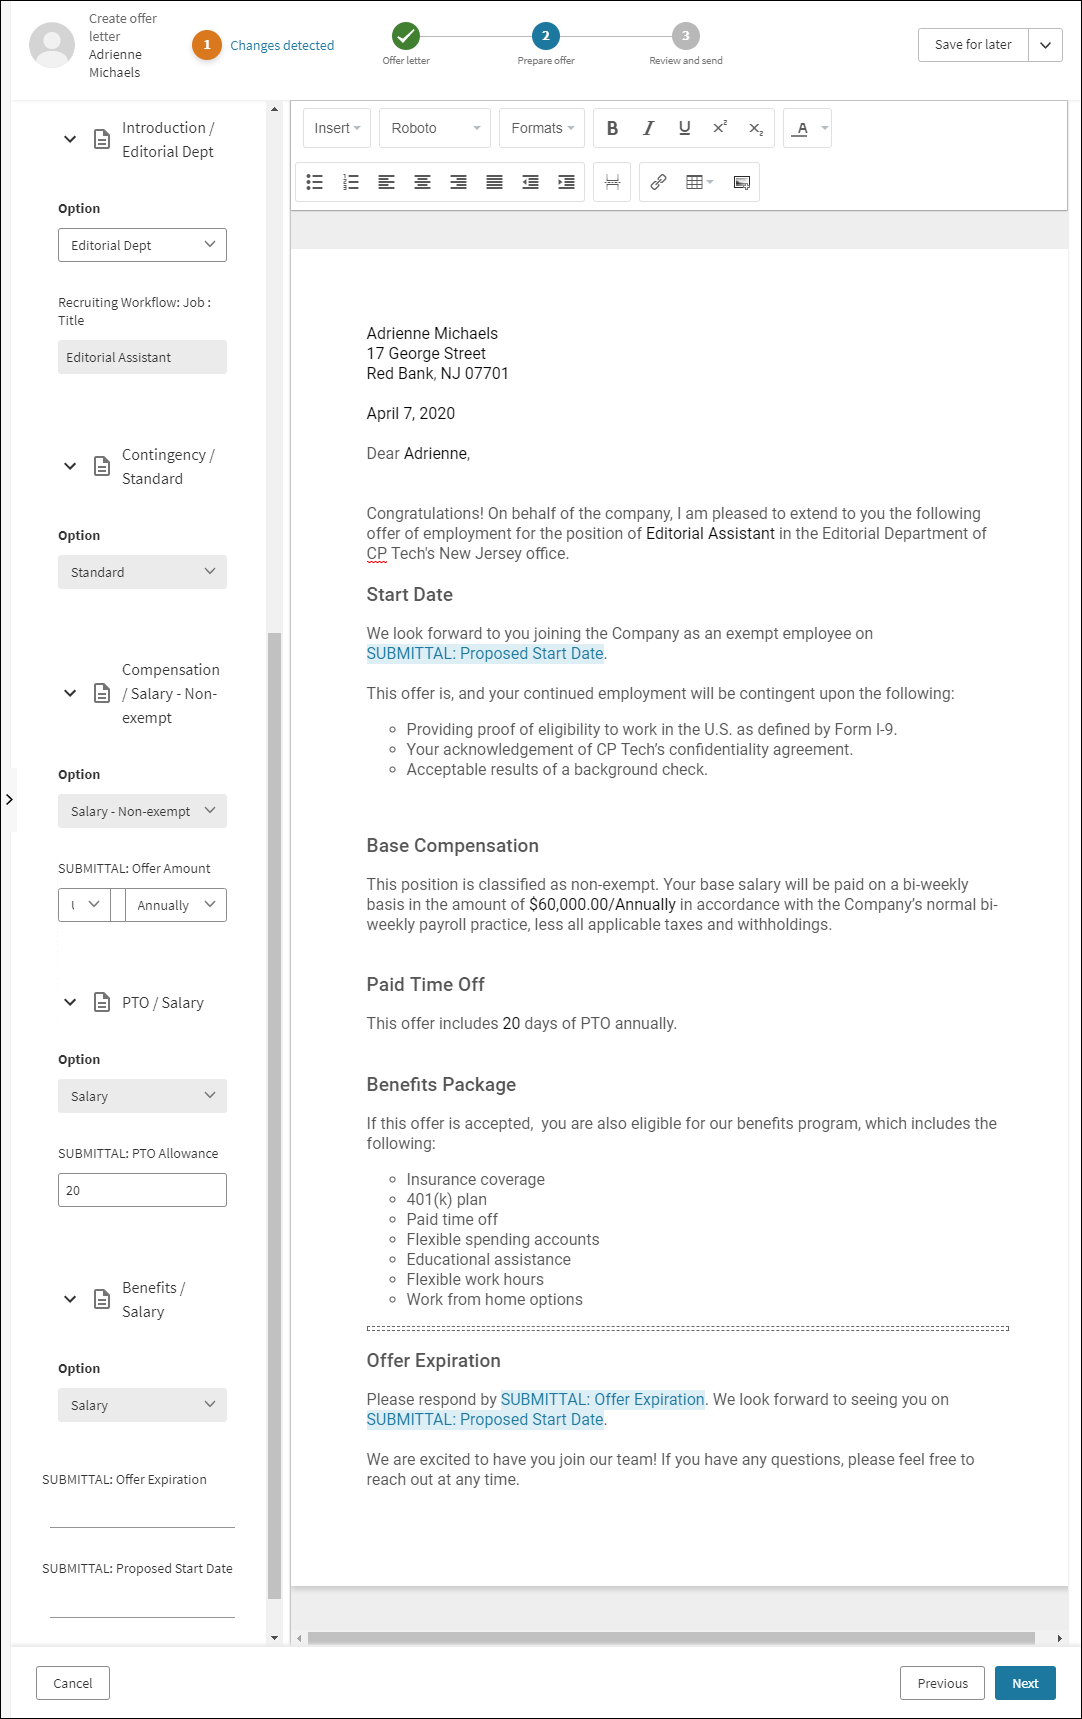 An offer letter with clauses and unresolved fields (blue highlighting) that can be populated using the sidebar. Variables are resolved and are read-only (gray) in the sidebar.
- Changes Detected: If the system detects that a profile field value has been changed and no longer matches the value in the offer letter, a Changes Detected alert displays above the offer letter.
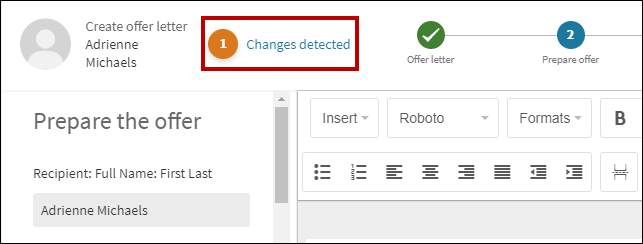
Select the Changes Detected alert to launch a popup that lists discrepancies between fields in the profile and the offer letter. Then, take one of the actions below:
- To update the offer letter with the new value from the profile, select the checkbox next to the applicable value and select Update Offer.
- To not update the offer letter to the new profile value, select Cancel on the popup or disregard the Changes Detected alert. When the offer letter is then saved or sent, the field on the profile is overridden with the value from the offer letter.
Tip: For more information on the Offer Studio, and inserting fields and variables, review the Creating and Managing Offer Templates in iCIMS Offer Management Knowledge Base article.
-
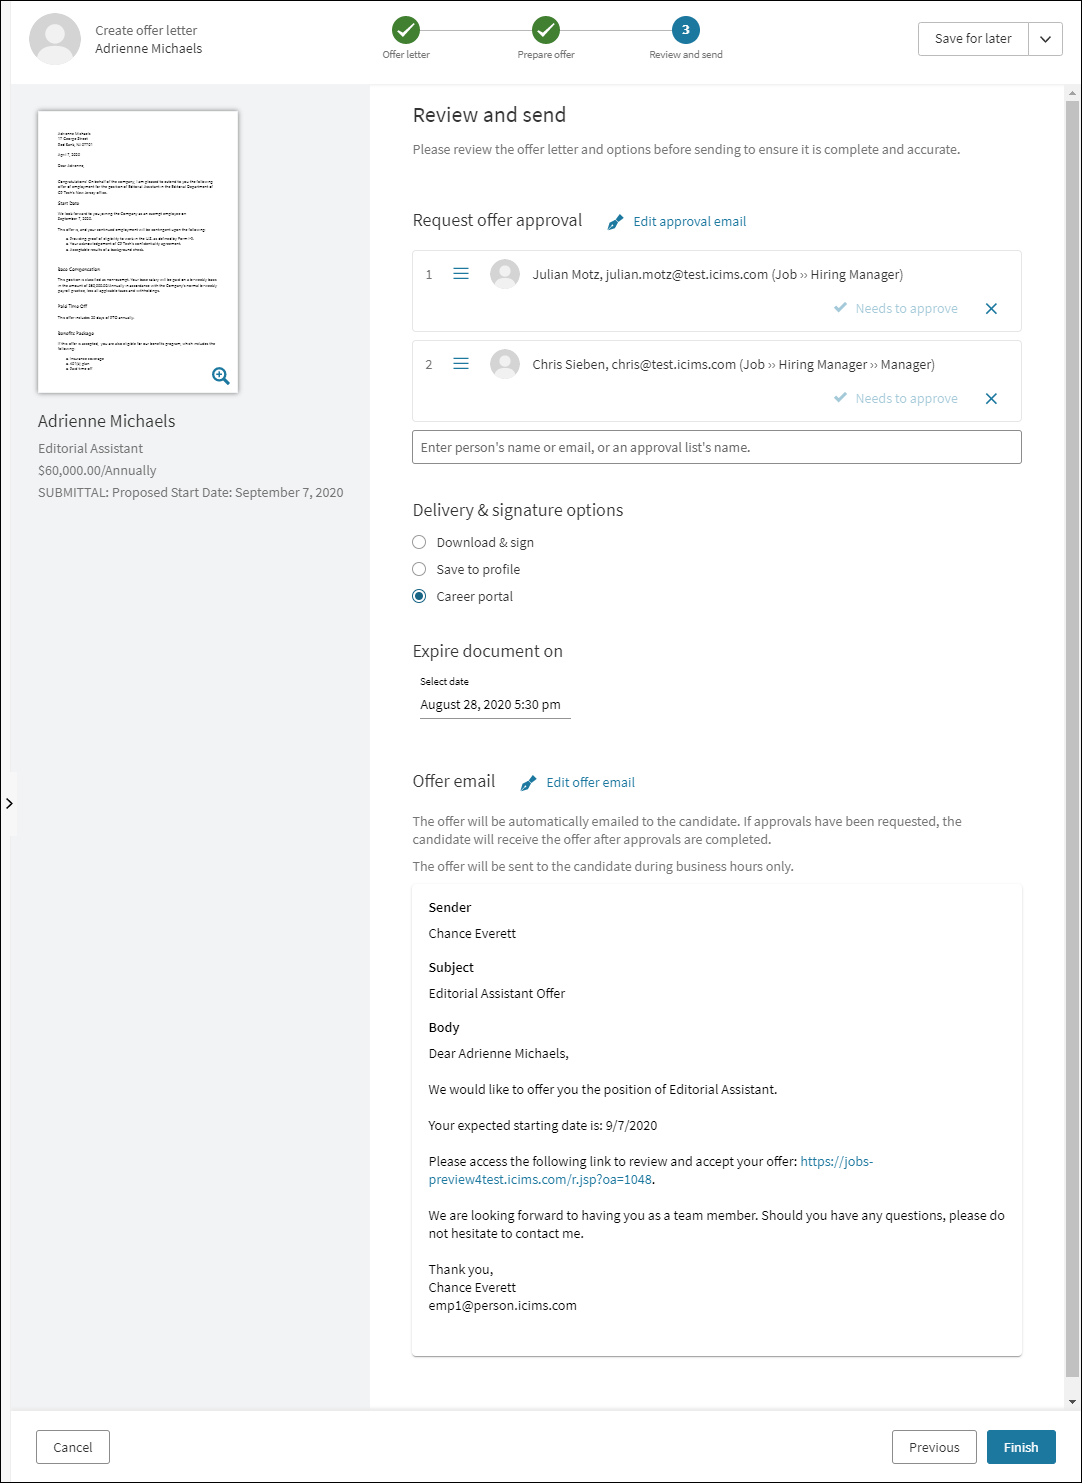
Select Next. The Review and Send page displays.
-
Preview the offer letter by selecting the thumbnail in the left side panel. A popup of the full offer letter displays.
- The preview cannot be directly edited, saved, or printed. Return to the previous page to edit and save as needed.
- Note: Certain fonts are not available for all language options. If the preview does not display the correct characters, return to the previous page and select another font and save as needed. iCIMS recommends selecting either Serif of Sans-Serif as these fonts support most language options.
-
If approvals are required, review the Request Offer Approval section. (If not required, skip this section and proceed to the next step.)
-
If updates are required, save the offer draft and contact your organization’s user admin or, if applicable, add, reorder, or remove approvers.
-
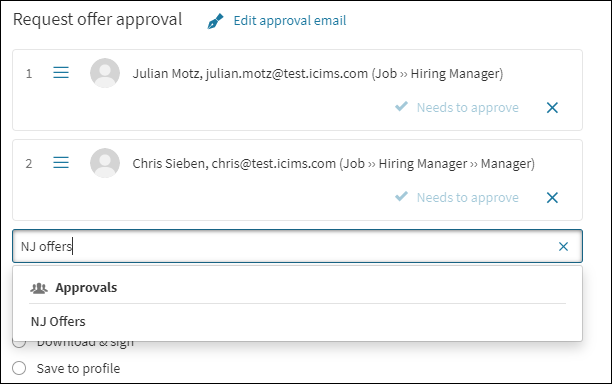
To add approvers, enter an approver’s name (or email address) or the name of a saved offer or universal approval list in the search bar. Select the name of a person or list to automatically add the approver(s) to the list.
-
To arrange approvers in the order in which they should be notified of the offer, select and drag the grip icon.
-
To remove an approver from the list, select the Delete (X) icon.
-
To review and edit the email sent to approvers, select the Edit Approval Email button. The Compose Email window displays with the default email template configured for your organization. Edits only apply to the email for the specific offer and do not affect the email template or other offers using the same template. Depending on your organization’s configurations, a PDF copy of the offer letter draft may be automatically attached to approval emails. If the offer letter is not attached to the approval email, an alert displays above the approver list.
-
If this section does not display and approvals are required for an offer letter, save the offer draft and contact your organization’s user admin.
-
If you are a user admin and want to learn more about Offer approvals configuration options, refer to the Configuring Offer Approvals section of the Configuring iCIMS Offer Management Knowledge Base article.
-
Select a delivery method for the offer under the Delivery & Signature Options section. Up to four options may display. For more information on these delivery options, refer to the Understanding the Offer Approval & Delivery Process section of this article.
-
Download & Sign: Allows the recruiter to download and send the final offer letter outside of iCIMS Offer Management.
-
Career Portal: Emails the candidate a link to review their offer letter on a career portal. If selected, the email message can be previewed on this page and edited by selecting Edit Offer Email.
-
DocuSign: Emails the candidate a link to review their offer letter in DocuSign. Requires the customer to have an active integration between iCIMS Offer Management and DocuSign. If selected, the email message can be previewed on this page and edited by selecting Edit Offer Email.
-
Save to Profile: Saves the final offer letter to the candidate’s profile without sending the offer letter to the candidate or automatically downloading the offer letter to the recruiter’s computer.
-
If an expiration is required for the offer, ensure Career Portal is the selected delivery method and select the applicable date and time for the offer to expire beneath Expire Document On. (If not required, skip this section and proceed to the next step.)
-
Select Finish. A confirmation page displays. The confirmation message differs based on the selected delivery option and if approvals were requested.
-
Select Done. The candidate’s Offer tab displays. For more information on the statuses and actions displayed on this tab, refer to the Reviewing & Taking Action on Offers section of this article.
Understanding the Offer Approval & Delivery Process
Depending on organization-specific configurations for Offer Management, the selected Delivery & Signature option, and whether the offer letter requires approvals, the user experience finalizing an offer will differ. Certain scenarios are automated and require no action from the user, while others require further action as detailed below.
No Action Required
DocuSign and Career Portal (No Approvers)
When DocuSign or Career Portal is the selected delivery method and there are no approvers, the offer email is automatically sent to the candidate after selecting Finish in the Offer Wizard.
Career Portal (Approvers & Auto-Send Setting Configured)
When Career Portal is the selected delivery method and there are approvers, the organization can configure offer emails to automatically send to candidates once approvals are completed. Automated offer emails can also be scheduled to send on a delay if approvals are completed outside of business hours. These configurations are controlled by the Auto Send Offer To Candidate and Send Offer Email During Business Hours settings in System Configuration. Contact your organization’s user admin to learn more about these settings and implement them at your organization.
Action Required
Download & Sign and Save to Profile
The Download & Sign and Save to Profile delivery options require the user to return to download the offer letter and send it to the candidate following an alternative process, such as printing and mailing. This can be accomplished from the Offers tab of the Offer Center, or from the Offer tab of an individual candidate’s Recruiting Workflow profile.
If there are approvers, the approval process is automated. The offer owner is sent a notification email by default once the offer has completed approvals and is ready to send to the candidate.
DocuSign and Career Portal (Approvers & Auto-Send Setting Not Configured)
When there are approvals, the DocuSign delivery option requires the user to extend the offer to the candidate after the automated approval process is completed. This can be accomplished from the Offers tab of the Offer Center, or from the Offer tab of an individual candidate’s Recruiting Workflow profile. The offer owner is sent a notification email once approvals are accepted.
The same action must be taken for Career Portal delivery offers with approvers if the organization has not configured offer emails to automatically send to candidates once approvals are completed.
Reviewing & Taking Action on Offers
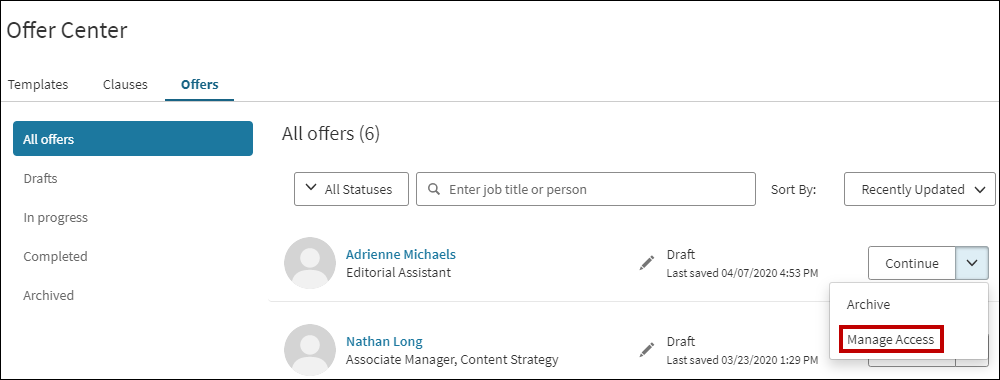
Users can review and take action on an individual offer by accessing the Offer tab on a candidate’s Recruiting Workflow profile. Users can also review and take action on multiple offers across their organization from the Offers tab of the Offer Center.
The Recruiting Workflow profile Offer tab allows recruiters to manage the progress of a candidate’s offer letter.
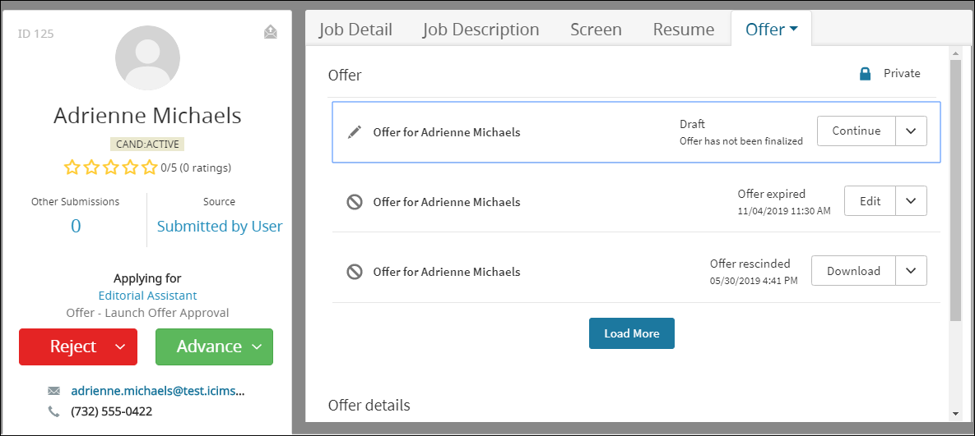
The Offer Center Offers tab allows users to manage multiple candidate offers at once from a central location.
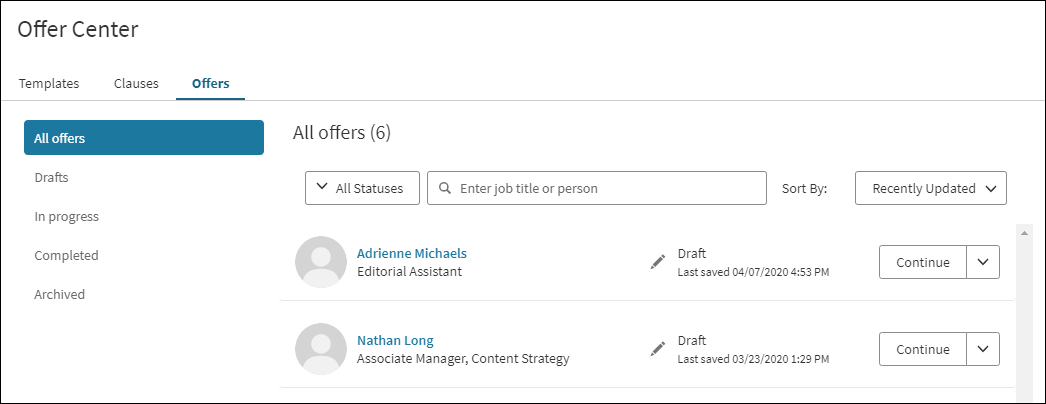
Both locations have the same functionality and may contain the following information, as applicable:
-
The offer’s current status
-
Recipients for offer-related communications
-
Message to provide additional status detail
-
Action buttons
Reviewing Offer Status
The following statuses may display for an offer. The statuses displayed depend on organization-specific configurations, the selected Delivery & Signature option, and whether the offer letter requires approvals.
-
Draft: Displays when the offer owner launches the Offer Wizard and saves progress or exits without submitting the offer for approvals or candidate review.
-
Approval pending: Displays when the offer owner finishes an offer that has approvers after the offer has been sent to the first approver and before the approval process has resolved.
-
Approval declined: Displays when an approver declines the offer. The offer owner receives an email when the offer approval is declined.
-
Approval approved: Displays when all approvers approve the offer. The offer owner receives an email when the last approver approves the offer.
-
Offer prepared: Displays when Save to Profile was the selected delivery method and an offer has been prepared and saved to the profile.
-
Offer pending:
- Offer received: Displays when the candidate has received the offer but has not yet accepted or declined.
-
Offer declined: Displays when Career Portal or DocuSign were the selected delivery method and the candidate declines the offer. The offer owner receives an email when the candidate responds.
-
Offer accepted: Displays when Career Portal or DocuSign were the selected delivery method and the candidate accepts the offer. The offer owner receives an email when the candidate responds.
-
Offer rescinded: Displays when the offer owner has selected either the Rescind action or the Edit action for offer letters in any status other than Offer Accepted and Offer Declined.
-
Offer expired: Displays when Career Portal was the selected delivery method and the offer has automatically expired. The offer owner and candidate receive emails on the date and time of expiration.
If more than one version of an offer for a specific candidate and job exists (e.g., at least one version of an offer left the Draft status and was edited), all offer versions can be referenced on the Recruiting Workflow profile Offer tab. Versions display in offer status rows from most recent to least recent. From the Recruiting Workflow profile Offer tab, the recruiter can download previous offer versions, if applicable. If necessary, the recruiter can also create a new draft based on the information in any version by selecting the Edit action within the correct offer status row.
Taking Action on Offers
The user may take the following actions on an offer via the action button. The actions displayed depend on the status of the offer and the user’s access entitlements:
-
Continue: Displays the first page of the Offer Wizard where the user can update and finalize the offer as needed.
-
Archive: Archives an offer draft.
-
Download (or Download Signed Copy): Downloads the offer PDF.
-
Resend: Resends the applicable email to the current approver or candidate.
-
Rescind: Cancels the offer, including removing access to the offer from the approver or candidate, if applicable.
-
Edit: Cancels the offer, including removing access to the offer from the approver or candidate, if applicable, and copies the contents to a new offer record. Launches the Offer Wizard. There is no way to review or recover a previous offer version if a recruiter selects Edit.
-
Manage Access: Controls user access to the offer. To learn more about this action, refer to the Managing Offer Access section of this article.
Managing Offer Access
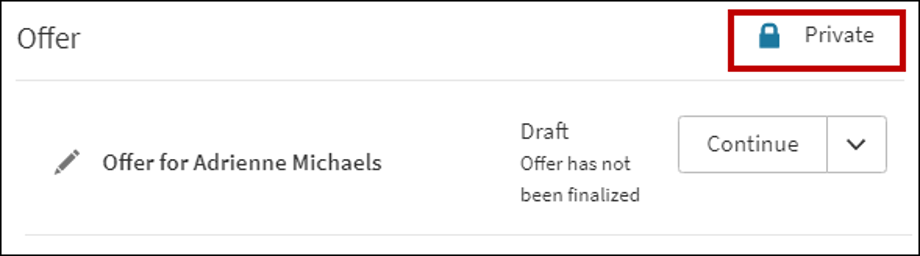
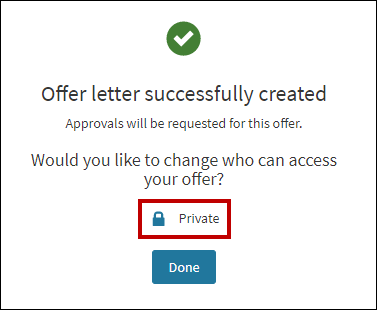
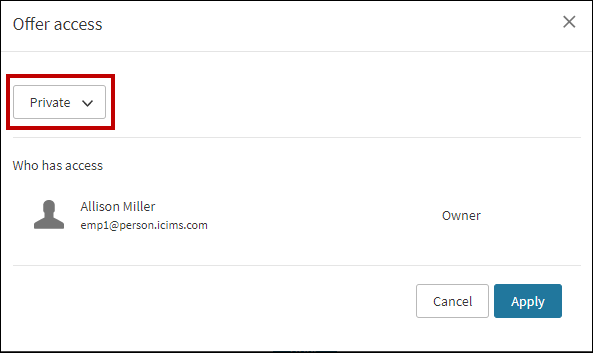
Each offer letter features user access controls that allow an offer letter owner to grant view or edit access to selected users or user groups to an individual offer. By default, an offer letter is set to Private, meaning only the owner and the organization’s user admin can access the offer. The user who creates an offer letter is the owner; the owner can determine the level of access (view, edit, no access) for other users or user groups who have the entitlements to view the Offer Center and/or the Offer Wizard. Offer access is an optional configuration; contact your organization’s user admin if you do not have this functionality.
The following steps detail how to update a private offer to share it with users via the Specific Groups option, which allows you to specify users or user groups who should have some degree of access to the offer.
-
Locate the access indicator in one of the following locations.
-
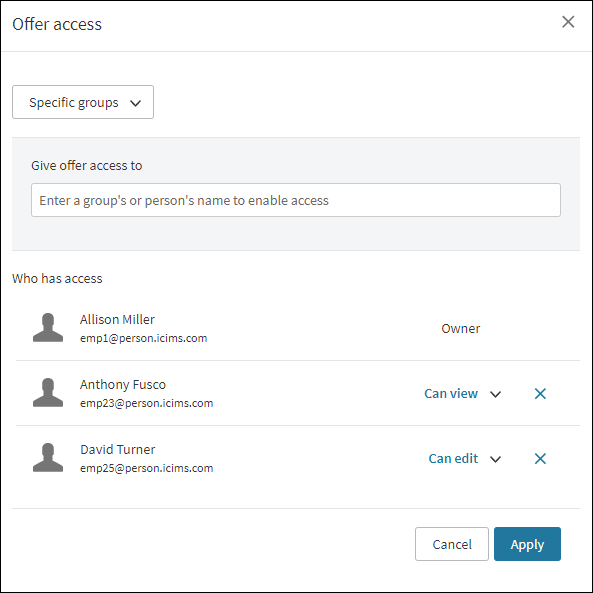
The Offer Access popup displays. Select the Private dropdown near the top left of the popup and select Specific Groups.
-
A search bar displays. Search for and select usernames or user groups to add them to the Who has access list.
-
In the Who has access list, select the dropdown beside the relevant name to modify the level of access; the following options are available.
-
Can View: The access level Can View displays by default. Keep Can View selected if the user or user group should have access to download the offer letter, but not make changes to the offer in the Offer Wizard.
-
Can Edit: Select Can Edit if the user or user group should have access to view, download, and make changes to the offer, such as editing via the Offer Wizard, rescinding, and archiving the offer.
-
No Access: If specific users within a selected user group should not have access to view, use, or make changes to the offer, search for and select their names in the search bar, then select No Access next to their names in the Who has access list. For example, if the Recruiter user group needs access to an offer, but one specific recruiter should be excluded, No Access can be selected.
-
Select Apply to apply offer access.
Notes:
-
Contact your organization’s user admin for assistance if you do not have this functionality or you do not have the access you require to view or modify offers.
-
Access permissions apply to all versions an offer may have. If a user with permission to edit an offer initiates a new version of an offer, previous access permissions are applied to the new version. That user becomes an owner of the offer in addition to the original owner. Therefore, an offer may have multiple owners in instances where a new version is initiated by a user other than the offer’s original owner. Additional owners can manage offer access along with the original owner. Any owner may remove offer access from other owners via the Offer Access popup.
-
Select the Everyone dropdown option on the Offer Access popup if every system user with the entitlements to view the Offer Center and/or the Offer Wizard should have some degree of access to the offer. Access can be restricted from certain users or user groups via the No Access option described in Step 4 above.
iCIMS Offer Management Curriculum
The iCIMS Knowledge Base includes additional resources to prepare users to use iCIMS Offer Management. The following resources are available:
|
|
|---|
