Content | Note: This article pertains to the iCIMS Applicant Tracking (ATS) Interview Scheduling feature. If you are using legacy interview management or legacy interview scheduling instead of or in addition to Interview Scheduling, review the Understanding Interviews in iCIMS Applicant Tracking article for lists of applicable resources.
If you are not sure which interview tool(s) you are using, ask your user admin or complete the following tests:
- Select Library from the main menu bar. If the Interview Scheduling Center option displays, you are using Interview Scheduling.
- Locate a test candidate via a Recruiting Workflow search and select the Schedule Interview button. If a window displays with four interview types (video interview, phone screen, onsite interview, and custom interview), you are using legacy interview management; if a window displays with the heading Schedule Interview - [Candidate Name] or Schedule Appointment - [Candidate Name], you are using legacy interview scheduling.
|
Overview
As part of iCIMS Applicant Tracking (ATS), the Interview Scheduling feature empowers organizations to streamline their interview process through greater automation and enhanced calendar synchronization. This feature allows users to create standard interview types, set individual availability preferences, quickly schedule interviews, invite candidates individually or in batches to self-schedule their interviews, and send multilingual email and text notifications. The Interview Scheduling feature supports single interviews, as well as multi-person and multi-meeting interviews. Bi-directional calendar integrations with Microsoft or Google make it simpler for interviewers to update and keep track of scheduled interviews, or you can use the built-in application calendar option. Automation, quick scheduling, candidate self-scheduling, and integrations with Zoom, Microsoft Teams, and Google Meet help streamline recruiters’ work.
In addition to being a complete scheduling feature on its own, Interview Scheduling is compatible with previous scheduling tools in iCIMS ATS (i.e., legacy interview scheduling and legacy interview management), allowing organizations to transition organically. Interview Scheduling is compatible with manual calendar scheduling and iCIMS Text Engagement, allowing organizations using ATS with a Text Engagement Subscription to invite candidates to interview via SMS/text.
Interview Scheduling also allows users to search, to build custom reports, and to create dashboard reports, charts, and exports with relevant data from this feature within ATS.
To enable Interview Scheduling in iCIMS ATS, submit a case to iCIMS Technical Support.
For more information on scheduling interviews, recruiters can review the Scheduling Interviews with Interview Scheduling article.
This article provides a guide for user admins to configure Interview Scheduling. Interview Scheduling streamlines the interview scheduling process by allowing users to establish available time slots, interview types, and associated templates in advance. Once Interview Scheduling has been enabled for your organization, user admins can configure a variety of items by navigating to the Interview Scheduling Center (Library > Interview Scheduling Center) and selecting the Settings button on the top right.
Note: While the Settings button is available to all users, most configuration options are only available to user admins. Other users only have access to their own Availability Preferences tab; for more information, review the Availability Preferences section of this article.
Information about the available Interview Scheduling configuration options is provided in the sections below:
Connecting Calendars and Enabling Standalone Scheduling
Organizations have two calendar options for Interview Scheduling: you can connect Interview Scheduling with your organization’s Microsoft or Google calendar, or you can enable standalone scheduling and schedule based on the application’s internal calendar. Your organization may also choose to enable both options and configure one or the other on an individual interviewer basis.
You must have at least one calendar option connected or enabled to use Interview Scheduling. The following sections outline how to connect an external calendar and how to enable standalone scheduling.
- Connecting an External Calendar
- Enabling Standalone Scheduling
Connecting an External Calendar
To facilitate calendar synchronization, an IT admin at your organization is needed to connect your organization’s Google or Microsoft calendar with Interview Scheduling.
Notes:
- Only Google or Microsoft calendar types are supported with Interview Scheduling. Your organization must have a separate account with either Google or Microsoft, which are third-party products and not affiliated with iCIMS.
- Only one external calendar type can be synced with Interview Scheduling at one time.
- This section contains links to third-party sites that are not maintained by iCIMS.
- The IT admin who completes this process must be able to log in as either a Google Apps domain administrator (for Google calendars) or an Azure Active Directory administrator (for Microsoft calendars).
Provide your IT admin temporary access to iCIMS ATS by assigning them a user admin license. Alternatively, submit a case to iCIMS Technical Support to request a new login user group and assign your IT admin to that group.
Provide your IT admin with the link to your organization’s instance of iCIMS ATS, as well as the username and password generated for them. Instruct the IT admin to take the following steps within iCIMS ATS:
- Navigate to Library > Interview Scheduling Center and select Settings.
- On the Connected Services tab beside either Microsoft Calendar or Google Calendar, select Add Service. An authorization window displays.
- On the window, complete the steps that follow to authorize and connect your organization’s calendar through Cronofy, a subprocessor of iCIMS.
- To learn more about Cronofy, review their Enterprise Connect – Guide for System Administrators.
- By integrating your organization's Google or Microsoft Calendar with Cronofy's Enterprise Connect, the Cronofy Service will have the ability to access any calendar in your organization's domain.
- Domains must be within a single Microsoft or Google Workspace tenant.
- Your organization is responsible for configuring the calendar access provided to Cronofy. To learn more, review Cronofy’s Enterprise Connect for Office 365 (Graph API) - Limit Cronofy's Access or Enterprise Connect for Google Workspace - Restricting Service Account Access article.
- When adding Microsoft Calendar, select Link Office 365 Account. Do not select Connect using EWS (Exchange Web Services) and a Service Account.
- Once this process is complete, the connected calendar displays with a Delete Service button in place of the Add Service button.
- For organizations that connect Office 365 and are interested in using the Microsoft Teams integration for video interviews, ensure Microsoft Teams is enabled for users by reviewing Microsoft’s Manage user access to Teams article. Organizations that have purchased an integration to Microsoft Teams will have this video conferencing service automatically available when scheduling video interviews.
- For organizations that connect Google and are interested in using the Google Meet integration for video interviews, ensure Google Meet is turned on for users by reviewing Google’s Turn on Meet video calling article. Organizations that have Google Meet enabled will have this video conferencing service automatically available when scheduling video interviews.
- To further facilitate bulk calendar synchronization for all active users, beside the connected calendar, select Generate Tokens.
Notes:
- After selecting Generate Tokens, Generating Tokens displays on the Connected Services tab until the process is complete.
- For details on individual user calendar synchronization, refer to the Managing Calendar Connections for Users section of this article.
- Once the calendar synchronization (and Zoom integration if applicable to your organization) are complete, remove the license from the IT admin’s profile in iCIMS ATS.
Enabling Standalone Scheduling
Organizations who do not require employees to keep their calendars up to date, do not assign calendars to certain individuals, or do not wish to connect their company calendar to the iCIMS system have the flexibility to schedule without a calendar connection through a built-in application calendar option, standalone scheduling.
A user admin can enable standalone scheduling by completing the steps below.
- Navigate to Library > Interview Scheduling Center and select Settings.
- On the Connected Services tab, under standalone scheduling, enable the toggle.
Once standalone scheduling is enabled, you have several options for creating individual calendars. These options are outlined in the Managing Calendar Connections for Users section below.
If you disable standalone scheduling, existing interviews are not canceled, but they also cannot be rescheduled or canceled in the future.
Connecting Zoom
Organizations can choose to connect their Zoom account as a video conferencing service option, in addition to Microsoft Teams or Google Meet. Once connected, Zoom meeting links are automatically generated, allowing users to quickly schedule video interviews.
Note: Organizations must have a connected external calendar configured in order to connect Zoom; this option is not available for organizations using standalone scheduling only.
To facilitate the integration with Zoom, an IT admin at your organization is needed to connect your organization’s Zoom account with Interview Scheduling.
Notes:
- Your organization must have a separate account with Zoom, which is a third-party product and not affiliated with iCIMS.
- Before connecting to Zoom, your organization’s Google or Microsoft calendar must first be connected with Interview Scheduling, as described in the Connecting Calendars section of this article.
- The IT admin who completes this process must connect a Zoom Admin account with calendar access that has the following permissions:
- User and Permission Management > View and Edit Users
- Zoom Rooms Management > View Zoom Rooms
Provide your IT admin temporary access to iCIMS ATS by assigning them a user admin license. Alternatively, submit a case to iCIMS Technical Support to request a new login user group and assign your IT admin to that group.
Provide your IT admin with the link to your organization’s instance of iCIMS ATS, as well as the username and password generated for them. Instruct the IT admin to take the following steps within iCIMS ATS:
- Navigate to Library > Interview Scheduling Center and select Settings.
- On the Connected Services tab beside Zoom Conferencing, select Add Service. An authorization window displays.
- On the window, complete the steps that follow to authorize and connect your organization’s Zoom account. If the integration is successful, you are redirected back to the Connected Services tab where Active displays beneath Zoom Conferencing.
Note: After this process is complete, remove the license from the IT admin’s profile in iCIMS ATS.
Managing Calendar Connections for Users
User admins can manage the calendar connections of individual users via the Connected Users section at the bottom of the Connected Services tab (Library > Interview Scheduling Center > Settings > Connected Services).
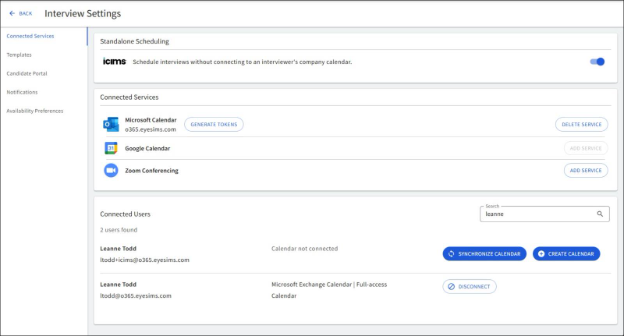
Here, user admins can connect, disconnect, and reconnect users’ calendars as desired. This includes creating and disconnecting application calendars for standalone scheduling.
Connecting & Reconnecting a User’s Calendar
To connect, reconnect, or create individual users’ calendars, follow these steps.
- In the Connected Users section, search for the desired user’s name. Results display with Calendar not connected beside users without a synchronized external calendar synchronization or a created application calendar.
-
Create or connect a calendar by selecting Synchronize Calendar to synchronize with an external calendar or Create Calendar to create an application calendar. Once the calendar is successfully synchronized or created, a Disconnect button replaces the previous buttons.
Disconnecting a User’s Calendar
To disconnect individual users’ calendars, follow these steps.
- In the Connected Users section, search for the desired user’s name. Results display with the calendar type and access level.
- Select Disconnect.
- Important Note: If you disconnect a user’s application calendar, the calendar is deleted, including the dates and times of previously scheduled interviews. However, the interviews themselves are not canceled, and information about the interviews is still available everywhere else it normally displays.
Creating and Managing Templates
User admins can create templates to establish standard categories of interviews (e.g., initial phone screen), from their names and descriptions to the interview types (in-person, video, or phone) and lengths. These templates both streamline the process of inviting candidates to schedule interviews and ensure consistency across interviews and invitations.
Templates can be managed via the Templates tab of the Interview Scheduling Center (Library > Interview Scheduling Center > Settings > Templates). For more information, review the sections below.
Creating a New Template
User admins can create new templates for different categories of interview (e.g., initial phone screen) using the steps outlined below.
Note: Users leverage the templates created through this process when scheduling interviews for candidates to quickly define the parameters of the interview. The settings configured in the steps below apply to all interviews scheduled using the template created; consider names and descriptions that reflect an appropriate level of specificity.
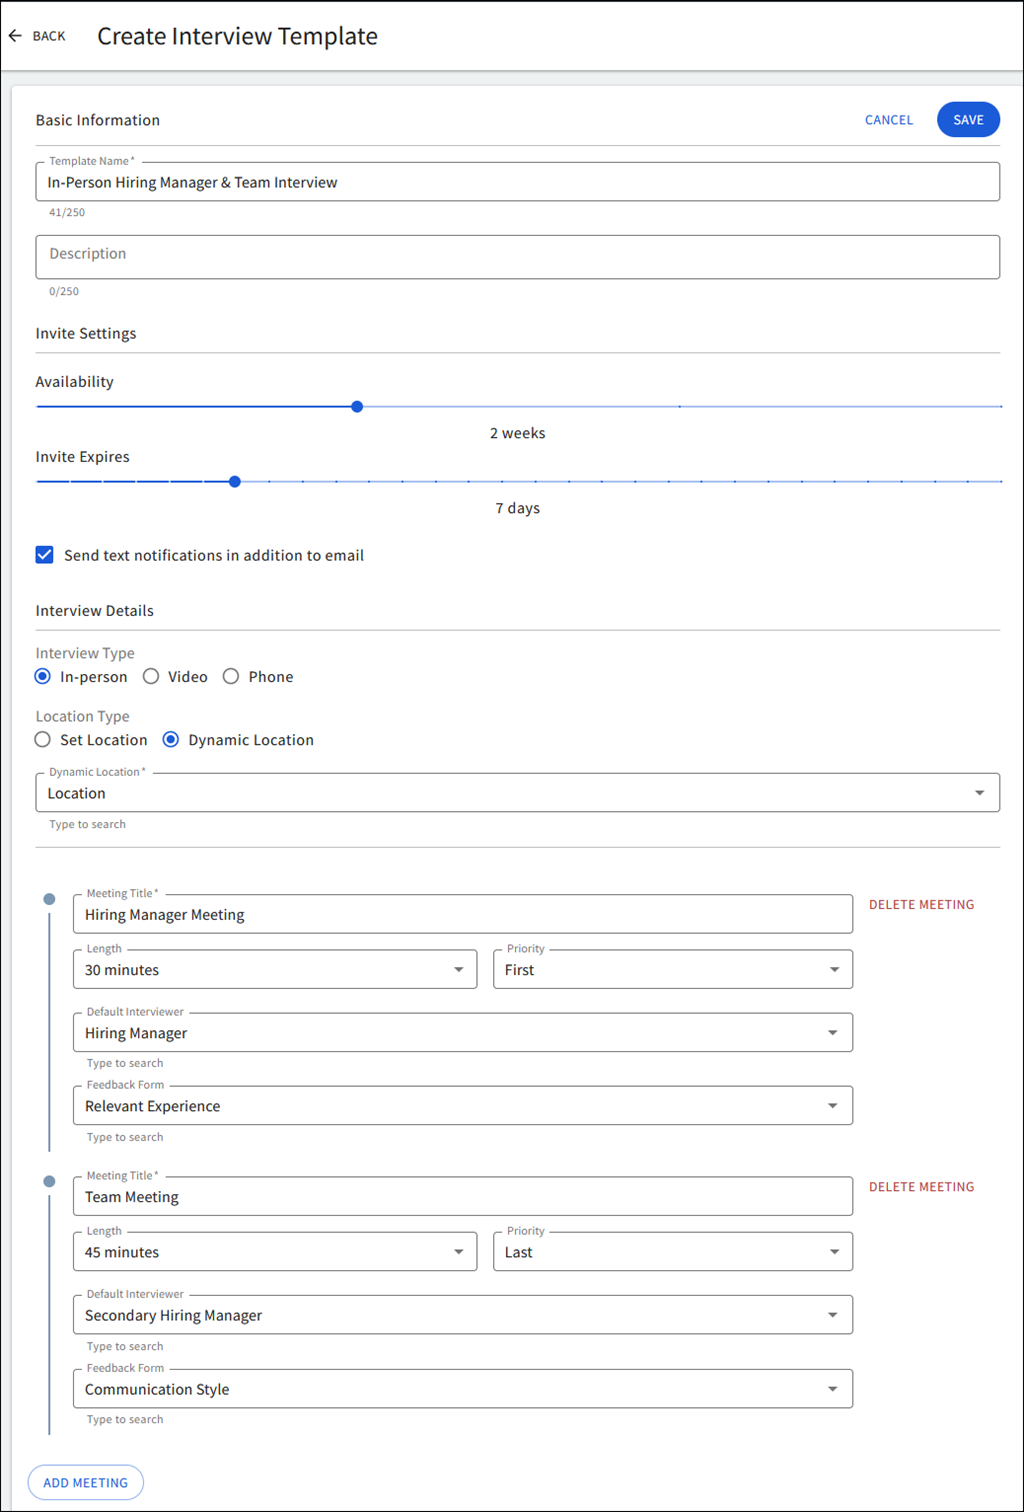 An example interview template An example interview template
- On the Templates tab, select the Create Template button. The Create Interview Template page displays.
- In the Template Name field, enter a name for the template.
- Optional: In the Description field, enter a description for this template’s interview category.
- Use the Availability slider to set how many weeks of the interviewer’s calendar the candidate can review when selecting an interview time. Between one to four weeks can be selected.
- Use the Invite Expires slider to set how many days the candidate has to schedule their interview before their invitation link expires. Between one to thirty days can be selected.
- Optional: If your organization has a subscription to iCIMS Text Engagement and you wish to send certain text notifications to candidates in addition to email, select Send text notifications in addition to email.
- Select whether the interview type is In-Person, Video, or Phone.
- In the Meeting Title field, enter a title for the meeting.
- Select the Length field to choose a length of time for this category of interview from the dropdown menu. Between fifteen minutes to two hours can be selected.
- Optional: Select the Default Interviewer field to choose the default interviewer role (e.g., the hiring manager) from the dropdown menu.
- Optional: Select the Feedback Form field to choose an associated interview feedback form.
- Optional: If this template’s interview category is associated with multiple meetings, select Add Meeting. The following fields display:
- Meeting Title: Enter a title for the meeting.
- Length: Select a length of time for this category of interview from the dropdown menu.
- Priority (Optional): To prioritize multi-meetings, select First, Any, or Last from the dropdown menu. Any is selected by default.
- Default Interviewer (Optional): Choose the default interviewer role (e.g., the recruiter) from the dropdown menu.
- Delete Meeting (Optional): To delete an additional meeting, select Delete Meeting.
- Once the form is complete, select Save to create the new template.
-
- Note: To discard changes and exit the form, select Cancel.
Managing Existing Templates
The Templates tab lists your organization’s templates. To find a specific template, user admins can take the following actions:
- Enter a template name into the search bar near the top of the page.
- Filter the list by interview type (e.g., display only phone interview templates) using the Interview Template Type dropdown.
- Browse through the list using the left and right arrows and page numbers at the bottom of the screen.
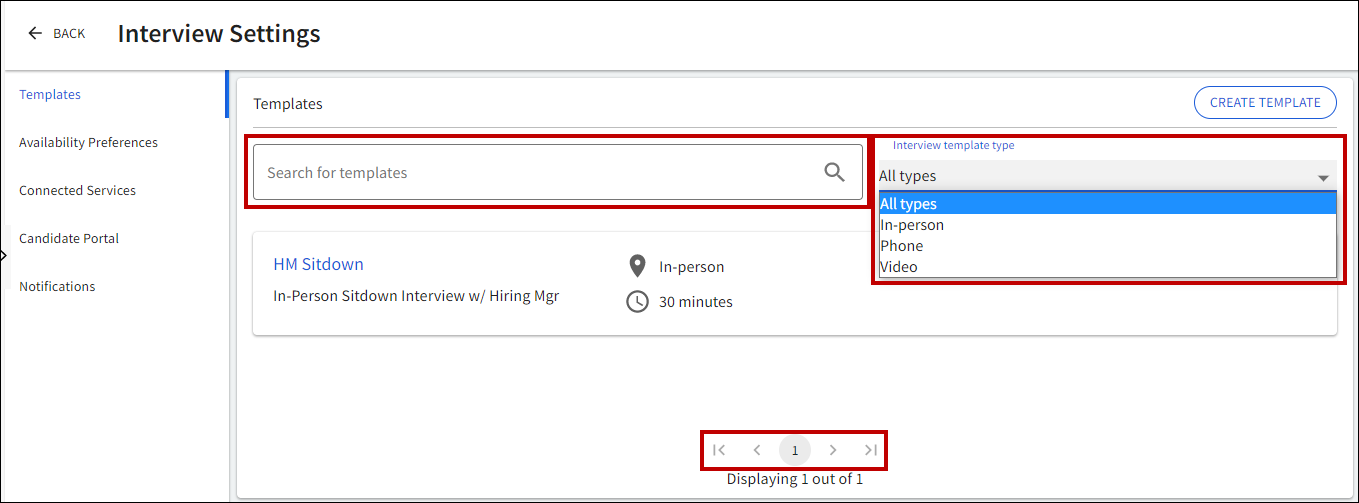 To view more information about a template, select its name. A summary page displays with details about the interview type.
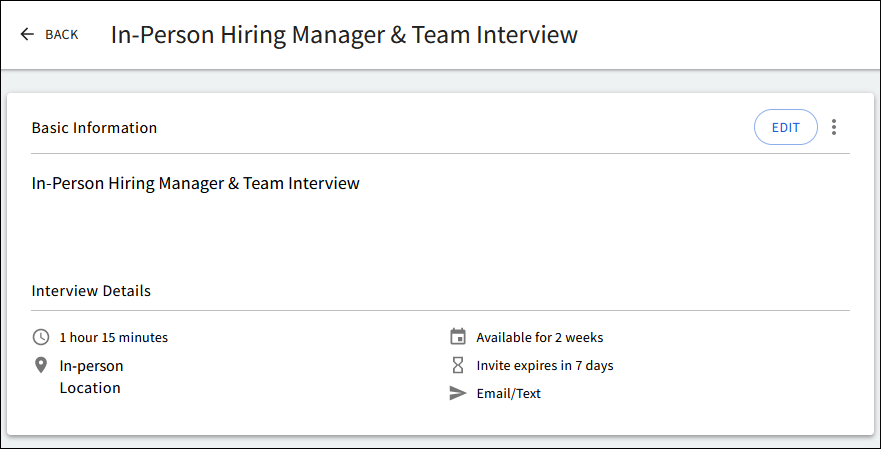
To edit a template, select the Edit button in the upper right corner of the summary page. The editing form that displays is identical to the template creation form described in the Creating a New Template section above. To archive a template, from the Templates page, select the menu icon beside the applicable template. Alternatively, from the summary page, select the menu icon beside the Edit button. Select Archive Template to remove the template from the Templates page. Users can no longer access templates once archived.
Managing Automatic Email & Text Notifications
Interview Scheduling includes several automated email notifications sent to both candidates and interviewers, along with four types of text notifications sent to candidates ( Note: Text notifications require a subscription to iCIMS Text Engagement). User admins can manage these notification emails and texts via the Notifications tab of the Interview Scheduling Center ( Library > Interview Scheduling Center > Settings > Notifications). Each type of notification has a standard timeframe in which it is automatically sent to its intended recipient (i.e., a candidate or interviewer), as listed below. While the content of these messages can be edited, the notification types and timeframes cannot be configured or disabled.
Notifications are automatically sent in the language according to the recipient’s locale. For interviewer recipients, locale is based on the language set in their system (Edit Preferences > Language). For candidate recipients (and interviewer recipients if language is not set in their system), locale is based on the career site or portal’s locale that they most recently applied through or logged in to. If locale preference is not available through Edit Preferences or a career site/portal, notification language defaults to English (United States). For more information on available language options, review the Understanding the Languages Available in iCIMS Talent Cloud Products article.
Automatic Candidate Notifications:
- Invite to Schedule Interview (sent immediately)
-
- Text notification also available with iCIMS Text Engagement Subscription
- Reminder to Schedule Interview (sent two days after invitation)
- Interview Confirmed (sent immediately)
- Text notification also available with iCIMS Text Engagement Subscription
- Upcoming Interview (sent 24 hours before interview)
- Interview Rescheduled (sent immediately)
- Text notification also available with iCIMS Text Engagement Subscription
- Interview Cancelled (sent immediately)
- Request to Reschedule Interview (sent immediately)
- Text notification also available with iCIMS Text Engagement Subscription
Automatic Interviewer Notifications:
- Interview Confirmed (sent immediately)
- Upcoming Interview (sent 24 hours before interview)
- Interview Rescheduled (sent immediately)
- Interview Cancelled (sent immediately)
- Request for Feedback (sent 4 hours before interview)
- Candidate Requested to Reschedule (sent immediately)
User admins can review and customize the content of these messages using the steps below:
- On the Notifications tab, beside the name of the notification, select Edit Email or Edit Text Message, as applicable.
- Edit the subject and body of the email, or the body of the text, in the text areas to the left, as desired. A preview of the final message displays to the right.
- Optional: To automatically include the applicable candidate’s resume in an email notification to interviewers, place your cursor in the desired area of the email body. Then from the menu bar, select Add Variable > Interview > Candidate > Resume Link. The resume link variable displays in the body.
- Notes:
- Resume links are not available to include in text message notifications.
- Candidate resumes are not contained within the File Library. In order to attach a candidate resume to an email, the resume must be linked within a notification using the above variable option.
- Resume links do not require authentication and are accessible to users outside ATS; however, links automatically expire after 90 days (not configurable).
- Optional: To automatically include hyperlinks in an email notification to interviewers or candidates, place your cursor in the desired area of the email body. Then from the menu bar, select Insert/Edit Link. The Insert/Edit Link window displays.
- Input the URL, Text to Display, and Title as desired. From the Open Link In dropdown, select the applicable menu option. Select Save. The hyperlink displays in the email body.
- Note: Hyperlinks are not available to include in text message notifications.
- Optional: To automatically include attachments from the File Library that display as links in an email notification to interviewers or candidates, place your cursor in the desired area of the email body. Then from the menu bar, select Add Attachment. The File Library displays.
- Review and select the applicable file(s). If desired, update the display title(s). Select Add. The attachment link(s) display in the body.
- Notes:
- Attachments are not available to include in text message notifications. Files can only be attached to an email notification from the File Library. For more information, review the Adding Files to the File Library article.
- Attachments from the File Library do not expire and are shared company-wide. To preserve files and keep records of information sent to candidates, it is not recommended to replace or overwrite files in the File Library. New versions may be uploaded and appropriately named or versioned to update the File Library.
- Optional: To set an email or text notification to another language, select the dropdown at the top right to choose the applicable language.
- Select Save to finalize the changes.
Email Notification Notes:
- Both the subject and body of the email can include variables related to the email sender or recipient, the interview, or the job.
- The body of the email can include some formatting (e.g., bold, italics), hyperlinks, and attachment links.
- If profile link variables are not resolving, submit a case to iCIMS Technical Support to enable direct links.
Text Notification Notes:
Branding the Candidate Interview Scheduling Page
When candidates receive an invitation for an interview, they are directed to the Candidate Interview Scheduling page to select their desired timeslot for the interview. User admins can configure the branding of this page via the Candidate Portal tab of the Interview Scheduling Center ( Library > Interview Scheduling Center > Settings > Candidate Portal).
To the left of the Candidate Portal tab, options to set brand colors, upload logos and other media, and write a welcome message to candidates are available. The Preview section located to the right reflects any updates made to these options. Steps for updating the Candidate Interview Scheduling page branding are provided in the sections below:
Uploading a Logo
User admins can upload a company logo using the steps below:
- Locate the Logo section of the Candidate Portal tab and select Choose File. A file selection popup then displays.
- Select a JPG or PNG file no larger than 2.5 MB to add to the page.
- Review the selected image in either the Logo section’s preview available to the left or the general Preview section available to the right.
- Select Save to the top right to upload the image.
- Notes:
- To select a different file, select Choose File again.
- To discard changes and revert to the previously saved settings, select Cancel.
Setting Brand Colors
User admins can set the page branding colors using the steps below:
- Locate the Colors section of the Candidate Portal tab and complete one or more of the following options as needed:
- Primary Color: Enter the hex code for the desired heading color.
- Secondary Color: Enter the hex code for the desired accent color.
- Button Color: Enter the hex code for the desired button color.
- Link Color: Enter the hex code for the desired link color.
- Review how the colors display in the Preview section to the right and adjust the hex codes as necessary.
- Select Save to the top right to update the color settings.
- Note: To discard changes and revert to the previously saved settings, select Cancel.
Writing a Welcome Message
User admins can provide a message welcoming candidates to the Candidate Interview Scheduling page by entering the desired text into the Welcome Message field.
Adding an Image or Video to the Candidate Interview Scheduling Page
User admins can add an image or video to the Candidate Interview Scheduling page using the steps outlined below:
- On the Candidate Portal tab, select either Image or Video from the toggle within the Landing Pages section.
- Video: Enter the URL for a publicly accessible YouTube, Vimeo, or other mp4 video to embed.
- Image: Select a JPG or PNG file to upload and review the preview.
- Select Save to the top right to add the provided video or image to the Candidate Interview Scheduling page.
- Note: To discard changes and revert to the previously saved settings, select Cancel.
Setting Availability Preferences
User admins can set default availability preferences for their organization and all users with access to the Interview Scheduling Center can set their personal availability preferences via the Availability Preferences tab (Library > Interview Scheduling Center > Settings > Availability Preferences).
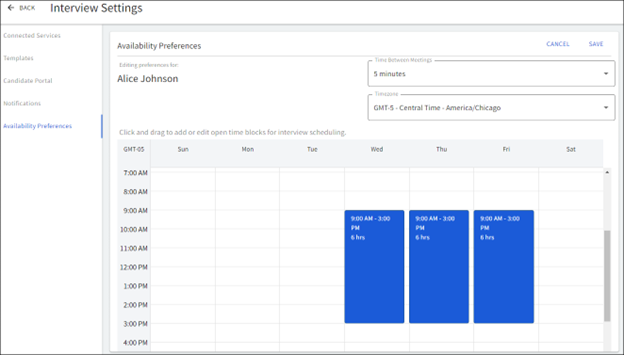 A user’s current availability preferences display directly in the tab. Users can edit their availability preferences using the steps outlined below. Note: For user admins, this tab initially displays the organization's default availability preferences. User admins can search for and update their own or another user's personal availability preferences by entering their name into the Viewing Preferences For search bar and selecting them from the dropdown before following the steps below.
- On the Availability Preferences tab, select Edit.
-
Note: When a user is new to Interview Scheduling, a message may display that calendar synchronization is automatically occurring, or if standalone scheduling is enabled then a Create Calendar button may display.
- Set scheduling preferences using the settings below:
- Time Between Meetings: For individual user availability preferences only, enter how many minutes of buffer time to include between scheduled meetings (e.g., to accommodate travel time between rooms, to write notes, or for quick breaks).
- Time Zone: The default time zone that displays is automatically populated based on the user's time zone in Edit Preferences (or browser settings if not selected in Edit Preferences). If desired, select a different default time zone from the dropdown menu.
- Note: When scheduling or rescheduling an interview, you have the option to select a different time zone than the default chosen here.
- Availability Calendar: On the calendar provided on the tab, select and drag to create blocks of available time when candidates can schedule interviews.
- To shift an existing block to another timeslot while maintaining its duration, select the center of the block and drag it to the desired time.
- To adjust the start or end time of an existing block (i.e., to change its duration), hover over the top or bottom edge of the block until the cursor changes to up and down arrows. Then select and drag the block to the desired start or end time.
- To delete a block entirely, hover over the block until the Delete (X) icon appears. Then select the Delete (X) icon in the top right corner of the block.
- Select Save to update the availability preferences.
- To discard changes and return to the last saved preferences, select Cancel.
Note: A user's available time blocks are overridden (in full or in part) by their currently scheduled events. This includes existing appointments scheduled for the user through Interview Scheduling as well as any appointments set to Busy or Out of Office on their synced external calendar. If a user with a synced external calendar needs to adjust their usual interviewing block on a particular day and does not want to update their overall preferences set in iCIMS ATS, scheduling a competing event on their synced calendar will accomplish this.
Assigning the Invite Candidate to Interview Auto-Launch Action
The ability to schedule an interview, as well as invite a candidate to schedule an interview is fueled by the Invite Candidate to Interview auto-launch action. In order to send interview invitations to candidates at the correct point or points in the hiring process, a user admin must assign this auto-launch action to one or more Recruiting Workflow statuses. Once configured, when a user advances a candidate into a status leveraging the auto-launch action, the user is automatically prompted to send an interview invitation to the candidate. Notes:
User admins can assign the auto-launch action to the appropriate Recruiting Workflow status using the steps below:
- From the main menu, select Admin, then choose System Configuration.
- Select Applicant Tracking from the left navigation pane. Then select Workflow from the list of options to the right.
- Next to Recruiting Workflow Bins and Statuses, select Edit to launch the Recruiting Workflow Bins and Statuses popup.
- Select a status from the list and select Invite Candidate to Interview from the Auto-Launch Action dropdown.
- Select Save to update the status.
- To assign this auto-launch action to additional statuses, repeat steps 4-5 as needed.
|
|
|---|
