Overview of iCIMS Connect (Legacy CRM)
Connect provides customers with an easy way to attract and engage candidates who are interested in your company’s employment brand. With various functionality, including built-in event management features, Connect allows you to build a pipeline of talent that can be nurtured over time until specific requisitions become available that match their skills and interests.
For more on Connect, visit Getting to Know iCIMS Connect (Legacy CRM).
|
iCIMS continues to support new and existing Connect customers while innovating a more robust CRM solution, iCIMS Candidate Relationship Management (CRM).
CRM includes:
- A drag-and-drop email editor to quickly design templates for your emails and campaigns.
- A comprehensive event management feature for virtual and on-site events.
- Functionality to match candidates in your CRM to any open job.
For more information, review Getting Started with iCIMS Candidate Relationship Management (CRM). |
Setting Up an Event in Connect
You can create a new event in Connect through the Event Manager, accessed from the menu bar via Communicate > Create/Manage Events. Each event has a dedicated Event profile; on this profile, you can access a sign-up link and QR code to send out for pre-registration. For more information, review Creating and Managing Events in iCIMS Connect (Legacy CRM).
- Note: During pre-registration, those who don't have an existing account in your system will go through the steps of creating a new profile.
About Kiosk Mode
Kiosk Mode is a streamlined sign-in and registration portal for use at your event. Attendees can sign in through the kiosk to confirm their attendance at the event; those who didn't register ahead of time can also input their information so that it is captured in your system. Everyone who signs in at the kiosk is listed on the People tab of the Event profile with the status of Attended.
For more information on how attendee information is displayed and accessed in Connect, review Creating and Managing Events in iCIMS Connect (Legacy CRM).
Launching Kiosk Mode
Kiosk Mode is enabled right from the Event profile and can be used on a tablet, desktop, or mobile device. The following steps detail how to begin using Kiosk Mode at an event.
- On the device(s) being used at the event, log in to Connect, select Communicate from the menu bar, and select Create/Manage Events. Select the name of the Event profile you want to open.
- Tip: You can also locate an Event profile by running an Event search, accessible from the menu bar via Search > More... > Event.
- On the Event profile, select the blue Launch Kiosk Mode button, located on the left side (below the factoids).
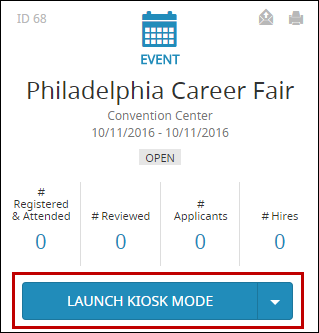
- Note: If you see a blue button for Share Link instead of Launch Kiosk Mode, select the arrow on the right side of this button and select Launch Kiosk Mode from the resulting dropdown. (This button will always display the action last selected.)
- Tip: To launch Kiosk Mode, make sure the status of the event is Open. When an event is closed, the Launch Kiosk Mode button will be disabled on its Event profile.
- In the Kiosk Mode popup, select a portal from the dropdown. Kiosk Mode will launch in the selected portal. (Note: The dropdown will only include Connect-enabled portals.)
- Select Ok. You will then be logged out of the system, and Kiosk Mode will open in the selected portal.
- Keep the kiosk open for your attendees to sign in at the event. For more information, review The Candidate Experience in Kiosk Mode below.
- When finished using Kiosk Mode, close the browser.
Tip: Kiosk Mode will refresh after a certain period of inactivity (5 minutes, by default), and incomplete entries will be deleted. User admins can configure this timeout via the Idle Timeout setting in System Configuration, described below in the Configuring Kiosk Mode section.
Note: Kiosk Mode remains active in your browser until the current session is disabled (or until the browser's cache is cleared). You can end your session and immediately start a new one by selecting Launch Kiosk Mode from the Event profile and then Finish in the Kiosk Mode popup.
The Candidate Experience in Kiosk Mode
With the kiosk open, attendees can sign in at your event by entering their email address. If an attendee didn't pre-register and doesn't have an existing account in your system, they will then be presented with additional steps to input their information:
- What are you interested in?: Includes a list of your talent pools. Attendees can check all applicable areas of interest; they will be added to those talent pools in your system.
- Include Resume!: Allows attendees to upload their resume using different methods:
- Camera: Selecting this option opens up a camera on the device being used. Candidates position the camera toward their paper resume (single page only) and take a photo of it, which is then uploaded to your system. If the image is clear enough, the resume is parsed into the candidate's Person profile. (Note: The Camera button is only available on a mobile phone or tablet and only in Kiosk Mode.)
- Google Drive, Dropbox, OneDrive: Selecting any of these cloud storage options opens up the appropriate app on the device, where candidates can log in to their account and locate their resume file. They are automatically logged out once they upload their resume to the portal. (Note: User admins can remove any of these options using the following settings in System Configuration: Allow Google Drive, Allow Dropbox, Allow OneDrive.)
- Profile: Enables attendees to fill out applicable fields to complete their profile. A new profile is created in your system as soon as the attendee selects Submit Profile from this page.
Note: Resumes uploaded through Kiosk Mode are stored directly in attendees' profiles, eliminating the need to collect and scan paper copies.
Configuring Kiosk Mode
User admins can configure different aspects of Kiosk Mode in System Configuration by going to Admin > System Configuration > Connect > Configure > Connect Event Settings. Locate the Kiosk Mode section and adjust any of these settings as necessary:
- Idle Timeout (minutes): Enter a preferred time (in minutes) for idle Kiosk Mode windows to log out and redirect to the portal's main page. The default value is 5 minutes.
- Thank You Page Redirect (seconds): Enter a preferred time for the Thank You page to return to the portal's main page (after completing sign-up). The default value is 10 seconds.
- Resume Upload: Check this box to activate or deactivate the step in Kiosk Mode where attendees can upload their resume (by locating it through cloud storage or taking a photo of their paper version). This is turned on by default.
User admins can also enable functionality to send automatic thank-you emails to candidates who register for an event or sign in via Kiosk Mode. Go to
Admin > System Configuration > Connect > Configure > Notifications, locate the section for Social Connect - Registration Thank You, and use these settings:
- Registration Thank You Email (using Event): Configure the email that goes out to individuals who sign up for an event through a registration link.
- Registration Thank You Email (using Kiosk): Configure the email that goes out to individuals who sign up for an event in person through Kiosk Mode. (The template for this setting encourages attendees to upload their resume and includes a variable for their profile login.
Recommended Next Steps
While your event is taking place, evaluate each attendee you meet and determine their fit for your organization using Recruiter Review Mode on the Event profile. You can also review their fit for the talent pools in which they've expressed interest. For more information and complete steps, review Creating and Managing Events in iCIMS Connect (Legacy CRM).
Once the event is over, evaluate the success of your event using the reports and metrics available through the Reports tab on the Event Manager.
iCIMS Connect (Legacy CRM) Curriculum
The iCIMS Knowledge Base includes additional resources to prepare users to use iCIMS Connect (Legacy CRM). These resources have been compiled in the following article: Getting to Know iCIMS Connect (Legacy CRM).

